Container Development Quickstart Guide
This quick start guide contains several examples of Docker images developed for use with XNAT Container Service. Before getting started, ensure your XNAT deployment has the Container Service plugin installed and configured to access a Docker server. See the Getting Started guide for details and tips. Steps in this guide will make use of Docker Command Line Interface (CLI) as well as the XNAT Container Service UI.
Hello World
The Hello World Quickstart will walk through building a simple Docker image and running that image as a container with XNAT Container Service. The container will produce a sample output, viewable as log output in the Docker CLI and XNAT UI. To get started, create a local directory named 'xnat-hello-world'. All of the files we generate will be stored under this directory.
Base image
This image will use the official Docker image 'hello-world' as its base image. You can both download and run the container on your command line by issuing the command:
$ docker run hello-world /hello
where hello-world is the image name and /hello is the container command to execute on container launch. The response should be a message from Docker, e.g
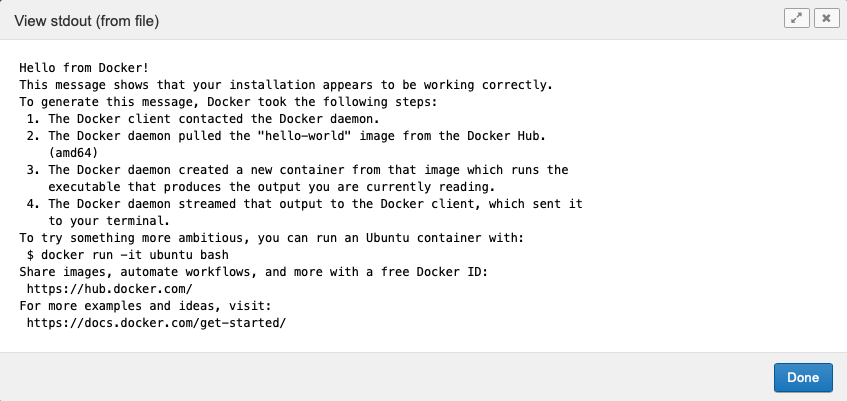
Hello from Docker!
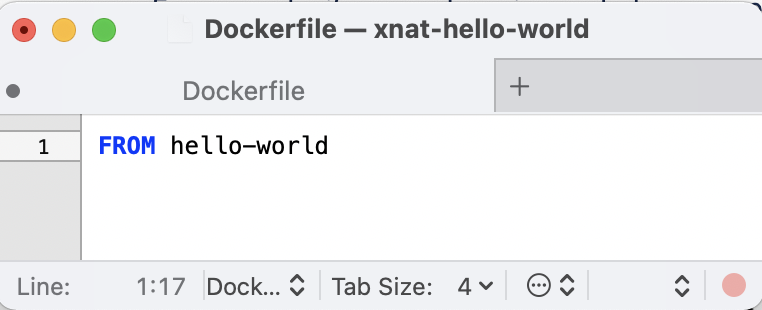
This message shows that your installation appears to be working correctly.To use this Docker image as our base, create and edit a text file named Dockerfile in your xnat-hello-world directory. This file will direct the docker build command to use https://hub.docker.com/_/hello-world as the base image. Note that hub.docker.com is the default Docker image repository and is used unless you specify something different.
On the command line, in you xnat-hello-world directory, issue the command:
$ docker build -t xnat/hello-world:1.0 .
This command tells Docker to build a new image, with the tag: xnat/hello-world and version 1.0, using the current directory as your build context - note the period character at the end of the command.
$ docker build -t xnat/hello-world:1.0 .
[+] Building 1.2s (6/6) FINISHED
 => [internal] load build definition from Dockerfile                                                                                         0.0s
 => => transferring dockerfile: 109B                                                                                                         0.0s
 => [internal] load .dockerignore                                                                                                            0.0s
 => => transferring context: 2B                                                                                                              0.0s
 => [internal] load metadata for docker.io/library/hello-world:latest                                                                        1.1s
 => [auth] library/hello-world:pull token for registry-1.docker.io                                                                           0.0s
 => CACHED [1/1] FROM docker.io/library/hello-world@sha256:37a0b92b08d4919615c3ee023f7ddb068d12b8387475d64c622ac30f45c29c51                  0.0s
 => => resolve docker.io/library/hello-world@sha256:37a0b92b08d4919615c3ee023f7ddb068d12b8387475d64c622ac30f45c29c51                         0.0s
 => exporting to image                                                                                                                       0.0s
 => => exporting layers                                                                                                                      0.0s
 => => writing image sha256:bb31f47d8cce4ac32588f855be49807af0926c794495faaf2cceee57f89e1ce9                                                 0.0s
 => => naming to docker.io/xnat/hello-world:1.0
After the builder is finished, you can list your newly created image with the command:
$ docker images
$ docker images
REPOSITORY                       TAG       IMAGE ID       CREATED       SIZE
xnat/hello-world                 1.0       bb31f47d8cce   6 weeks ago   13.3kB
Define I/O
The hello-world image doesn't make use of any input or output, so we can skip that step for now. See the next Quickstart for I/O definition examples.
Define runtime parameters
Using the Docker CLI, runtime parameters are defined according to the Docker run reference. Note that XNAT supports only a subset of the official options and, for the most part, default values are sensible and do not need to be specified, especially for this simple example.
Like the I/O definition, the hello-world example doesn't require any runtime parameters, but we can specify some as a best practice.
$ docker run --memory 6M --memory-reservation 6M xnat/hello-world:1.0 /helloHere, you are instructing the Docker engine to run the /hello executable on your xnat/hello-world:1.0, image, which we've just built. You've also specified a memory limit using --memory 6M (Docker will use no more than 6M to run this image) and a memory reservation using --memory-reservation 6M (Docker will not attempt to run the image until 6M are available). Note that memory reservation requests are honored only in Docker Swarm mode.
XNAT Integration
Once you've defined your container image, I/O, and runtime parameters, you can add your process to XNAT using a JSON Command Definition.
Command Definition
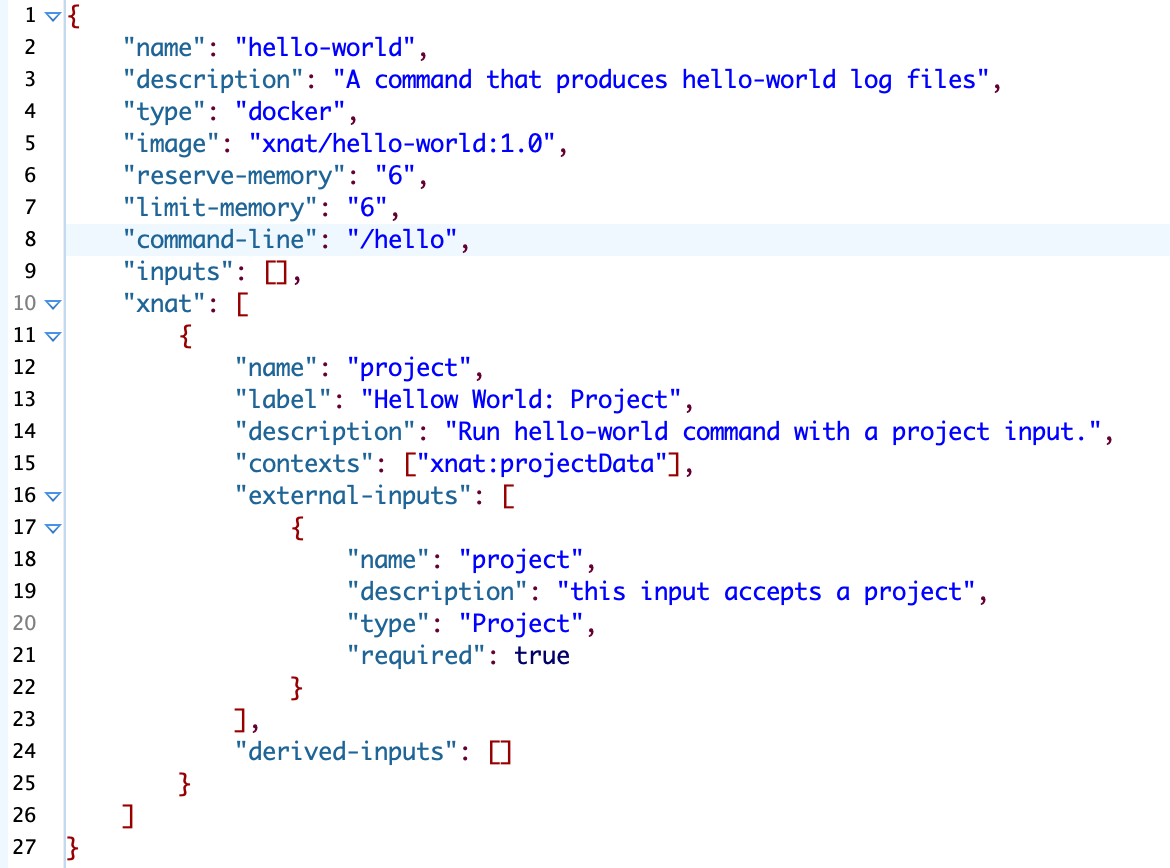
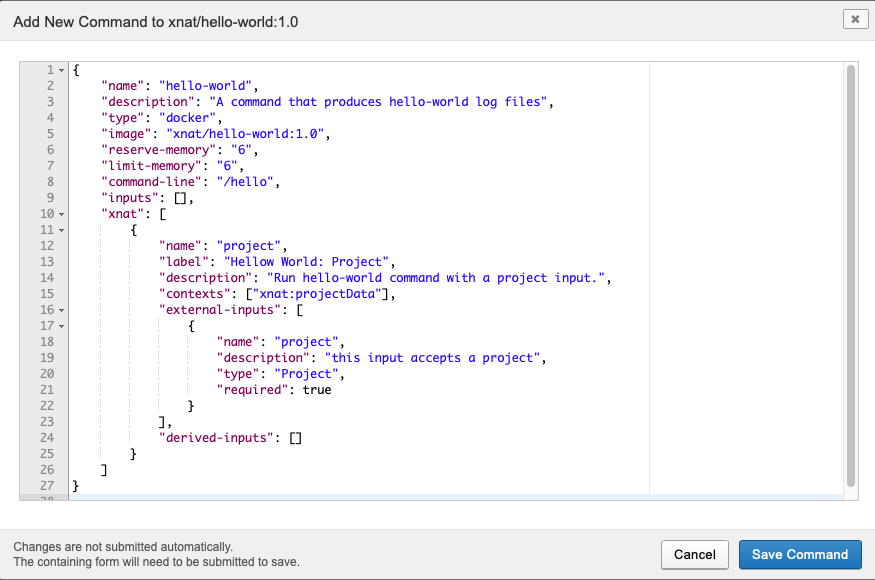
The Command Definition is a collection of properties that describe your docker image, which XNAT can read to understand what your image is and how to run it. The JSON file below is used to describe how we'd like XNAT to interact with the xnat/hellow-world:1.0. Note especially the parameters listed on lines:
line 5: Specifies the
xnat/hello-world:1.0Docker image.line 6: Specifies the reservation of 6 Megabytes of RAM. (corresponds to the CLI
--memory-reservationparameter)line 7: Specifies a limit of 6 Megabytes of RAM. (corresponds to CLI
--memoryparameter)line 8: Specifies that the
/hellocommand should be run at container launch.lines 10-26: Specify the context and mapping between XNAT data space. Note especially line 15, which specifies the launch context for this command using the XNAT XSI Type "xnat:projectData". This parameter dictates on which UI pages XNAT will show the Run Container menu.
Download the Dockerfile and command.json files from this project here.
JSON Command Definition: See the full Command specification here.
Installing and Running
Using your Docker image and command definition you can use XNAT to launch the xnat/hello-world:1.0 container. You will need to be logged in to an XNAT with administrator access.
This guide assumes that you have built your hello-world Docker image on the same machine as is hosting XNAT. If your XNAT instance is hosted on a different machine, you will need to push your Docker image to a remote repository before proceeding. See https://docs.docker.com/docker-hub/ for guidance.
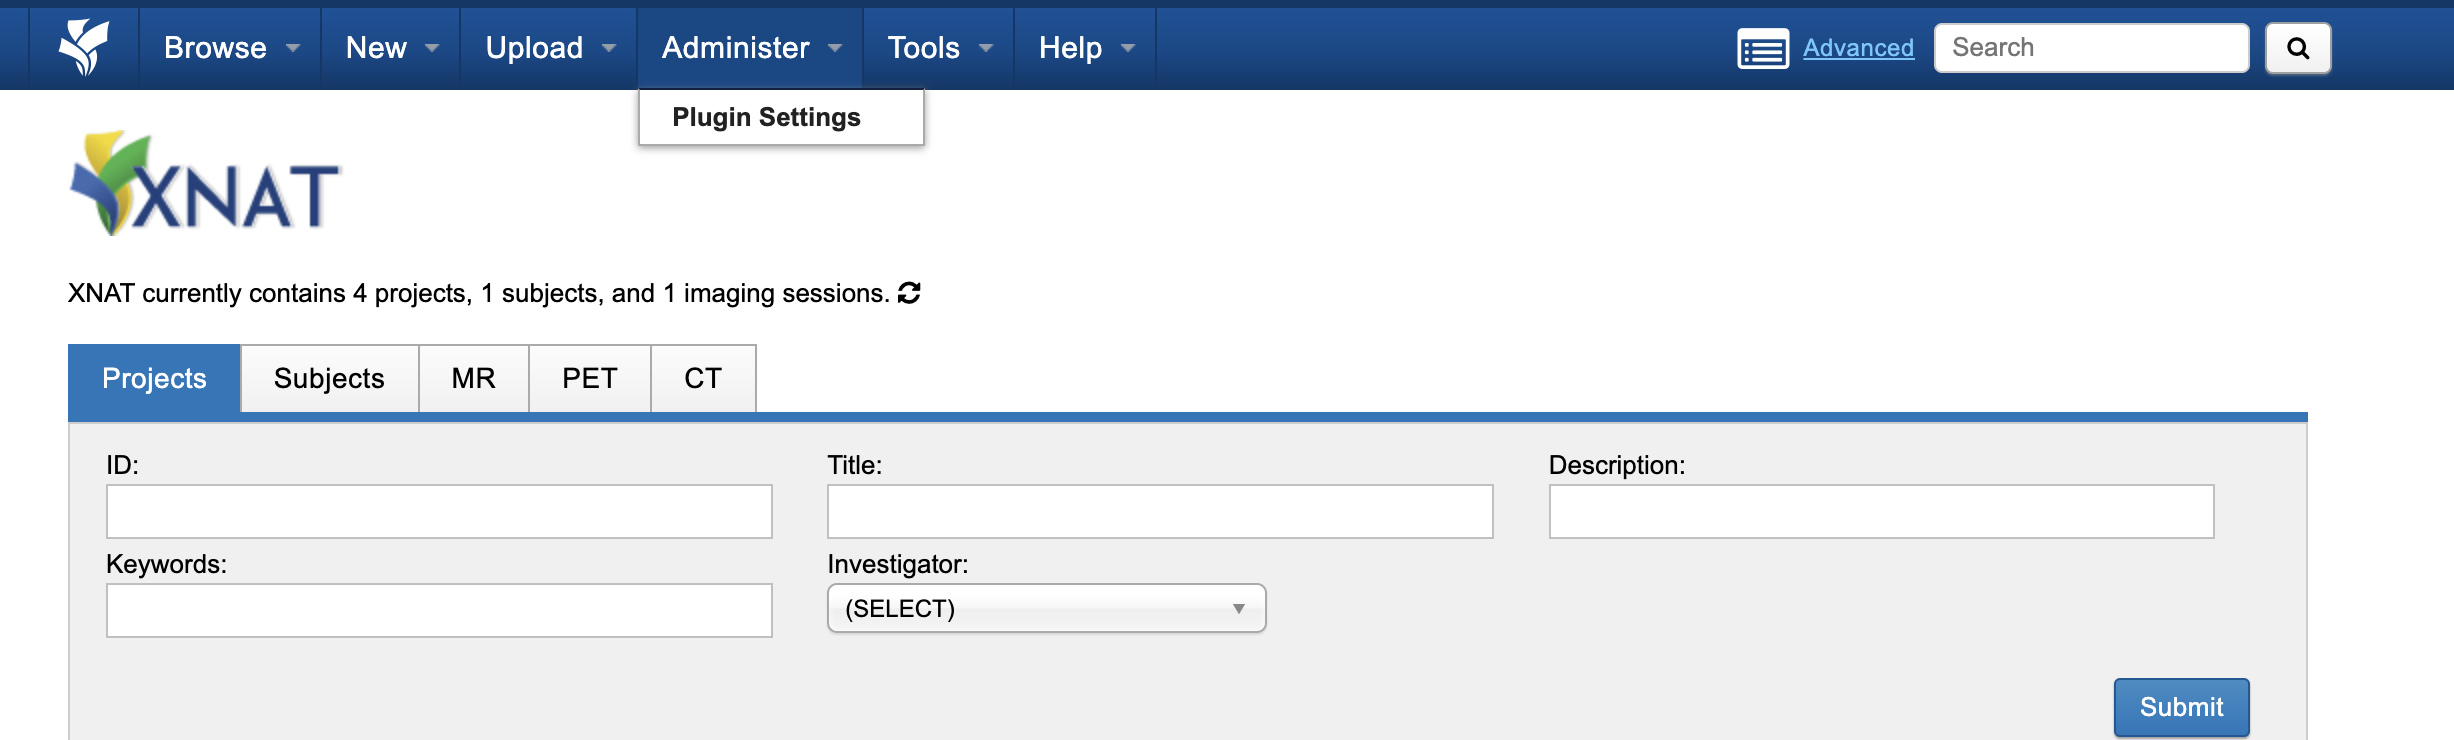
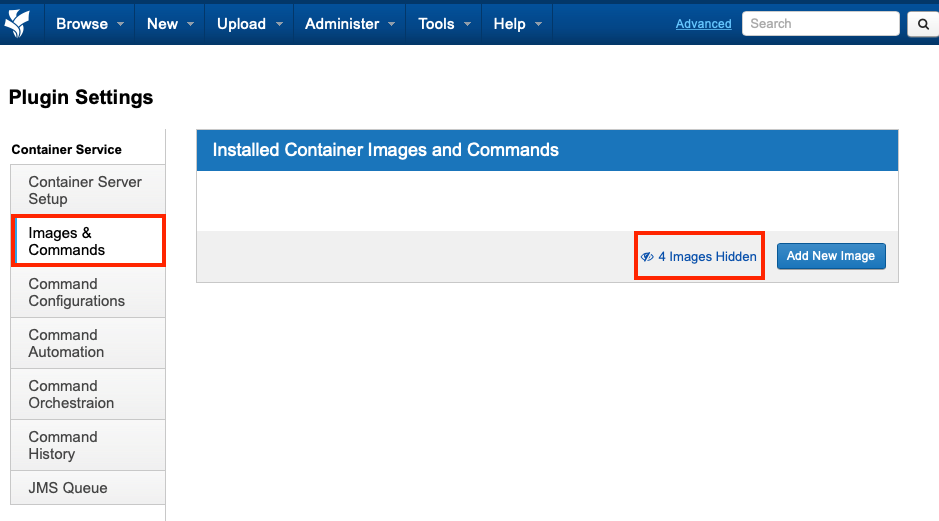
In the XNAT UI, select Administer → Plugin Settings
On the Plugin Settings page, choose Images & Commands. Docker images without associated commands (such as your new hello-world image) are hidden by default. Choose the N Hidden Images label to list all Docker images on the XNAT host.
Pulling a Container Image - If your XNAT instance is hosted on a remote machine, you will need to pull the xnat/hello-world:1.0 image onto your system in order to see it on the Images & Commands listing. See Getting Started: "Get Your Tool Into XNAT"
Click the Add New Command button to bring up a JSON editor.

Paste the Command Definition downloaded or generated above into the editor window. Choose Save Command to save and close the window. This will deserialize, validate, and store the command parameters into the XNAT database.
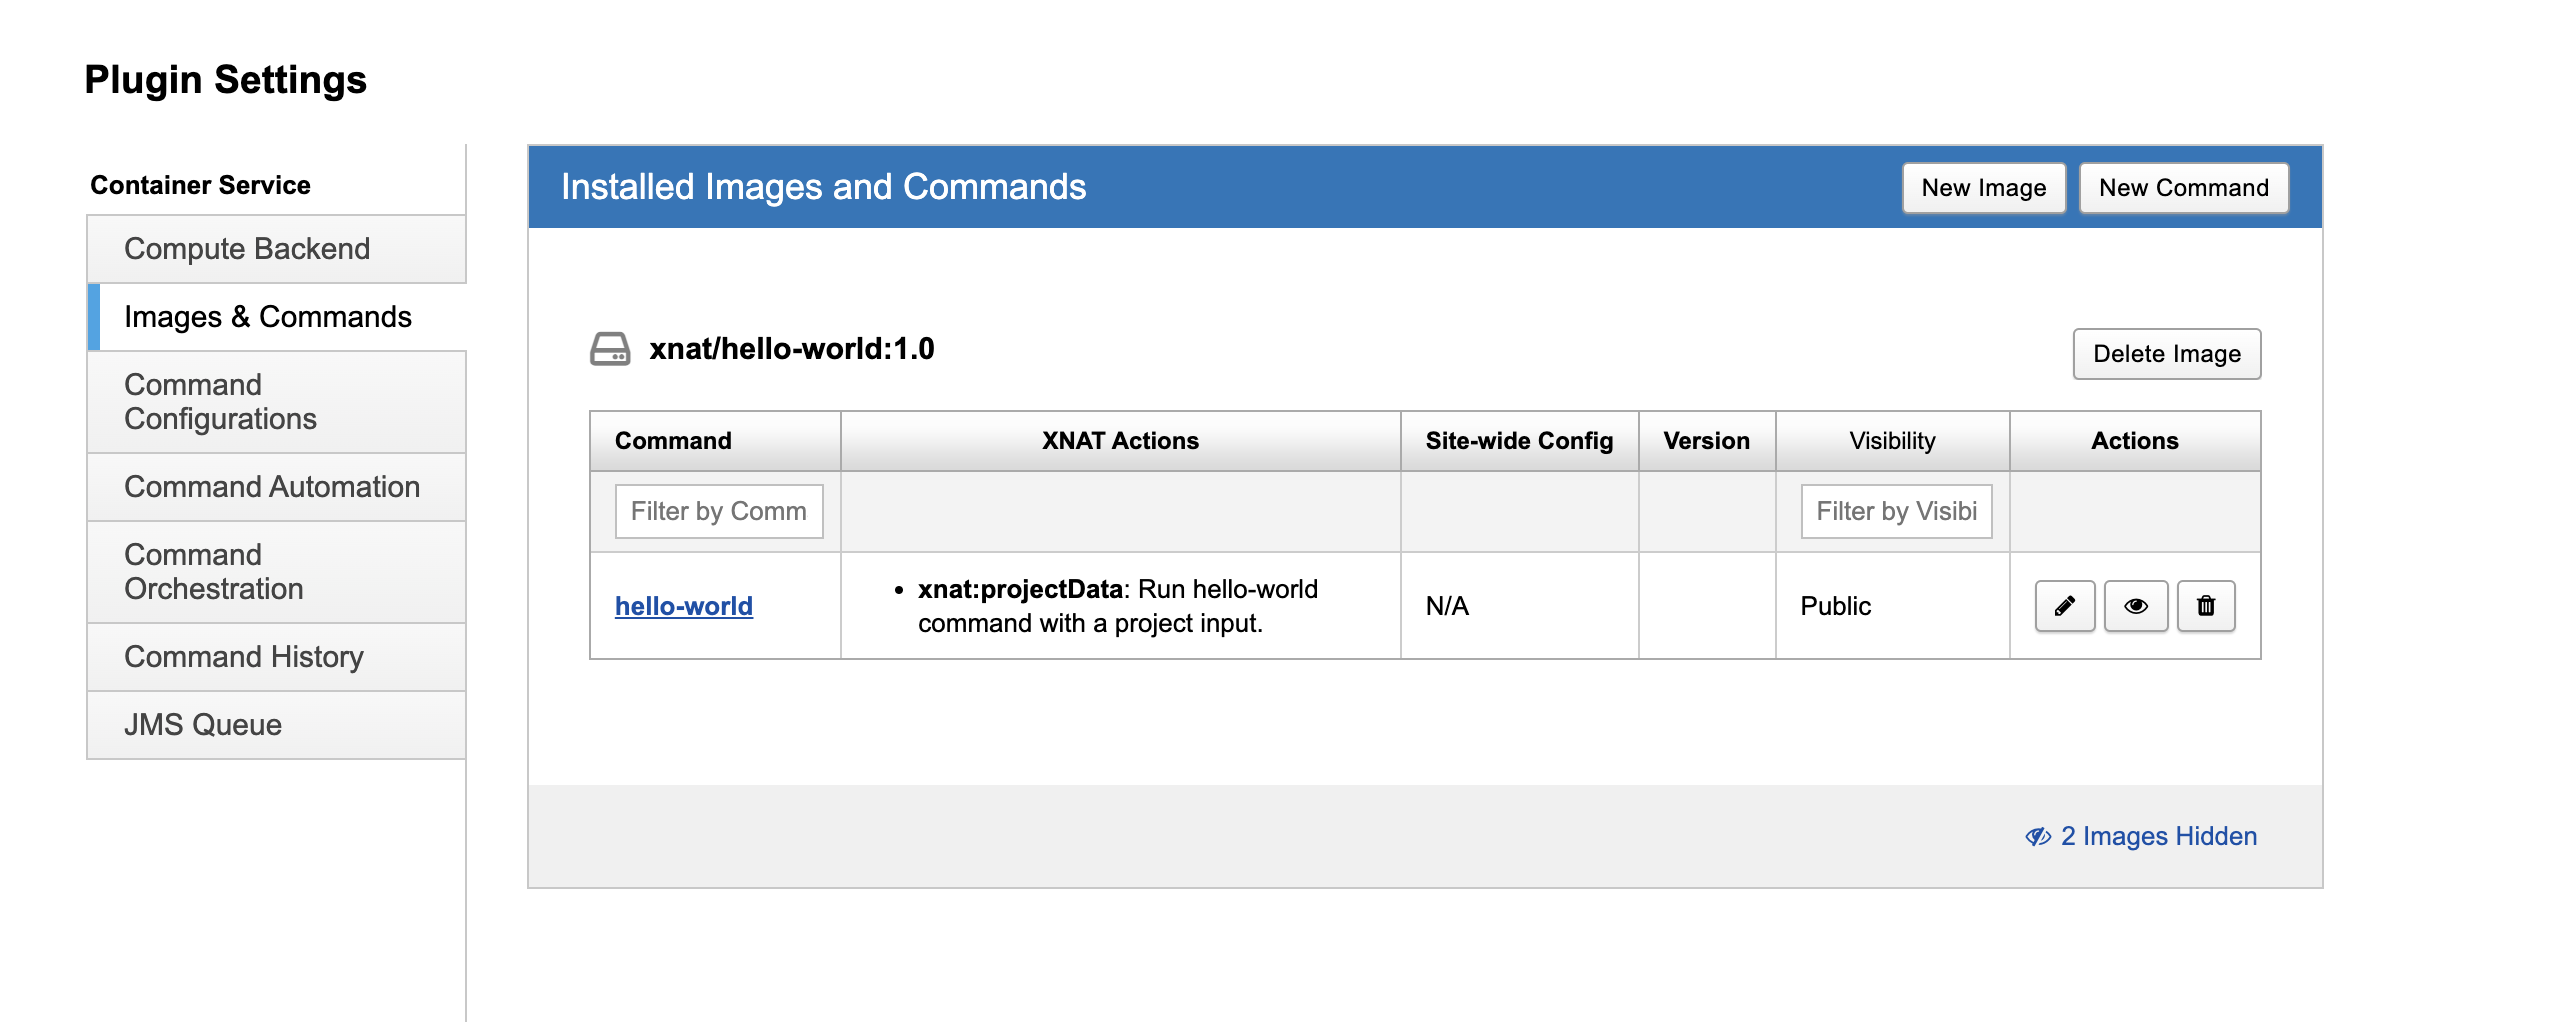
On the Images & Commands screen, you should see your newly associated command and image listed. Note the XNAT Actions column, which shows each command's launch context. This one is designed to launch at the Project level, according to line 15 in the Command JSON.
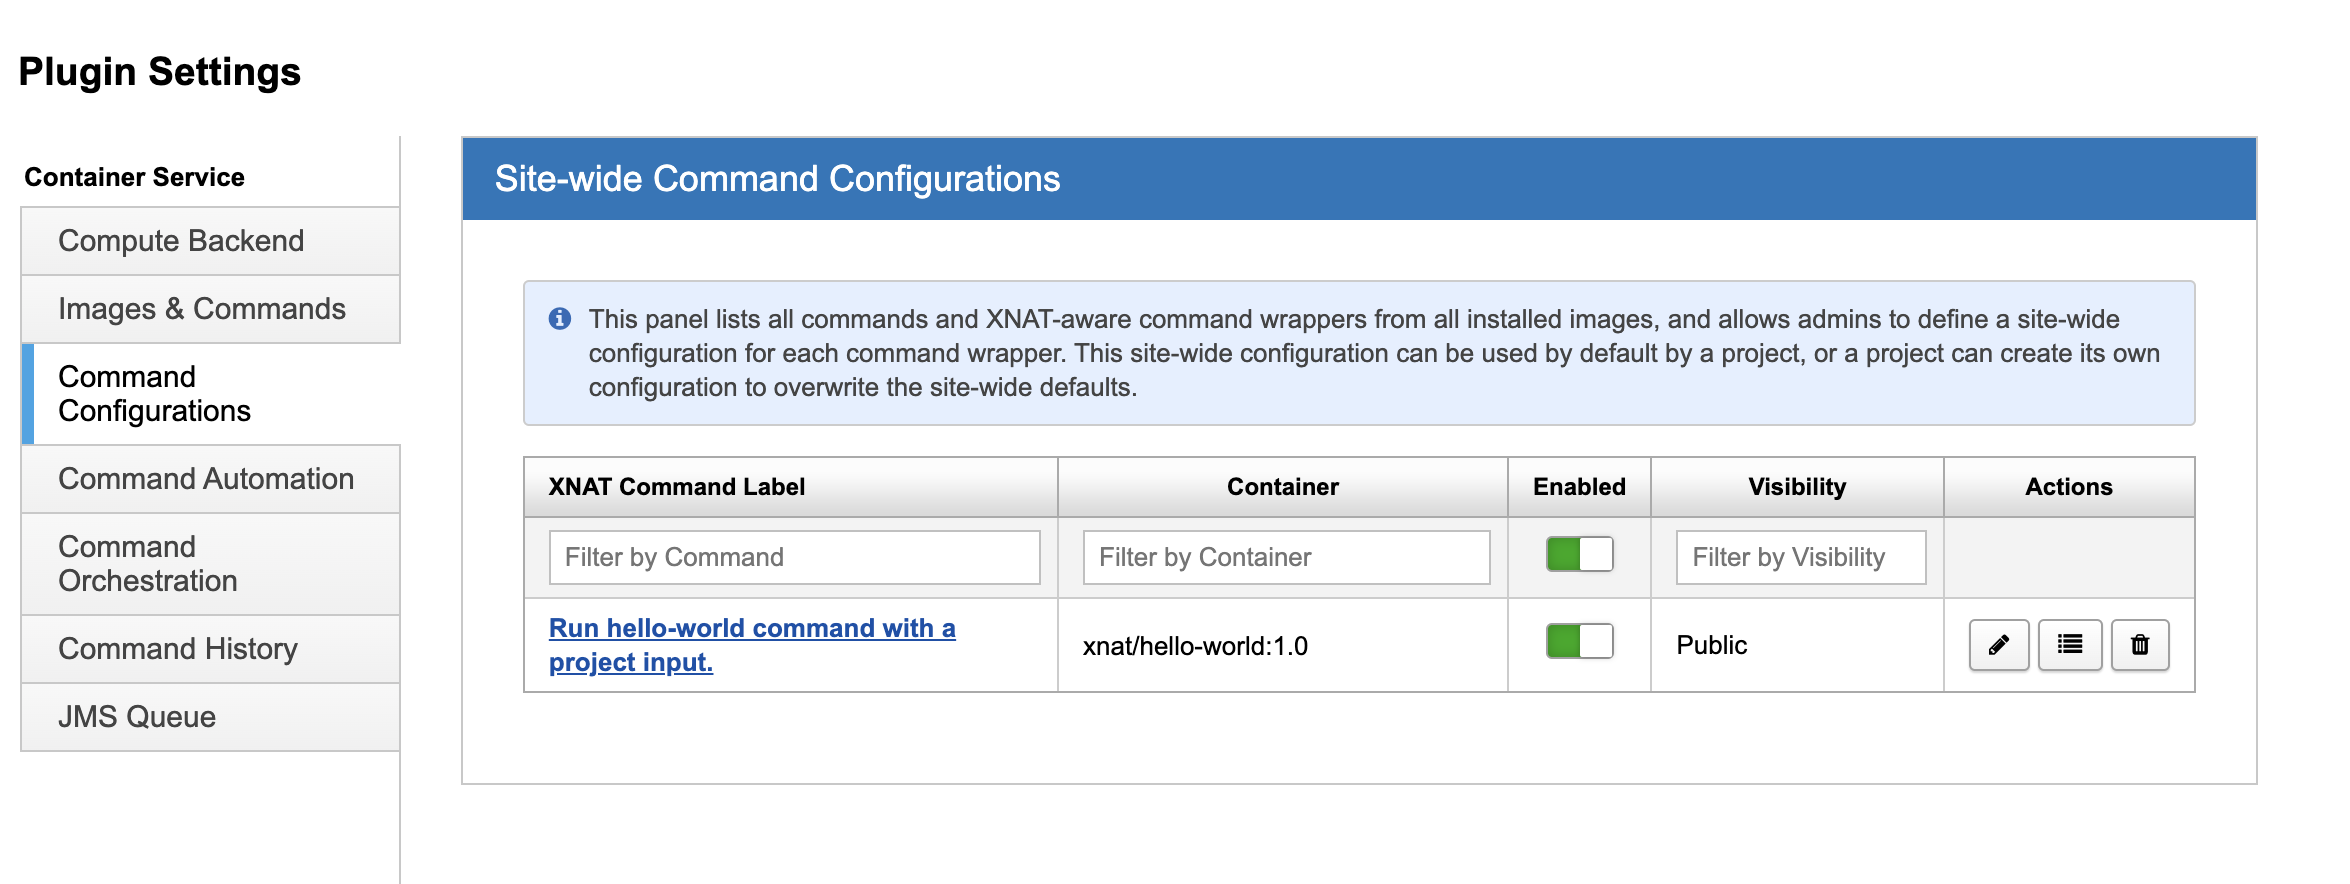
Before using a command, it needs to be enabled at both the site and per-project. Browse to the Command Configurations tab on the Plugin Settings page. You should see your Command listed under Site-wide Command Configurations. Select Enabled.
On any project that you have Project Owner permissions, you can enable access to individual commands based on the command accessibility. On the Project Page, choose Project Settings from the Actions menu.
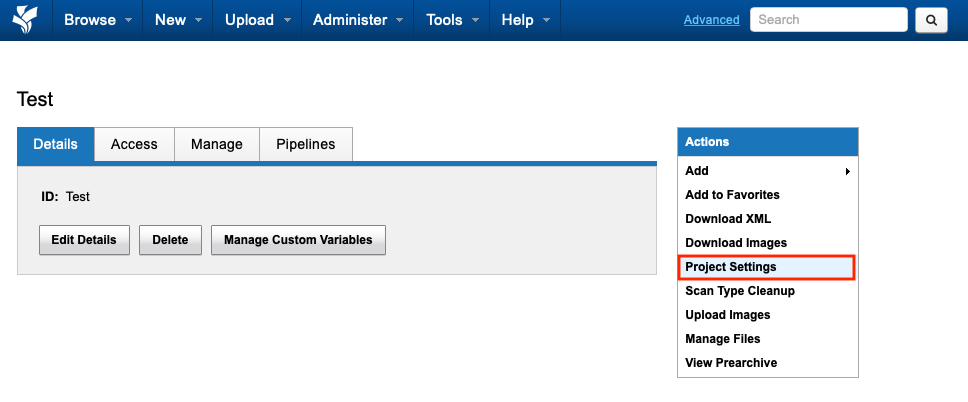
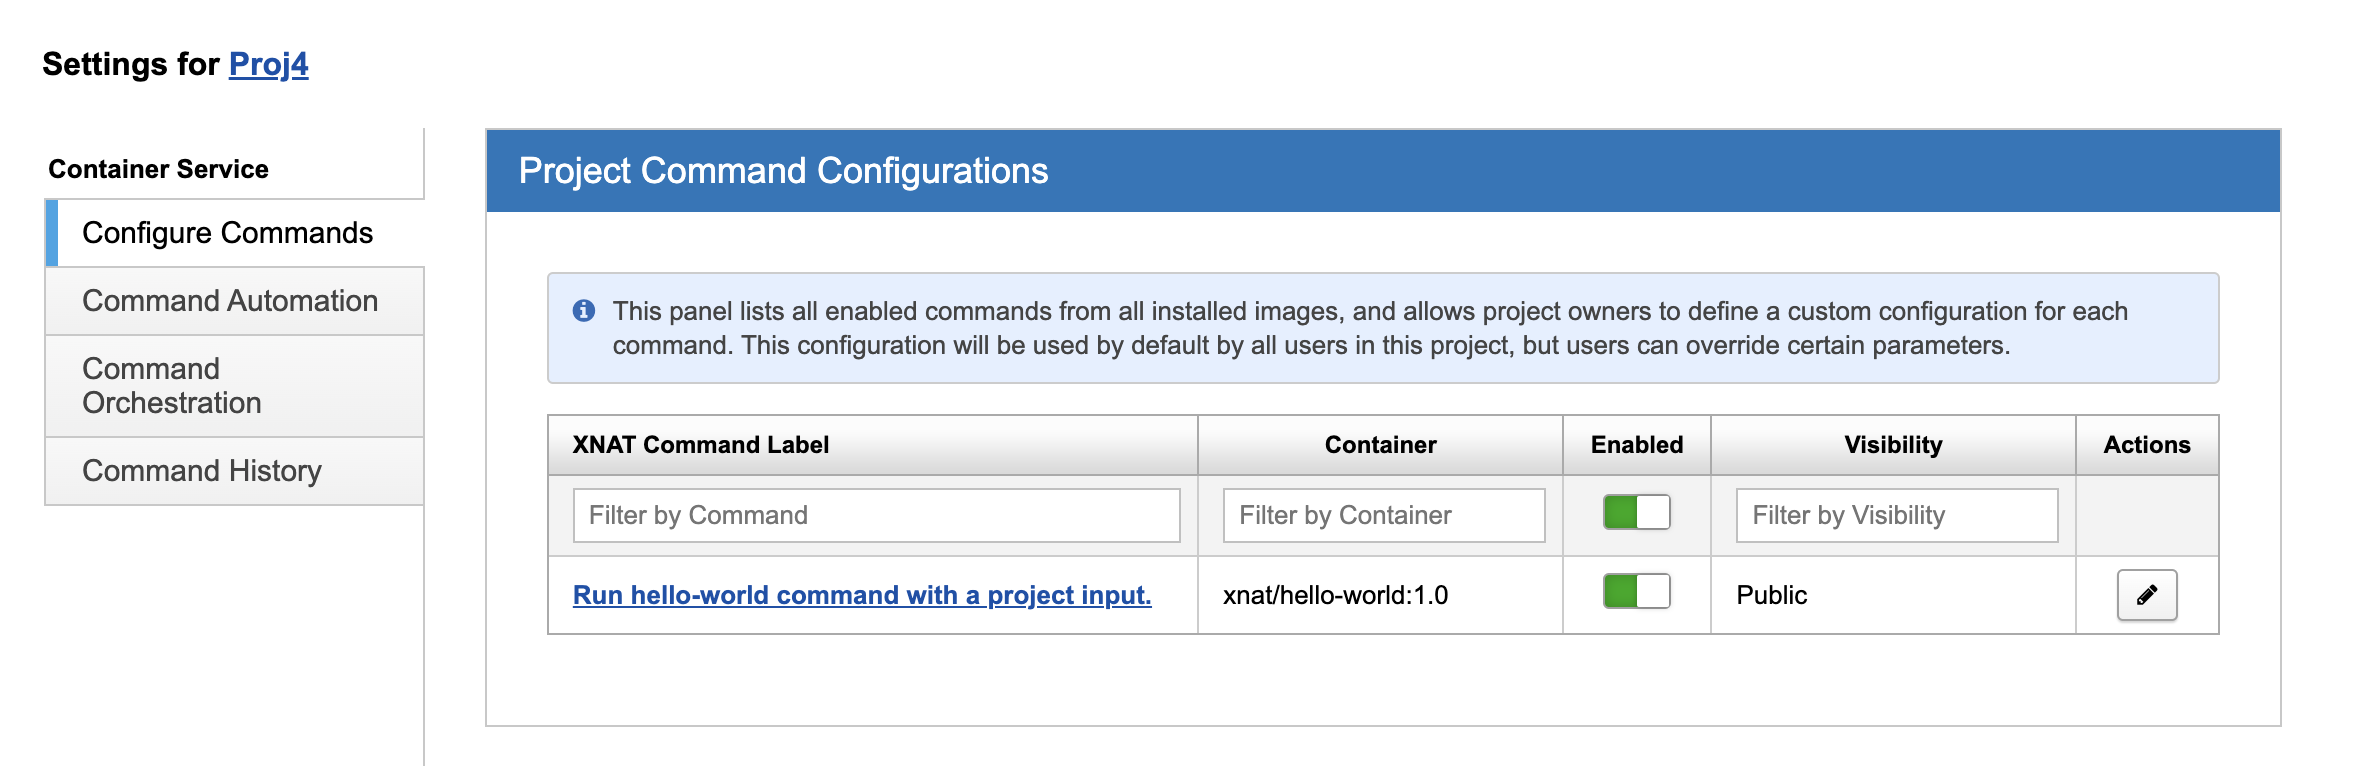
On the Project Settings page, choose the Configure Commands tab and Enabled to enable access to the command on this project.
Once enabled, you can launch the command using the Run Containers sub-menu under Actions on the project home page. Notice that the Hello World: Project label corresponds to the label specified on line 13 in the Command Definition.
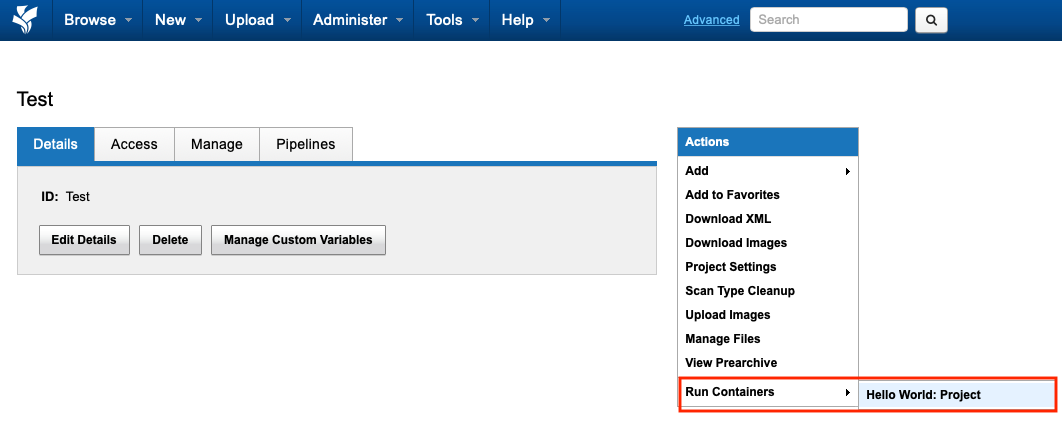
Selecting the Hello World: Project menu item brings up a launch window, prompting the user for input. As this command has no user-settable inputs, you are simply prompted to Run Container.

After running the container, you can browse to Command History to see the status and output logs from your container. Select Administer → Plugin Settings → Command History. The History table should list your completed command execution.
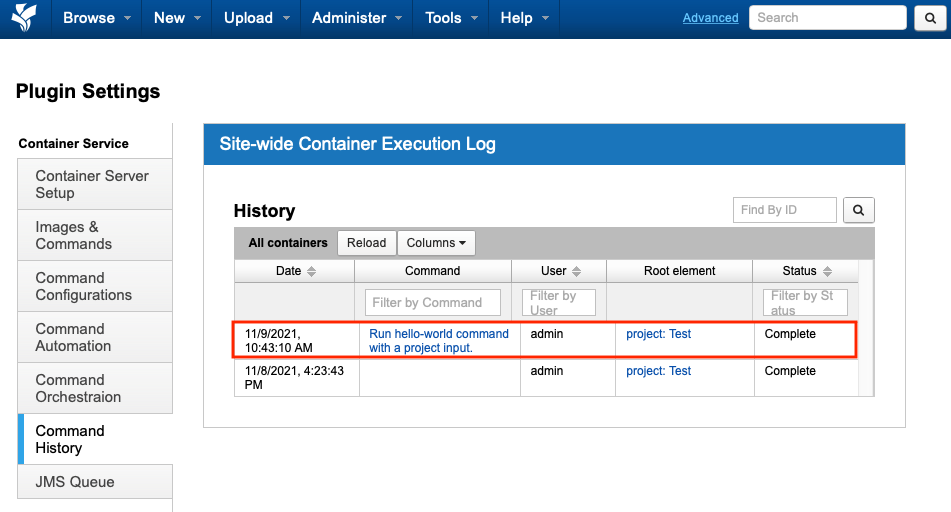
Select the command name to view details of your container/command execution.
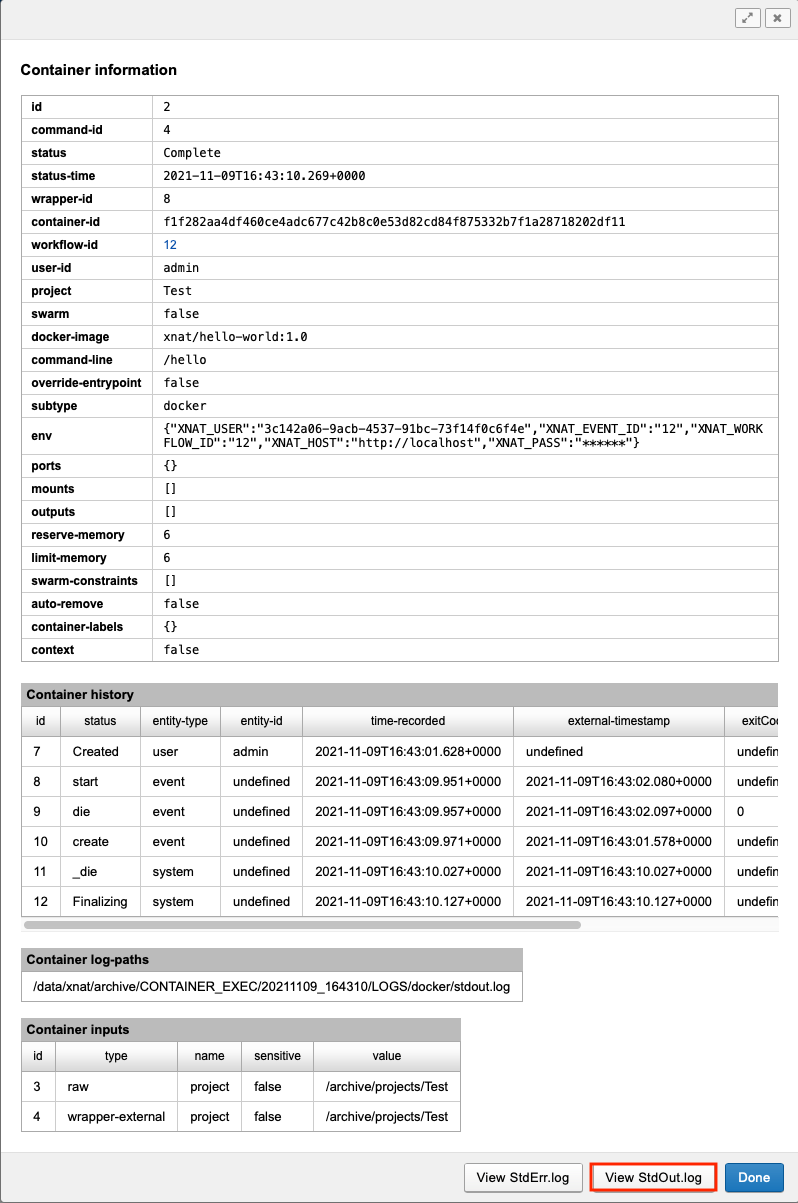
Finally, select View StdOut.log to see the Std Out log message from your hello-world container.