Creating a Custom Resource Uploader
Setting Up A Custom Resource Uploader
If you have an inexperienced user base, or you simply want to create a more streamlined workflow for users, you can configure a custom resource uploader for your project. A resource uploader would be used for uploading additional files that are not image scan files to your XNAT file system, and associating them with a data record in your project. Examples might be:
- EPrime files related to Task MR sessions. (Set up a resource uploader at the scan level to associate these files with specific scans.)
- Adding patient health or biometric information related to an image session. (Set up a resource uploader at the image session level.)
- Project protocol documentation. (Set up a resource uploader at the project level.)
Here are the step-by-step instructions.
1. Open the "Manage" tab on your Project home page, and go to Project Resource Settings.
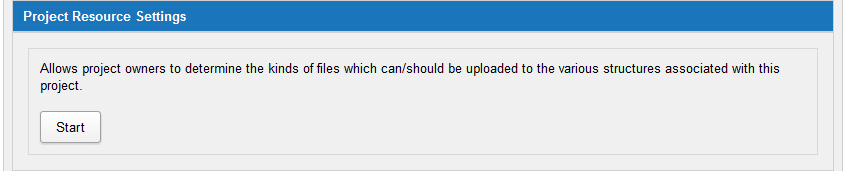
2. Click Start to open a configuration console.
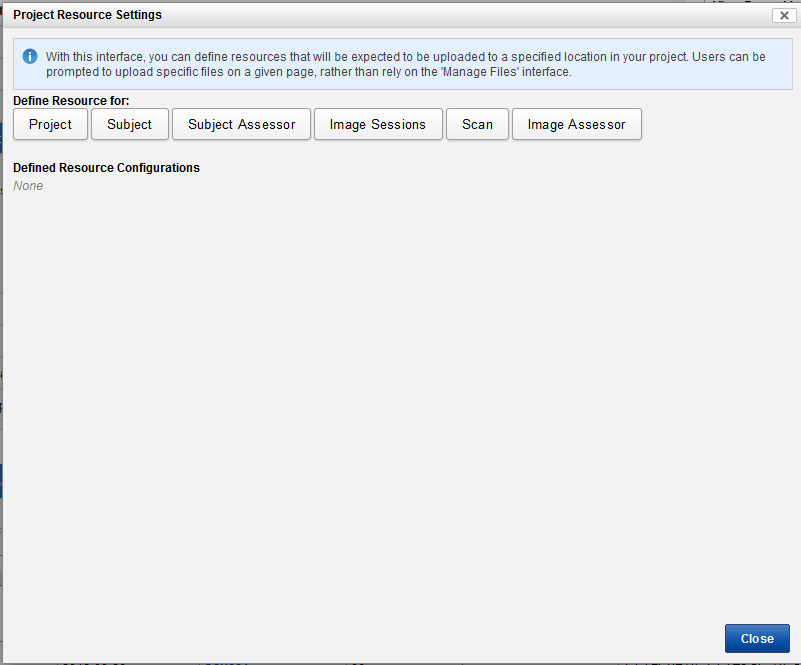
3. Pick a context for your uploader. Resource files can be added at every level of the XNAT data structure. If you want to set up an uploader at multiple levels (i.e. project and subject and session), you will need to run through this process multiple times. You will notice that inputs for the following steps may change slightly depending on your selection.
Note: "Experiments" are referred to as "Subject Assessors" in newer versions of XNAT.
4. Define what resource you expect users to upload. This allows you to make most of the decisions that the Manage Files interface requires ahead of time, so users don't have to go through so many clicks.
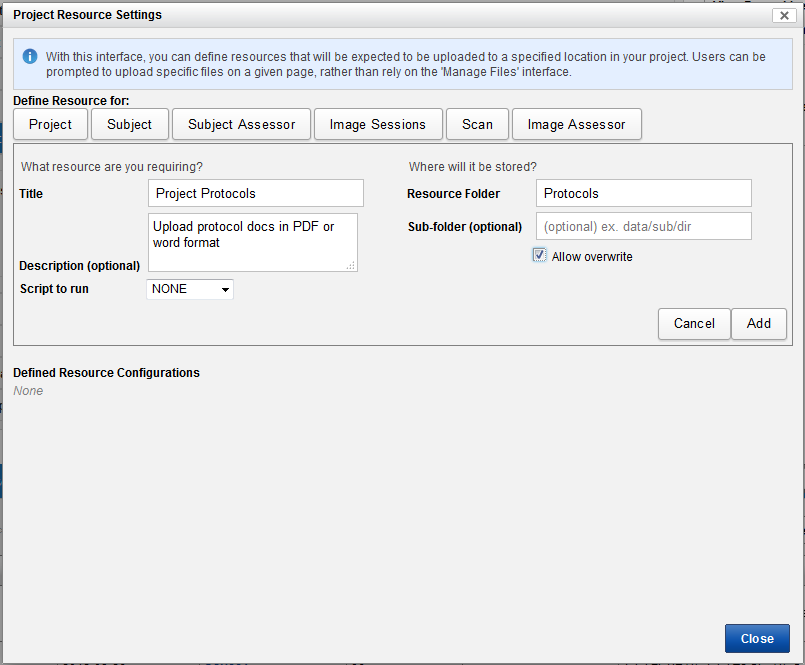
Here is a quick rundown of options.
- Title: This field gets used in the UI for users, as they are asked to choose what type of resource they are about to upload.
- Description: This field is not shown to users, it is only for internal reference.
- Script To Run: Automation scripts can be defined in the Admin UI by site administrators. If any scripts are defined, they can be selected here and applied to your files on upload. See XNAT Administration Docs for more details.
- Resource Folder: All files will be uploaded into the "RESOURCES" root folder, using this interface. This setting allows you to specify which subfolder within the RESOURCES root folder to upload these files to. If this folder does not already exist, it will be created.
- Subfolder (optional): Additional nested subfolder structures can be created here. Note: Do not include a leading slash "/" in this definition field.
- Allow Overwrite: If enabled, this will allow users to overwrite previously existing files with new uploads of the same name.
Additional options may appear depending on which level you are configuring the uploader for:
- Select Data Type: If you are configuring an uploader for a subject assessor, image session, or image assessor, you can specify a specific data type to allow uploads to. The default setting is "All types."
- Types: If you are configuring an uploader for an image session, you can configure which scan types to allow uploads to.
- Level: If you are configuring an uploader for an image assessor, you can change the default root folder from "RESOURCES" to "Inputs" or "Outputs"
5. Click "Add" to save the custom upload configuration. Saved configurations will appear in this dialog under "Defined Resource Configurations."
Using A Custom Uploader
If a custom uploader is configured for your project, users will see a new action in the actions menu: Upload Additional Files.
Custom Uploaders cannot be run on shared resources. For example, if you have shared a subject from a source project into a destination project, you cannot run a resource upload script on that subject in the destination project. This is because the source project still owns that subject and its resources.
Once you click on Upload Additional Files, an upload modal dialog will open.
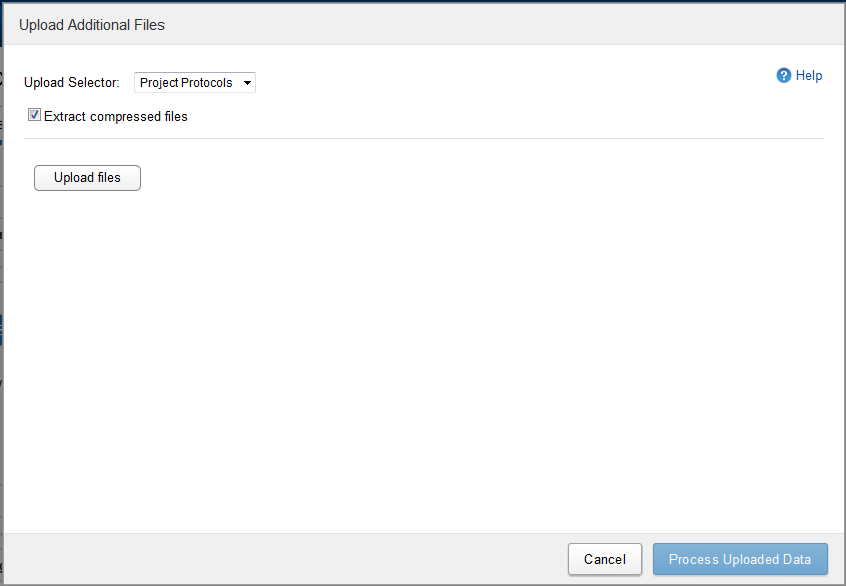
Using this UI presents a much simpler experience for users. All they have to do is pick an upload type from the select menu, and click Upload Files. Any files selected will be uploaded and processed and added to the appropriate resource folder.