DICOM SCP Receiver Configuration
Configuring a new DICOM SCP receiver in XNAT is fairly simple, but there are many options for customizing the behavior of these receivers.
To get started, log in as a site administrator and go to Administer > Site Administration > DICOM SCP Receivers and then click New DICOM SCP Receiver. You should see the modal below. This is the modal for an XNAT with the single default DICOM Object Identifier that is shipped with all XNATs.
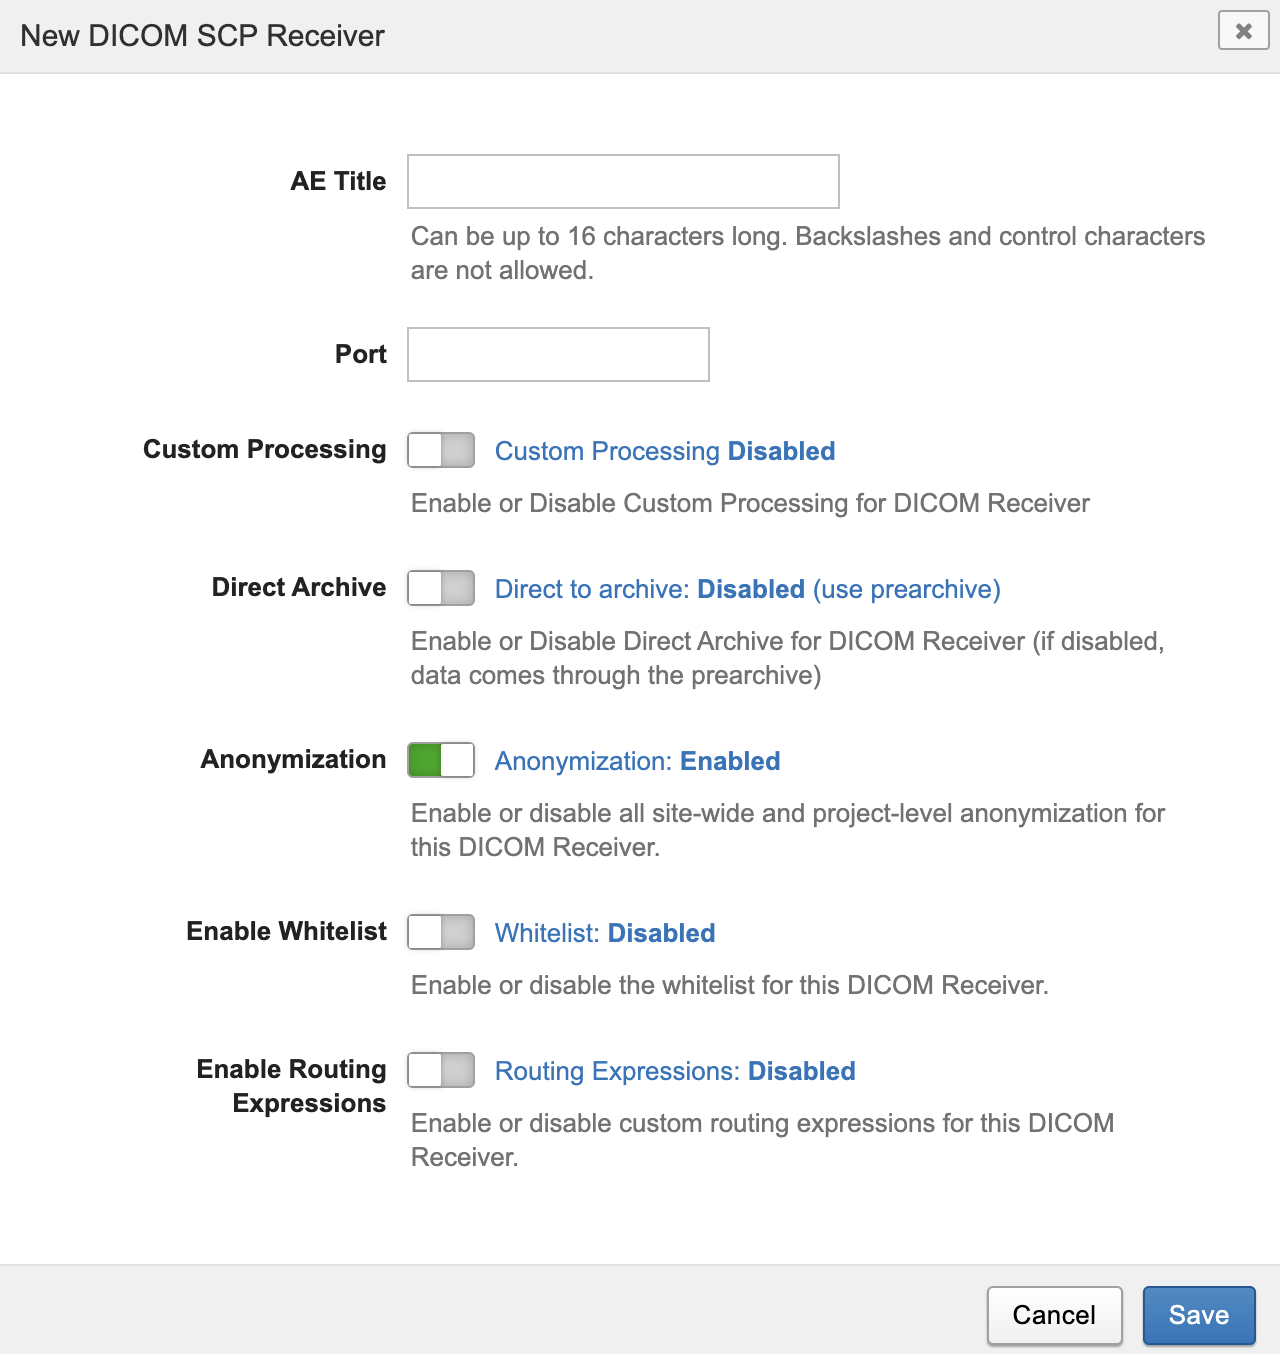
Only AE Title and Port are required inputs to initialize a new receiver. Once you enter values for these inputs, you can click "Save" and the receiver will be added. It will start out enabled and will be ready to use immediately. However, there are many other options that can be customized.
SCP Receiver Configuration Options
Not all of these options will be visible by default. Options that are relevant to your XNAT and plugin environment are shown.
AE Title
Enter the DICOM AE Title that labels this receiver. The combination of AE Title and Port must be unique within XNAT. The string must have a maximum of 16 characters. Leading and trailing spaces are removed. All characters are allowed except BACKSLASH "\" and control characters.
Port
Enter the TCP/IP port on which this receiver will listen. Valid entries are integers in the range of registered TCP/IP port numbers, 1024 to 49151. XNAT uses 8104 as the default. The exact range of available values will depend on details of XNAT's particular network environment.
Custom Processing
The "Custom Processing" setting allows the SCP receiver to make use of the archive processor framework, which can apply project identification and subject/session relabeling functions prior to anonymization. (Developer docs: Adding Custom Image Import Processors).
Direct Archive
The "Direct Archive" setting (introduced in XNAT 1.8.3) allows the receiver to process data more efficiently under common scenarios (see Using Direct-to-Archive Uploading).
Selecting DICOM Object Identifiers
It is possible to install additional DICOM Object Identifiers with different rules for identifying project, subject, and session. A common source of Identifiers are XNAT plugins. For example, The DICOM-Query-Retrieve (DQR) plugin adds an Identifier for its purposes. The New/Edit DICOM SCP Receiver modal dialog will look like the following when multiple Identifiers are present. Note the addition of the Identifier drop-down menu that allows the selection of one from the list of all Identifiers known to XNAT.
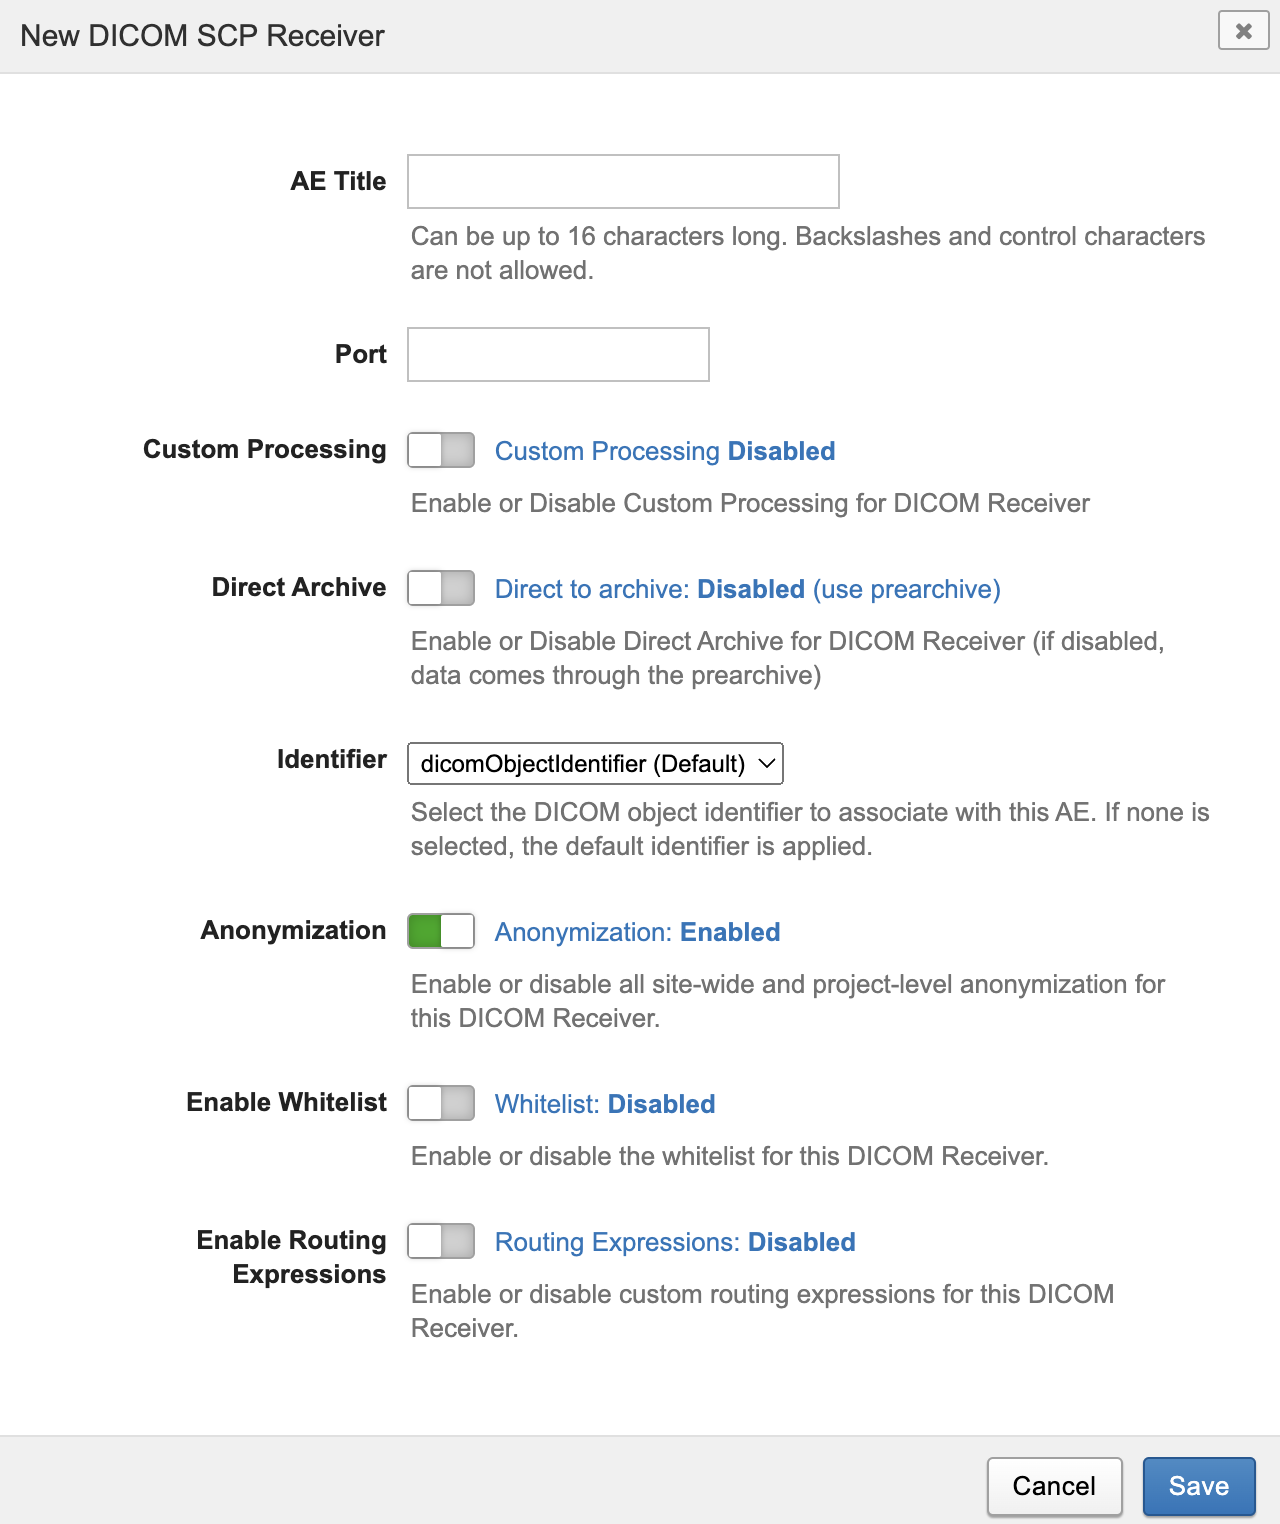
The appearance of the dialog will also change depending on the capabilities of the chosen Identifier. Note that the default Identifier has the ability to enable routing expressions. For example, the DQR Identifier does not support routing expressions. The dialog changes to reflect this when the DQR Identifier is selected.
If your XNAT has one or more DICOM Object Identifiers added via plugin, you will see a selector in this setup UI to choose which object identifier will be used for this SCP receiver definition. The default routing rules are documented in How XNAT Scans DICOM to Map to Project/Subject/Session.
Anonymization
This setting (introduced in XNAT 1.8.5) allows finer-grained control of the application of anonymization by allowing you to enable/disable site-wide and project-level anonymization on individual receivers. Anonymization is enabled by default.
Disabling anonymization may effect the contents of data stored in XNAT, potentially allowing protected healthcare information (PHI) onto XNAT.
Enable Whitelist
The whitelist setting (introduced in XNAT 1.8.5) allows you to configure a list of AE Titles and/or IP Address that the DICOM SCP Receiver is allowed to interact with. When the whitelist is enabled, only entries in the whitelist will be allowed to make a connection to the receiver. Entries in the whitelist should be separated by a newline character and can be an AE Title, IP Address, or AE Title@IP Address. CIDR mask notation is also supported to specify a block of IP addresses.

In the example above:
SENDERS_AE@192.168.1.1 - Would allow connections from the AE Title: SENDERS_AE located at the IP Address 192.168.1.1
192.168.1.2 - Would allow any AE Title to make a connection from the IP Address 192.168.1.2
SENDERS_AE_2 - Would allow the AE Title: SENDERS_AE_2 to make a connection from any IP Address
198.51.100.0/22 - Would allow connections from any AE Title from the IP block 198.51.100.0 to 198.51.103.255.
Enable Routing Expressions
DICOM Object Identifiers use attributes in the incoming DICOM objects to determine to which project, subject, and session the object belongs. This switch allows you to customize the routing rules for individual receivers. The modal dialog will expand when this feature is enabled.
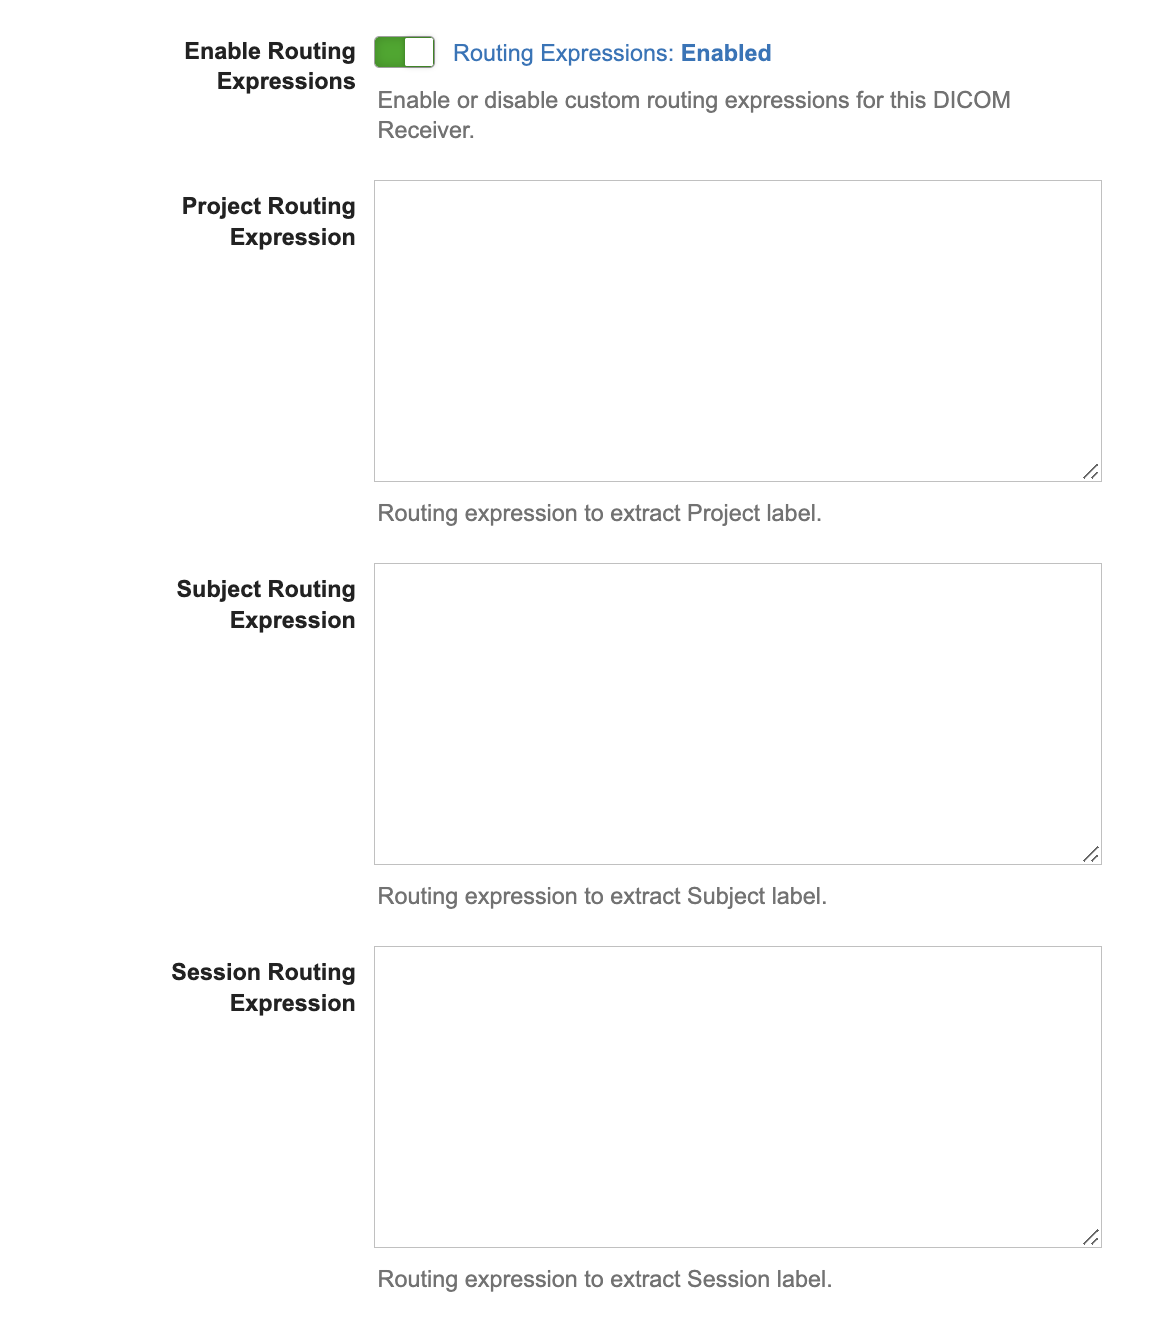
Text areas are exposed enabling you to enter specially-formatted strings that are rules used by the DICOM Object Identifier to determine project, subject, and session labels. The syntax for the expressions is complicated and identical to the expressions used documented in XNAT Custom DICOM Routing Rules in the Admin UI. Any one of the expressions can be left blank. Blank expressions result in the identifier using its default rules.
For each of Project, Subject, and Session labels, the receiver will apply the first rule it encounters in the following order.
Receiver-specific routing rule. (configured here).
Site-wide routing rule. (Configured in Administer > Site Administration > Custom DICOM Routing). See XNAT Custom DICOM Routing Rules in the Admin UI
Default routing rules. See How XNAT Scans DICOM to Map to Project/Subject/Session
Editing these routing rules can lead to weird or unpredictable placement and labeling of sessions, depending on the structure of your incoming data. Make sure your users are aware of the rules you configure to prevent confusion.