
Account Creation
To get started on an XNAT system, you’ll need to create a user account. There are four ways in which a user account can be created:
-
Registering your own account.
-
Receiving an invitation to join a project.
-
Receiving an account from your XNAT administrator
-
Connecting an institutional accounts
Once your account is created and enabled, you’ll be able to create projects, enter and upload data, and work on projects to which your collaborators have given you permission.
Registering Your Own Account
In a standard XNAT installation, user accounts must be created by either the user themselves or by the site administrator. Users will be given the option of registering for an account when they first visit the site.
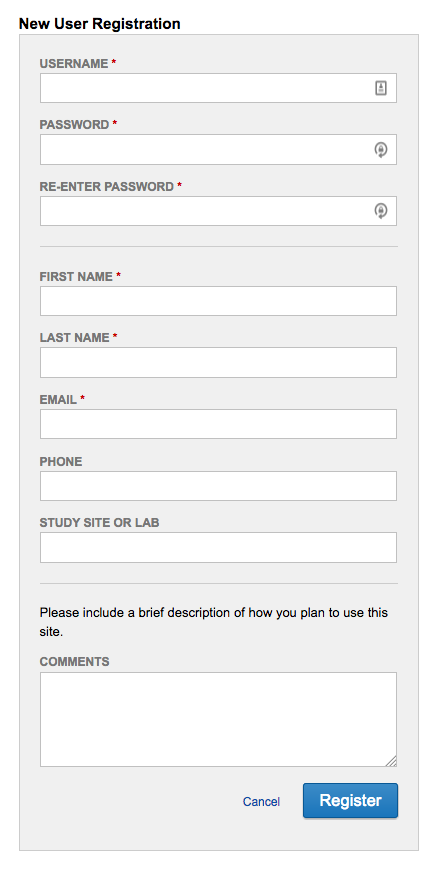
The User Registration form collects the necessary data for the creation of your account including First & Last Name, Email, and Username. Once you have registered for an account, your new account may need to be enabled by an administrator (depending on how the site is configured). Once an administrator has enabled your account, you will receive a Welcome email at the email address you entered on the registration page. Usernames cannot be changed once your account has been created, so choose wisely.
Receiving an Invitation To Join a Project
An existing project owner may invite you to join XNAT with the purpose of granting you access to their project data (see https://wiki.xnat.org/documentation/creating-and-managing-projects for instructions on sending project invites). If they do so, you will receive an email from XNAT with a specially coded link called a Project Access Request. Clicking on that link will take you to a customized version of the account registration page, where you can either log in with an existing account, or create a new one.
By default, if you join XNAT with a project access request, XNAT is configured to allow you get access immediately without any additional Administrator approval required. (This setting may be different in your XNAT.)
Receiving an Account from your XNAT Administrator
Your XNAT Administrator has full capabilities of managing user access, including creating, enabling or disabling user accounts. By default, you will receive an email when the administrator creates your account. Your administrator may have changed this setting though, so check with them if you’re expecting them to create your account but didn’t receive an email.
Connecting an Institutional Account
Your XNAT administrator may have set up single sign-on on your XNAT system, allowing you to use institutional credentials to login. If so, you don’t need to create a separate account on your XNAT system. If single sign-on is set up on your XNAT, you should see links to your institutional login service on the login page. Check with your administrator if you are unsure. Your administrator may also have setup an account approval process for your login, so check with your administrator if you’re having trouble logging in.
Account Management
Having a valid user account in XNAT gives you access to the web application and its primary functions, but not keys to the kingdom. Access to any data in XNAT is governed on a project-by-project basis.
Editing Your Account
After creating your account, if you decide that you want to change your password or associate a different email address with your account, you can click on your username in the top navigation bar. After entering and confirming your new password or email address, simply click 'Submit' to change it.
User Session Limits and Timeouts
For security reasons, each XNAT has a defined period of time in which a user session can remain active. You will see this reflected in the top navigation bar as an "Auto-Logout" countdown. The default time limit in XNAT is 15 minutes, but this can be changed in the Admin settings.
If the timer reaches 0:00, your session will automatically end and you will be redirected to the login page. However, any user activity involving a new page load – even a simple page refresh – will result in this counter being reset to the full time limit. Additionally, the user can click on the "Renew" link in the top navigation to renew the session without leaving or refreshing your current page.
Re-enabling a Deactivated Account
After a certain period of time of inactivity (the default setting in XNAT is 1 year, though your administrator may have changed this), your account will be deactivated. This means that this account must be re-enabled by an XNAT administrator. If you attempt to login to a decactivated account, you will receive a notice to this effect, with a link to send the XNAT administrator your request. No data is deleted when an account is deactivated, so once your account is re-activated by your administrator, you will be able to continue working on your projects.
Password Recovery
You’ve forgotten your username or password. It happens. No problem: Just click on the “Forgot login or password” on the login screen. You’ll get an email with a link to reset your password. If your XNAT system uses an institutional account, you’ll need to got to your institution’s password recovery page.