Building Workshop Virtual Machines
First Things First
Before you try to build your first machine, make sure you have Vagrant and VirtualBox installed and added the XNAT base box. Instructions for doing that are provided here. Next, prepare the XNAT workshop vagrant environment. For those of you with the official XNAT Workshop thumb drives, unpack the xnat-workshop-vms.zip file in a convenient spot on your local machine. If you don't have a drive or want to make sure you have the very latest code, run:
git clone https://bitbucket.org/xnatdev/xnat-workshop-vms.git
Cue up the Pre-Configured Resources
Download the resource file here: https://bitbucket.org/xnatdev/xnat-workshop-vms/downloads/xnat-workshop-local.zip
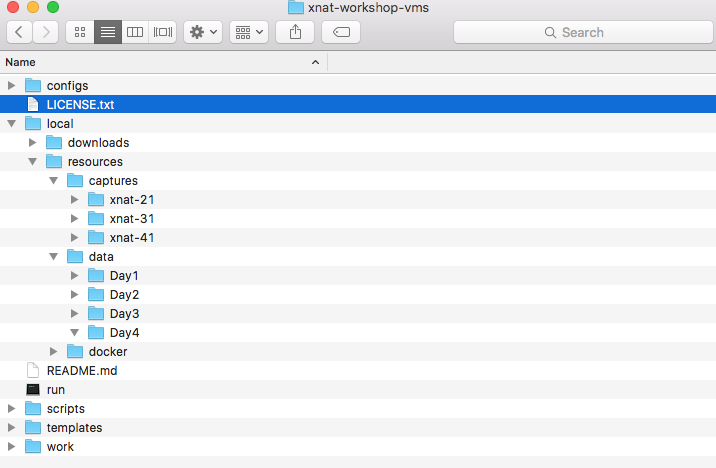
After unzipping, make sure the folder "local" is placed inside the xnat-workshop-vms/ folder. This will ensure that specific resources for each practical exercise get applied when you run "Setup."
We've pre-packaged some data and other goodies that are needed for building the machines. Copy the xnat-workshop-local.zip from your thumb drive and unzip it into the xnat-workshop-vms folder created above (you can also get this file here). It will create a folder called "local" and you should now have a directory structure in xnat-workshop-vms that looks a whole lot like this:
Now Build a Machine
Using your preferred terminal tool, navigate into the xnat-workshop-vms directory that you created when you unzipped xnat-workshop-vms.zip (or cloned with git). Now run:
./run xnat-## setup where ## = the practical number and part that you are working on. So, for Practical 1, Part 2, you would enter "./run xnat-12 setup". Some of the practicals include multiple parts but only require a single machine, in which case, you can just keep using the machine you built for the first part.
This will launch a script that uses Vagrant to build and deploy the virtual machine.
What Did You Just Do?
You just built yourself a monster. A beast. An XNAT. But not just an XNAT. It's an XNAT that has been conveniently preloaded with the data and plugins you'll need to complete the practical you're working on. Some things to know:
- You can access the machine at http://xnat-##.xnat.org (again, the ## is the Practical Number and Part you're working on). This is done through a bit of DNS wizardry so you will need an internet connection but it is actually accessing your local virtual machine.
- You can ssh to the machine by type "./run xnat-## ssh".
- You can access data, scripts, and docker images that you might need for your practical on the VM at /resources.
Did You Know You Can Make Your Own Pre-Configured Machines?
Sure, you can make your own machines that are pre-loaded with whatever data you like. Here's how. Start with one of the workshop machines (xnat-12 is a good one b/c it's pretty much an empty XNAT). Configure the site, create users and projects, upload some data, do whatever you'd regularly do with your XNAT. When you want to capture its state, ssh onto the machine and type "xnat-capture <tag>" where tag is something useful (like the xnat-## scheme we're using for the workshop). The script will create a capture of XNAT system's state into a folder called "local/captures/<tag>" within your local xnat-workshop-vms directory. Then create a new machine configuration by copy and rename one of the existing folders in xnat-workshop-vms/configs to match your <tag>. In your new <tag> config folder, modify the config.yaml file like this:
# <tag>/config.yaml
# DO NOT EDIT THIS FILE (Note from Dan: Sure, go ahead and edit it. Replace <tag> with the value you used with xnat-capture.)

name:           <tag>
host:           <tag> # uses [name] if not defined or empty string
server:         <tag>.xnat.org
project:        xnat
vm_user:        xnat # this is the user that will run Tomcat and own files/folders under /data
vm_ip:          10.1.7.55 #pick an IP address that's outside the workshop block.
provision:      ../../scripts/provision.sh
build:          ../../scripts/war-deploy.sh
deploy:         war
revision:       1.7.0-SNAPSHOT
db_version:     9.5
xnat_url:       https://bitbucket.org/xnatdev/xnat-web/downloads/xnat-web-1.7.0-SNAPSHOT.war
pipeline_url:   https://bitbucket.org/xnatdev/xnat-pipeline/downloads/xnat-pipeline-1.7.0-SNAPSHOT.zip
# VM config settings
box:            nrgxnat/xnatstack-ubuntu1404-docker
java_path:      /usr/lib/jvm/java-8-openjdk-amd64
ram:            2048
cpus:           1
gui:            false
shares:
    '../../local/resources':
        - '/resources'
        - ['fmode=777','dmode=777']
Now, whenever you want to create a machine with the state you just captured, just go back to xnat-workshop-vms and run "./run <tag> setup". Boom. You got your XNAT.