Part 2: Automating XNAT ZFS Project Mounts
One of the great benefits of ZFS is the ease of making data snapshots. However, if there are a lot of edits or deletes to the data, the snapshots themselves can begin to take up a lot of space. At some point as an Administrator, you may want to start deleting old snapshots to recover some storage. Or as your XNAT ages, some of your projects may be completely over, but continue to take up a lot of space. If there is a cold storage option at your university, it sure would be nice to move old projects there. However, if you delete the project from your ZFS, all the sessions are going to be copied into snapshots, and you won't be able to reclaim the space. If your entire XNAT archive is stored on a single file system mount, then there is no way to safely separate out the snapshots for the deleted project from the remaining projects. You'll be hanging onto that deleted project's data for months or years still.
The emerging ZFS solution for handling project data on a large XNAT is to give each project it's own file system mount. In this case, each project's archive and it's snapshots are stored independently and therefore can be moved or deleted independently.
So then the question becomes: how do we get XNAT to create these project mounts every time a new project is created? With XNAT's new automation capabilities, we are able to hijack the "Create Project" process into generating the mount point.
Start With A Bash Script
We begin with a simple bash script, createProjectMount.sh, with the commands to create the mount given one parameter, the XNAT project id:
#! /bin/bash

# Script name: createProjectMount.sh

project="$1"
project_folder="tank/xnat/archive/${project}"

sudo /sbin/zfs list ${project_folder} 2>&1 | grep -q "dataset does not exist"

if [ $? -ne 0 ]; then
    echo "zfs folder ${project_folder} already exists"
    exit 1
fi

sudo /sbin/zfs create ${project_folder}
sudo /opt/ozmt/snapshots/snapjobs-mod.sh ${project_folder} 15min/4 hourly/12 daily/0
sudo /opt/ozmt/utils/zfs-cache-refresh.sh &
Let's copy the createProjectMount.sh script into the right places
./run xnat-21 ssh
mkdir /data/xnat/automation
cp "/resources/data/Day2/createProjectMount 2.sh" /data/xnat/automation/createProjectMount.sh
chmod +x /data/xnat/automation/createProjectMount.sh
If you don't find the file "/resources/data/Day2/createProjectMount 2.sh to copy, then try:
wget https://raw.githubusercontent.com/XnatWorkshop/createProjectMount/master/createProjectMount.sh
chmod +x /data/xnat/automation/createProjectMount.sh
We will come back to this script in a moment.
Enable sudo for xnat user
Next we need to able whatever user is running tomcat to be able to perform the actions in the script above. So we'll need to give the user those permissions:
sudo -i
cat >> /etc/sudoers.d/xnat
# Enable xnat user to create ZFS project mounts
xnat    ALL=(root) NOPASSWD: /sbin/zfs
xnat    ALL=(root) NOPASSWD: /opt/ozmt/snapshots/snapjobs-mod.sh
xnat    ALL=(root) NOPASSWD: /opt/ozmt/utils/zfs-cache-refresh.sh
Press Ctrl-D
Enable Script Automation on Project Create in XNAT
Now we will finally tie the event of a new project being created to the execution of the script we saw above. We actually need to create a little python script in XNAT to launch our bash script above. We could also use JavaScript or Groovy.
You cannot complete this step in Safari due to a known XNAT bug with adding scripts. You must use a different browser to complete this step.
- Open your XNAT vm in a browser (http://xnat-21.xnat.org). Log in (admin/admin).
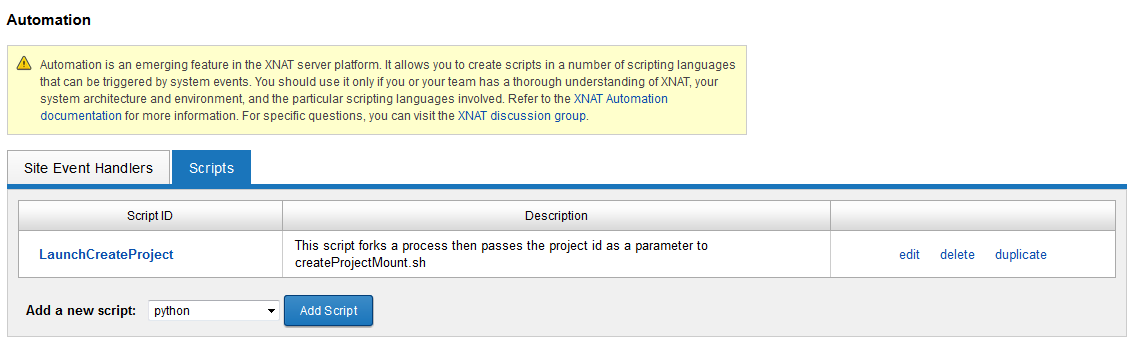
- In the top menu bar, go to: Administer > Automation
- Click on the Scripts tab.
- On "Add a new script", select "python", then click "Add Script"
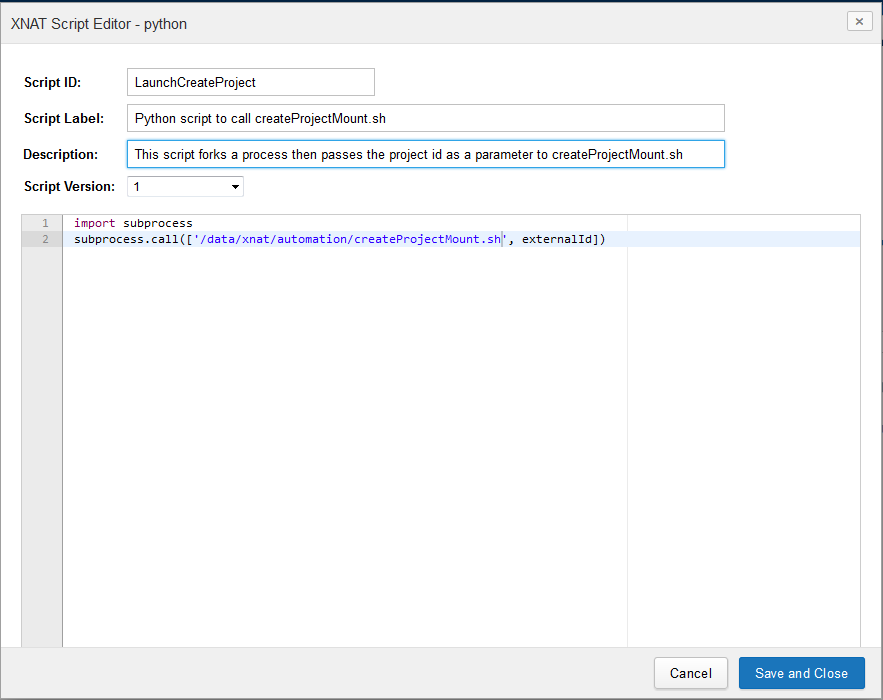
Enter the following values:
- Script ID: LaunchCreateProject
- Script Label: Python script to call createProjectMount.sh
- Description: This script forks a process then passes the project id as a parameter to createProjectMount.sh
- Script Version: 1
import subprocess
subprocess.call(['/data/xnat/automation/createProjectMount.sh',externalId])
Then click "Save and Close"
You should then see the following screen appear:
XNAT Logout / Login Required
Before we continue, please quickly log out and back into XNAT. Otherwise the script we just created will not show up for the next step.
Next click the SIte Event Handlers tab (within the Administer > Automation page).
Click the "Add Event Handler" and fill out the form as shown below:
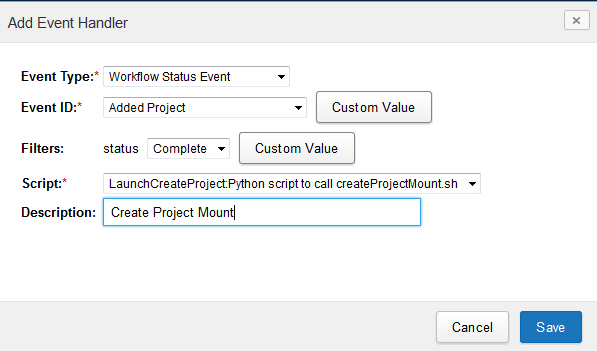
- Event Type: Workflow Status Event
- Event ID: Added Project
- Filters: status Complete
- Script: LaunchCreateProject:Python script to call createProjectMount.sh
- Description: Create Project Mount
Then click "Save".
Test Run
The only thing left now is to see if it worked. First we'll verify that the directory does not already exist.
In the Command Line:
sudo su - xnat
ls -l /data/xnat/archive
In XNAT:
Click New > Project
Fill in the form however you would like. 🙂 Just make a note of the Project ID.
Now back to the command line:
zfs list
You should now see your XNAT_2016 listed as a ZFS mount!
Step 4 Complete