DQR Admin: Connecting XNAT with a PACS for DQR Usage
In order for your XNAT to be able to take advantage of the functionality provided by the DQR Plugin, you must first set up a working connection to a PACS or DICOM AE. This requires the coordination of two parties – the XNAT Administrator, and the PACS Administrator. In order to complete this process, you will need to have network information and AE Titles for both systems, and each party will have to configure their system to talk to the other.
There are two connection types which are available for the DQR plugin: DIMSE and DICOMWeb. These have diverging setup requirements. We will outline the setup for a DIMSE connection first; so, if you wish to use a DICOMWeb connection, you may skip the DIMSE setup instructions and move onto the DICOMWeb instructions.
Registering a PACS using DIMSE Connections
Adding a DIMSE PACS Configuration
1. Go to Administer > Plugin Settings > DICOM Query-Retrieve > DQR Settings in the site navigation and find the "Manage Connected PACS/VNA" panel:
2. Click on the Add New button which will open up the dialog to configure your PACS connection:
3. Choose a DIMSE connection within Connection Type field.
This dialog will initially only have two fields available: AE TITLE and Connection Type. In order to create a new DIMSE connection, select DIMSE in the Connection Type selector. This will open up all of the necessary fields to create a DIMSE connection:
4. Enter the network information and configuration for this PACS system in the dialog. The fields are outlined below:
FIELD | DESCRIPTION |
|---|---|
AE Title | This should be the AE Title broadcast by the PACS or DICOM AE you are connecting to. |
Label | This is used internally by XNAT to identify this PACS in the UI. It should be set so that users can understand what PACS connection they are using. By default, the label will be set to be the same as the input AE Title. Note: Labels must be globally unique across all PACS connections within a given XNAT instance. |
Host | This is a network address, and could be an IP address, "localhost" for a dev setup, or a URL. Note: The "http/s" protocol must be omitted. |
Port | This is the network port used by the PACS system to accept requests and send or receive data |
Queryable | Toggles whether to allow users to send C-FIND queries and C-MOVE requests to this PACS in order to find and import data |
Default Q/R AE | If multiple PACS are configured to be "Queryable", only one can be the "Default" for querying new data. This affects the select menu on the "Import Studies" UI |
Storable | Toggles whether to allow users to push data from XNAT to this PACS |
Default Storage AE | If multiple PACS are configured to be "Storable", only one can be the "Default" for storing data. This affects the select menu on the "Send To PACS" UI |
A example configuration for a DIMSE connection is shown below:
5. Click Save to save this configuration.
When creating a PACS, a utilization schedule is automatically set that allows requests to be processed 100% of the time, every day of the week. You can restrict the PACS Utilization schedule using the process outlined in the next step.
Your new PACS configuration will now appear in the table. You can go back and edit this configuration at any time by clicking on the highlighted name of the PACS in the table, or the pencil icon in the table row for that PACS.
Setting the Calling AE Title for DIMSE Connections
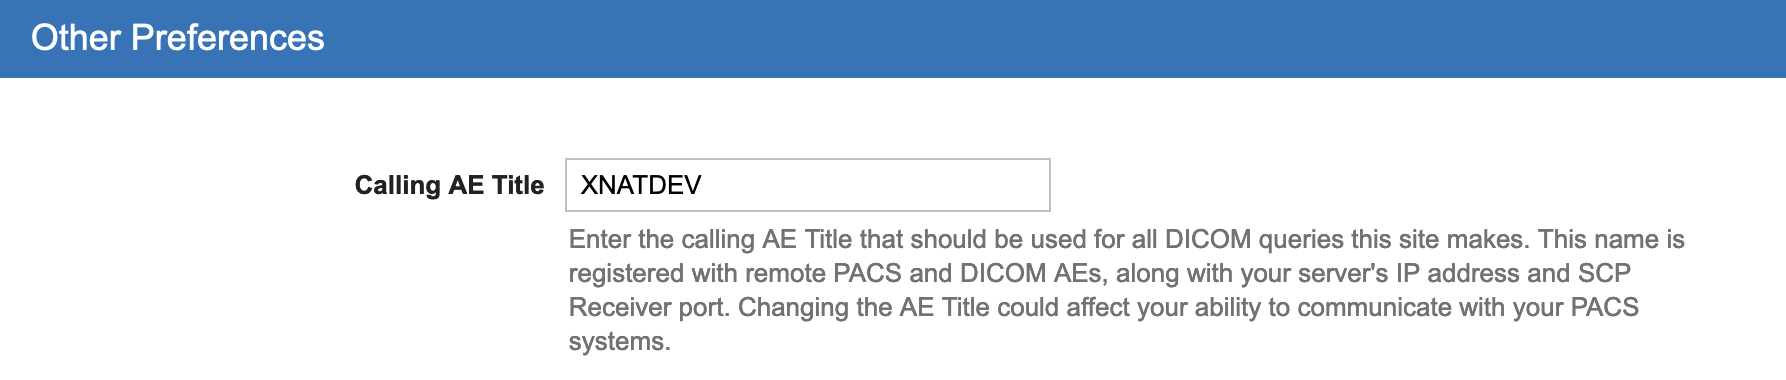
Every DICOM AE has a single "Calling AE Title" that is attached to every DIMSE DICOM Query. This can be (but does not have to be) separate from any AE Title specified as an XNAT SCP Receiver. Scroll down to “Other Preferences” section to set this field.
Registering XNAT in the PACS system for DIMSE Connections
PACS Administrators are charged with securing highly sensitive patient data, and are naturally extremely concerned about data security. If you are setting up DQR for the first time on a development XNAT instance, it is doubtful that the PACS Administrator will agree to set up a connection to your XNAT. You may want to set up your own development PACS instance to use in testing, before attempting to connect to a production PACS instance.
It is also essential that the PACS you are trying to communicate with is set up so that it can speak with your XNAT. In addition to making sure there are no network issues with your XNAT communicating with the PACS, you will need to make sure that the information within the XNAT about the properties of the PACS is coordinated with the actual information found on the PACS and vice versa.
When you use DQR to request data from a PACS, XNAT tells the PACS to send the data to a specific AE Title. The PACS will then look at its own configuration, see that the requested AE destination is associated with a specific site and a specific port, and send the data to that site and port.
Note: This is why it is sometimes necessary to use an AE Title other than "XNAT" for your XNAT. If you were to try to connect two XNATs to a PACS and both XNATs only had a single receiver at "XNAT:8104", then when the PACS received a request for data to be sent to the "XNAT" AE, there would be no way to configure the PACS to know which XNAT's receiver it should send the data to. This is also the reason that we include a Label field within the setup of a PACS connection. The label can function as a clear description of the PACS connection to users of your XNAT while not affecting the connection between XNAT and PACS.
As an example, if you are working with a local Orthanc PACS, you might want your orthanc.json file to have a block like this:
"DicomModalities": {
        "xnat": [
            "{AETITLE}",
            "{ADDRESS}",
            "{PORT}"
        ]
    },
This will route any requests that come into the PACS for data to be sent to an AE with your specified "{AE TITLE}", to the SCP Receiver using the specified "{PORT}" on the XNAT available at the specified IP "{ADDRESS}".
Your XNAT's Calling AE Title (defined above) and every DQR-enabled SCP Receiver AE Title (defined in the Admin UI) must be registered in your PACS, or else queries and C-MOVE requests will not be accepted by the PACS system.
Note: Different PACS platforms (Orthanc, DCM4CHEE, etc.) will each have a different means of configuration. The details of those different configurations is out of the scope of this documentation. Consult the documentation for your PACS, or work with your PACS Administrator to complete this step.
Testing Your PACS Connection in XNAT
After configuring both ends of your XNAT-PACS connection, you can test the connection by logging into your XNAT as an admin and going to the DQR Settings tab in your Plugin Settings page. There, click the Ping button associated with your PACS configuration within the Actions column.
If the ping is successful, you will see a success message at the top of the page. If not, double-check your connection settings, and ensure that the PACS system is running and available on your network.
Registering a PACS using DICOMWeb Connections
Step 1: Register PACS in the XNAT system
1. Go to Administer > Plugin Settings > DICOM Query-Retrieve > DQR Settings in the site navigation and find the "Manage Connected PACS/VNA" panel:
2. Click on the Add New button which will open up the dialog to configure your PACS connection:
3. Choose a DICOMWeb connection within Connection Type field.
This dialog will initially only have two fields available: AE TITLE and Connection Type. In order to create a new DICOMWeb connection, select DICOMWeb in the Connection Type selector. This will open up all of the necessary fields to create a DICOMWeb connection:
4. Enter the network information and configuration for this PACS system in the dialog. The fields are outlined below:
FIELD | DESCRIPTION |
|---|---|
AE Title | This should be the AE Title broadcast by the PACS or DICOM AE you are connecting to. |
DICOMWeb Root URL | External URL which will be used as the indexing root URL. Note: Clicking “Test” will fail if there are no studies in the PACS for today’s date |
Label | This is used internally by XNAT to identify this PACS in the UI. It should be set so that users can understand what PACS connection they are using. By default, the label will be set to be the same as the input AE Title. Note: Labels must be globally unique across all PACS connections within a given XNAT instance. |
Host | This is a network address, and could be an IP address, "localhost" for a dev setup, or a URL. Note: The "http/s" protocol must be omitted. |
Queryable | Toggles whether to allow users to send C-FIND queries and C-MOVE requests to this PACS in order to find and import data |
Default Q/R AE | If multiple PACS are configured to be "Queryable", only one can be the "Default" for querying new data. This affects the select menu on the "Import Studies" UI |
Identifier | The DICOM Object Identifier associated with the PACS connection. Users must select a DQR-enabled DICOM Object Identifier. The DQR Plugin installs one called DICOMweb connections do not use the SCP Receiver, so this selection is necessary to ensure that DICOM data is imported and routed appropriately. |
Anonymization | Enables or disables all site-wide and project anonymization when using this PACS connection |
A example configuration for a DICOMWeb connection is shown below:
5. Click Save to save this configuration.
When creating a PACS, a utilization schedule is automatically set that allows requests to be processed 100% of the time, every day of the week. You can restrict the PACS Utilization schedule using the process outlined below.
Your new PACS configuration will now appear in the table. You can go back and edit this configuration at any time by clicking on the highlighted name of the PACS in the table, or the pencil icon in the table row for that PACS.
Setting the DICOMweb Auth Credentials in your XNAT
This requires access to the XNAT backend and should be done by the site administrator who installs the DQR plugin.
In order to successfully query a PACS via DICOMweb, a set of authentication credentials must be stored in your local system. Rather than reference stored credentials in Postgres, the DQR plugin is configured to look for them in a system properties file located at $XNAT_HOME/config/auth/dicomweb-auth.json.
This file is formatted as a JSON list of credentials, structured like this:
[
  {
    "aeTitle": "<an AE title for the PACS>",
    "username": "<a username>",
    "password": "<a password>"
  },
  ...
]
Each entry in the list is a JSON object with keys aeTitle, username, and password, which is used to define the credentials to connect to a PACS over DICOMweb. The value of aeTitle must be unique within the file.
Testing Your PACS Connection in XNAT
After configuring both ends of your XNAT-PACS connection, you can test the connection by logging into your XNAT as an admin and going to the DQR Settings tab in your Plugin Settings page. There, click the Ping button associated with your PACS configuration within the Actions column.
If the ping is successful, you will see a success message at the top of the page. If not, double-check your connection settings, and ensure that the PACS system is running and available on your network.
Setting a PACS Utilization Schedule
In a high-use, data-rich environment, PACS Administrators may have specific business rules regarding how much network traffic they want to allow to and from their PACS system. The "Schedule" setting allows XNAT Administrators to restrict all use of each connected PACS to certain hours of the day. You can also throttle the data transfer rate, if desired.
In order to set this value for your current PACS connection, click the calendar icon found within the actions column of the current PACS connection which will bring up the scheduling menu.
For further discussion on how to edit the Availability Schedule for a PACS, see: DQR Admin: Setting A PACS Availability Schedule