Visits and Protocols Plugin
Table of Contents
Introduction
A study protocol is ready when the objectives, design, method, assessment types, collection schedules for a study are defined. A study, longitudinal or otherwise, in XNAT maps to a single XNAT project or many XNAT projects (if it is a multi-site study). A study protocol could include one or more visits for the participant. At the time of a visit, the participant (subject) possibly fills out some forms and undergoes one or more tests (experiments). As subject enrollment for the study (project) commences, it becomes imperative that the collected data is organized suitably, that the collection schedules are followed and that it is possible to monitor the progress with respect to available and missing data in the study. The XNAT Visit and Protocol (V&P) plugin facilitates tracking these aspects for a study.
Features of V&P Plugin
The XNAT V&P plugin enables:
- defining the project protocol requirements,
- organizing data acquired for a subject into visits,
- creating visit specific naming conventions for a data type,
- enforcing data acquisition within a defined schedule,
- monitoring the missed visits or deviations,
- visualize project progress,
- automatic upcoming/overdue/missed visit email notifications,
- share protocol definition.
Deploying the V&P Plugin
In order to deploy the V&P plugin, include the plugin jar file in your XNAT plugins folder and restart tomcat (More details on how to deploy a plugin are available here).
Setting up the V&P Plugin
Setting up the V&P plugin for a project is a two step process. First, the Site Administrator defines a protocol. The project owner then applies the appropriate protocol to the project.
Defining a protocol
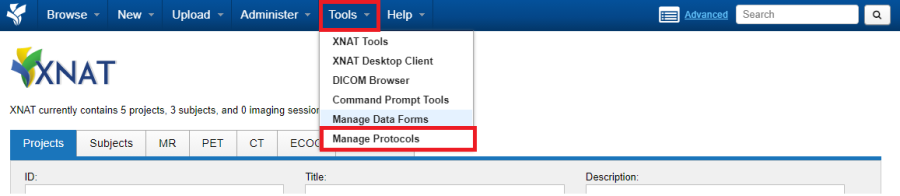
As site administrator navigate to Tools -> Manage Protocols -> Start New Protocol
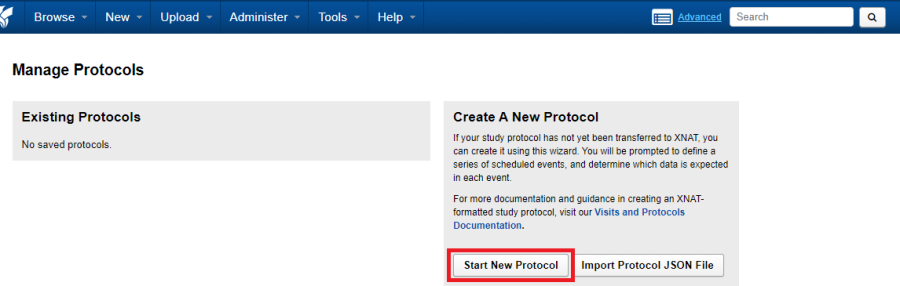
Creating a new protocol
Assign a name to the protocol. As the protocols are available to any project within the XNAT instance, the name assigned to the protocol must be unique
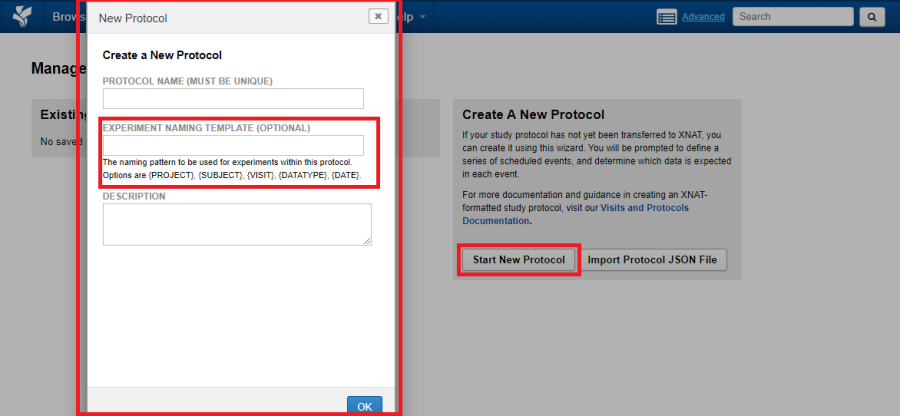
Provide an optional naming pattern for any experiment uploaded into the protocol. You could use the following patterns:
- {PROJECT}
- {SUBJECT}
- {VISIT}
- {DATATYPE}
- {DATE}
For example, if an experiment naming template for a protocol is defined as:
{SUBJECT}{DATATYPE}{VISIT}
and an MRI experiment is uploaded for a Subject identified as S1 for the Baseline Visit, BL, the experiment would be named automatically by all the upload methods as:
S1_MR_BL.
The above naming pattern helps in organizing data based on datatype and visit. The naming pattern can help making decisions while executing analysis workflows.
Setup protocol schedule options
Once a name has been assigned to a protocol, the next step is to set the protocol schedule options. These options include configuring:
- if Unexpected experiments are allowed in a visit,
- if Unexpected Visits (Ad Hoc) are allowed,
- Should all data for a visit be completely captured before data for the next visit is allowed to be uploaded,
- Should deviations be allowed for missing data.
We will now walk through each of these options and their implications:
Allow Unexpected Experiments in Visits

This option lets you add an unexpected experiment to any of the defined visits. However, these experiments will not show up in expected visit reports or project summary dashboards. The only way to access such experiments from the project report tab is to use the datatype specific tab. On the subject report page, such experiments are grouped under Unsorted Experiments. By not allowing any unexpected experiment only the required experiments can be added into the visit and hence the visit data rule is more stringent. The default value for this option is false.
Allow Unexpected (Ad Hoc) Visits Other Than Terminal Visit
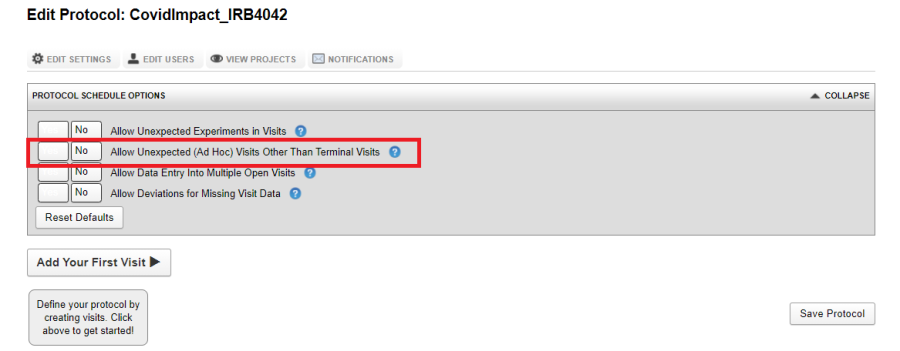
A visit is deemed as terminal if the subject either withdraws from the study or passes away. The V&P Plugin always allows a Terminal Visit. If some data is acquired for a subject during an unscheduled visit (that is, a visit which is not part of the protocol definition), in order to save data for an unscheduled visit, set Allow Unexpected Visit Other Than Terminal Visit. Such events will also show up in visit reports and project dashboards. An ad hoc visit can allow any valid data type.
Note: "Allow unexpected experiments" must be allowed if Ad Hoc visits are to be allowed.
Allow Data Entry Into Multiple Open Visits
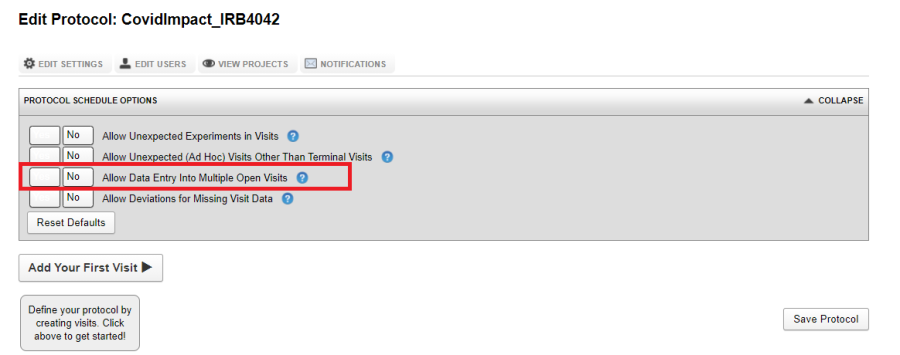
By default, unless a visit is closed, that is, all required data is uploaded, the next visit cannot be opened. By setting Allow Data Entry Into Multiple Open Visits to Yes, data can be uploaded to multiple open visits at the same time.
Allow Deviations for Missing Visit Data
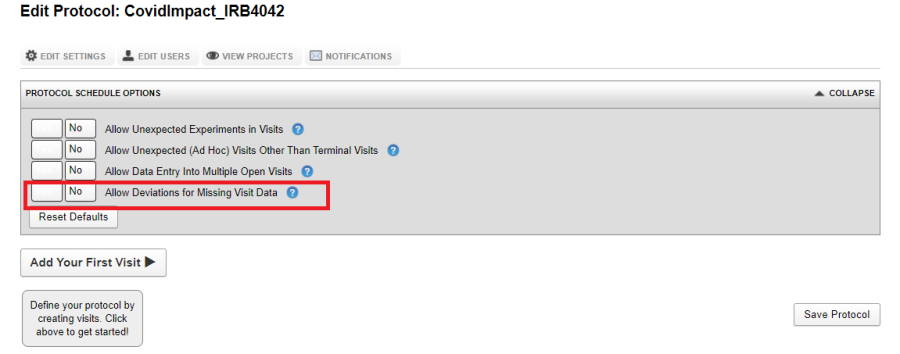
By setting this option to Yes, your protocol will allow deviations for otherwise required missing experiments. Setting a deviation will require the user to input a deviation explanation which is stored with the visit for future reference and will show up on project reports and dashboards. If this is not checked the default behavior requires that all expected experiments for a visit be fulfilled before the visit can be closed.
Defining Visits within a protocol
Click on Add Your First Visit.
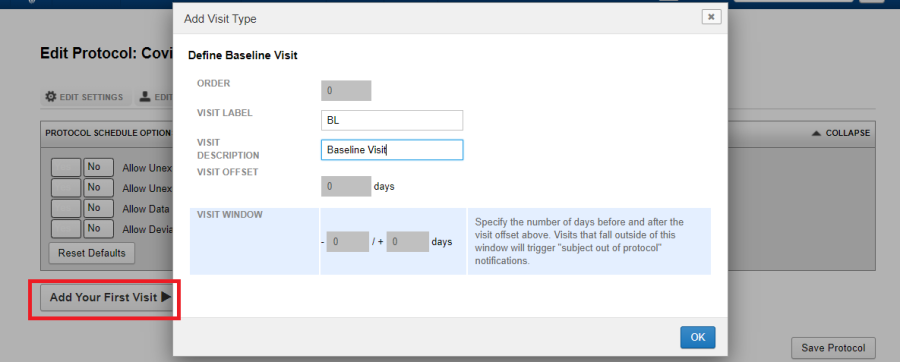
The first visit would be a baseline visit. Hence its order is zero. In case there are more visits in the protocol, the order would be the next number in the sequence. Define the parameters:
- Visit Label: The label for the visit. This label will be used if you are using the optional naming pattern and also will be used on the project dashboard (report page).
- Visit Description: A short description for the visit.
- Visit Offset and Visit Window: The default values can be left as it is. More on impact of these values in the following sections.
Define experiments within a Visit:
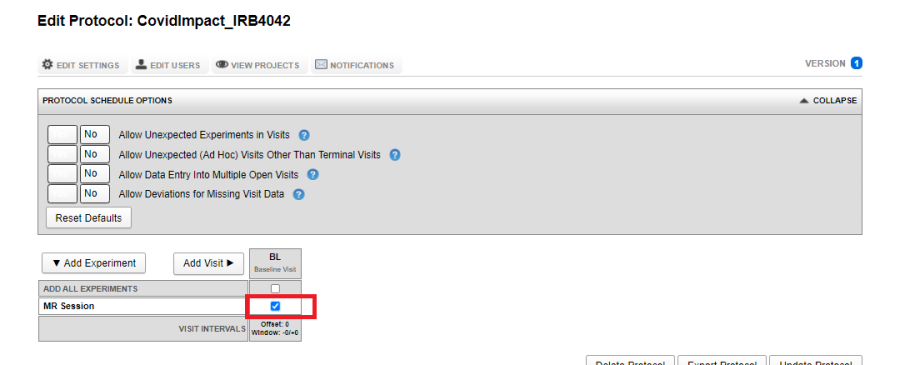
A subject is expected to undergo tests during a visit. These could be non-imaging (such as psychometric tests) as well as imaging (an MRI Session or a PET Session). By default, V&P Plugin displays a MR Session, Auto QC and CT Session as the expected experiments to be captured during a subject visit. Select the experiments as required by clicking on the checkbox in the Required Column.
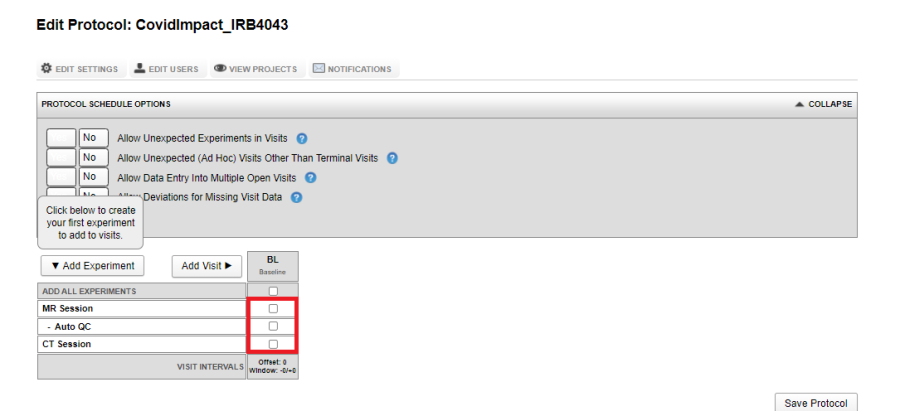
If you want to remove any of the prefilled experiments, hovering over the row display the delete icon.
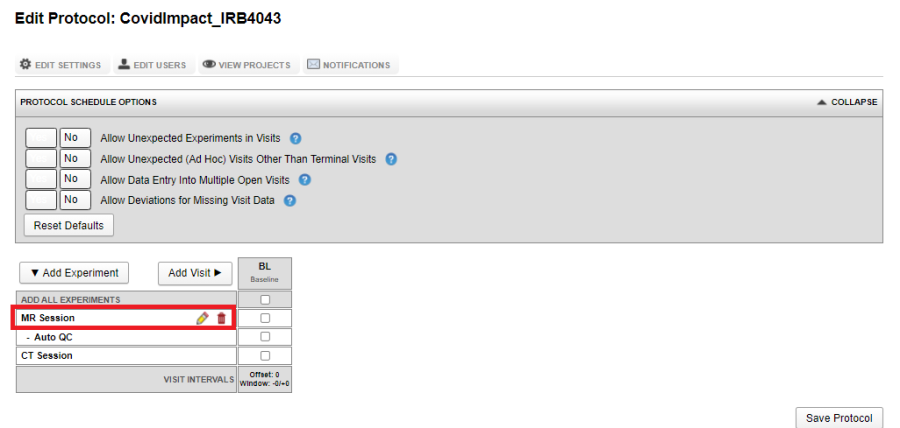
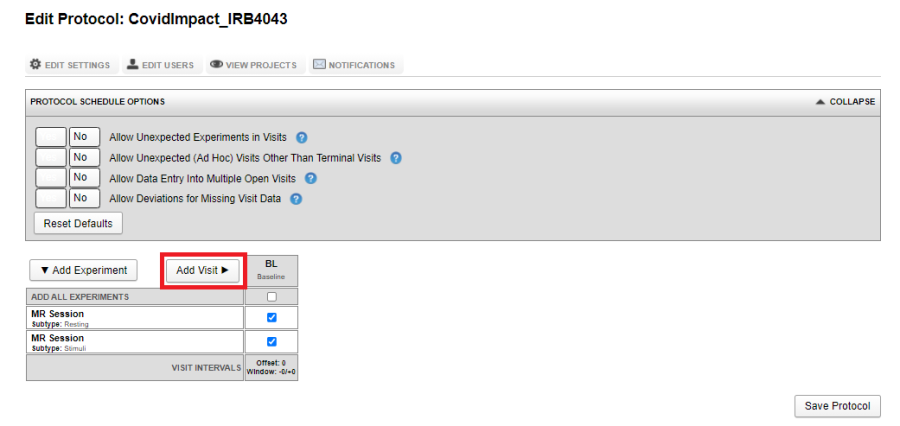
The image below shows a visit with only an MR Experiment as required:
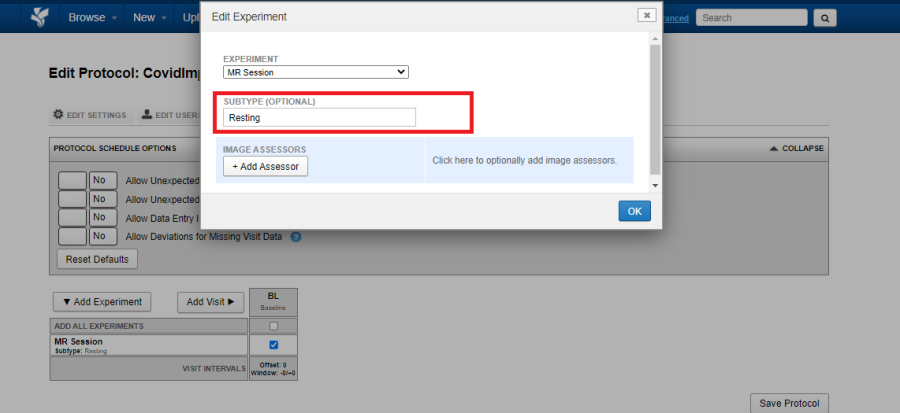
If you want to acquire multiple experiments of the same type within a single visit, say two MR Sessions: one resting state and one with stimuli, click on the Edit Icon (Pencil icon in the image above) and assign a Sub-type.
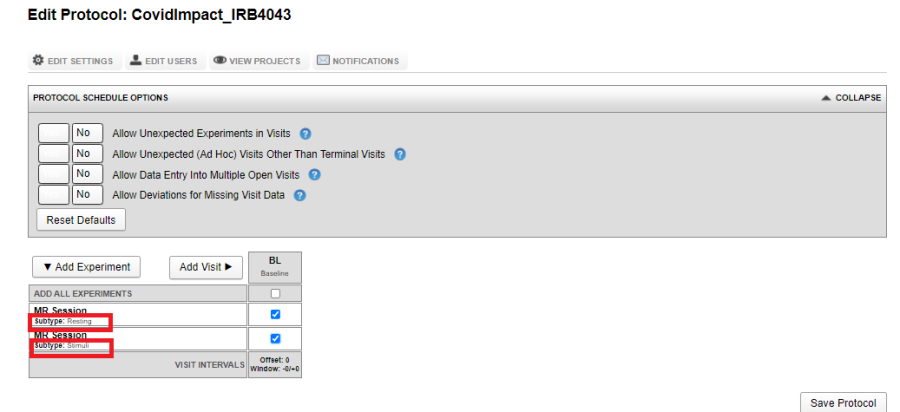
The image below shows a visit which has two MR Experiments marked required: a Resting subtype and a Stimuli subtype.
Creating additional visits
To create an additional visit, click on Add Visit.
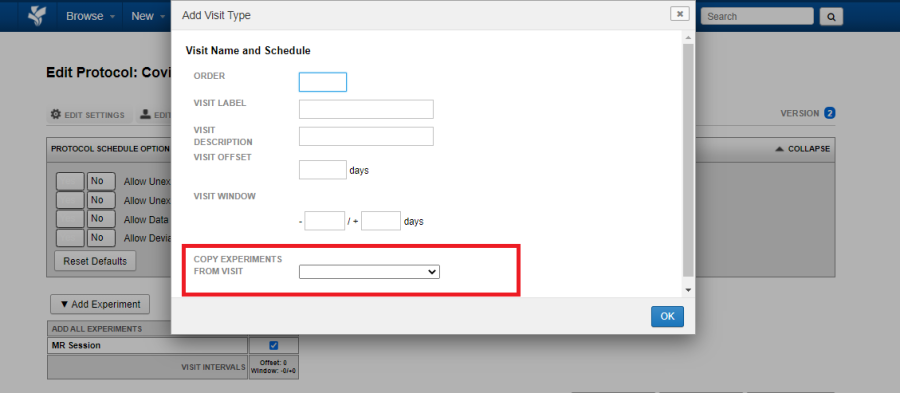
You must define the order for the new visit. This is a numeric value defining the sequence, hence an order of visits. As in the case of the Baseline visit, enter the visit label and the visit description.
- Visit Offset: Specify the number of days since the subject's first visit that this visit should occur. This is the visit interval.
- Visit Window: Specify the number of days before and after the visit offset above. Visits that fall outside of this window will trigger "subject out of protocol" notifications.
If the new visit is expected to have the same set of required experiments in a previous visit, use the Copy Experiments From Visit to select the appropriate visit.
Impact of Visit Offset and Visit Window
The Visit Offset and Visit Window enforce scheduling. Consider an example, as part of your protocol, let us say that there are two visits: a baseline and a six month follow-up. In this case, the baseline would be acquired on Day 0 and the visit offset would be 180 days. To allow subject to visit on day 175 or day 190 since the baseline visit, use the Visit Window setting. A visit window value of -5/+10 days implies that data acquired for a subject between days 175 and 190 days since baseline visit adheres to the protocol. See the following table for more illustration.
Visit 0: Baseline | ||||
Visit Window | Subject | Visit 0: Opening Date (mm/dd/yyyy) | Visit 1: Opening Date (mm/dd/yyyy) | V&P Trigger |
|---|---|---|---|---|
-0/+0 | S1 | 09/01/2021 | 10/01/2021 | Not allowed before the visit offset |
-0/+0 | S1 | 09/01/2021 | 04/01/2022 | Not allowed after the visit offset |
-0/+0 | S1 | 09/01/2021 | 02/28/2022 | Allowed on day 180 since baseline |
-5/+10 | S1 | 09/01/2021 | 03/01/2022 | Allowed within 175 to 190 days since baseline. |
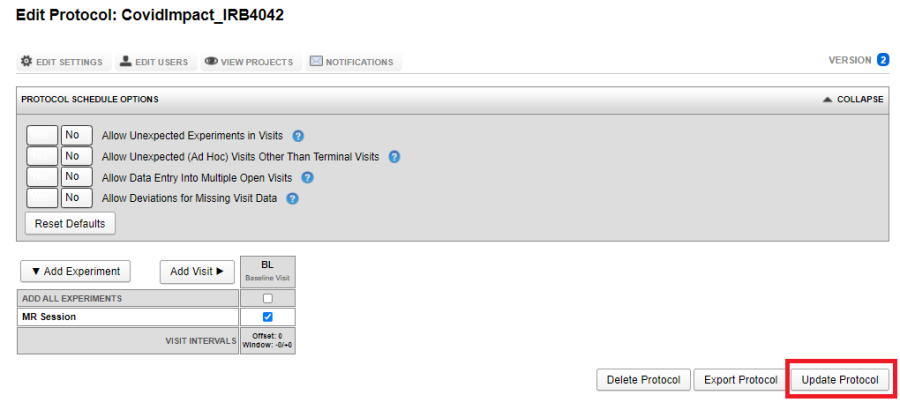
Saving a protocol
Once the visits are defined, click on Save Protocol
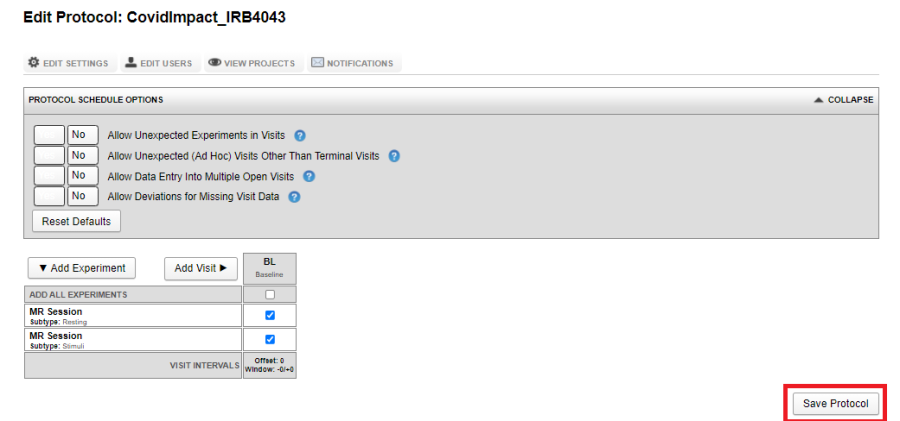
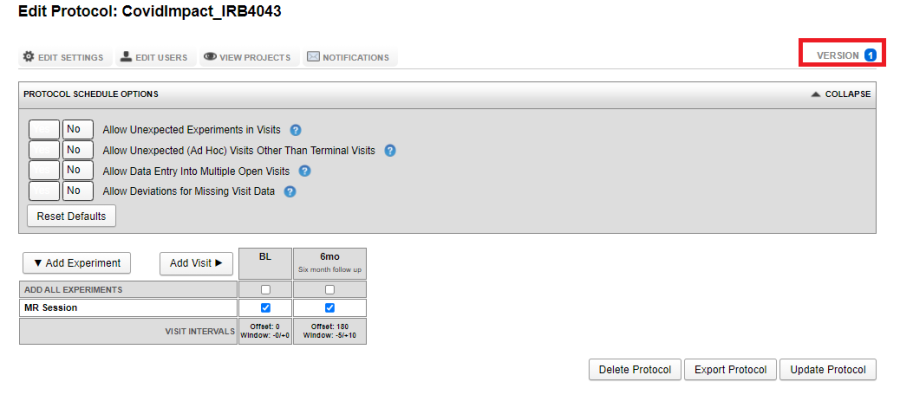
Once a protocol is saved, it is assigned a version. More on impact of version of a protocol in the following sections.
Viewing all protocols for a site
As site admin, navigate to Tools -> Manage Protocols. The left panel displays all the protocols and their latest versions.

Applying protocol to project(s)
Once the protocol is saved, there are two ways a protocol could be assigned to project(s).
Option 1:
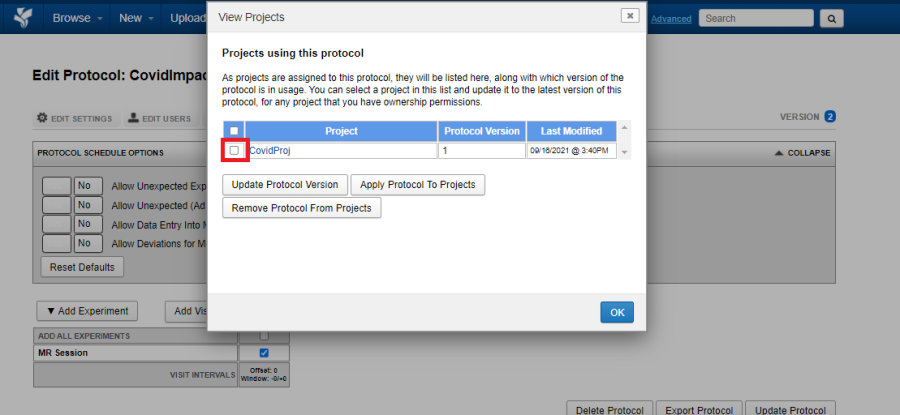
- As site admin, immediately after saving the protocol, click on Update Projects.
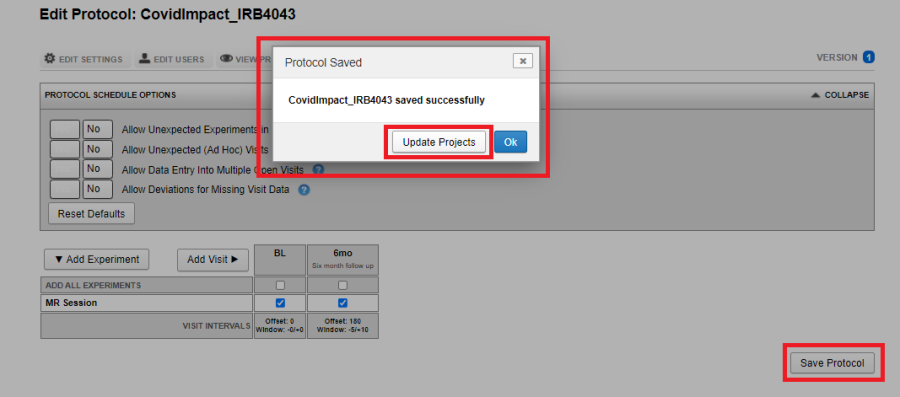
- Select the projects to which the protocol should be applied and click OK.
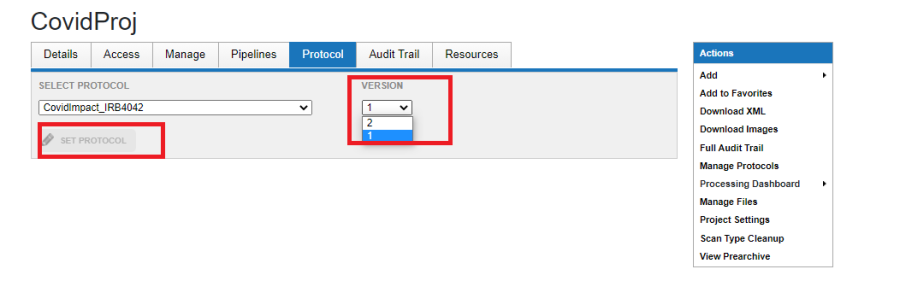
Option 2:
- As project owner, navigate to the project and click the Protocol Tab
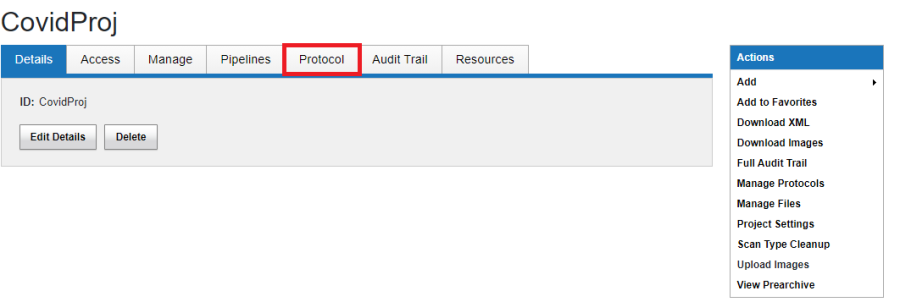
- Select the appropriate Protocol and Version.
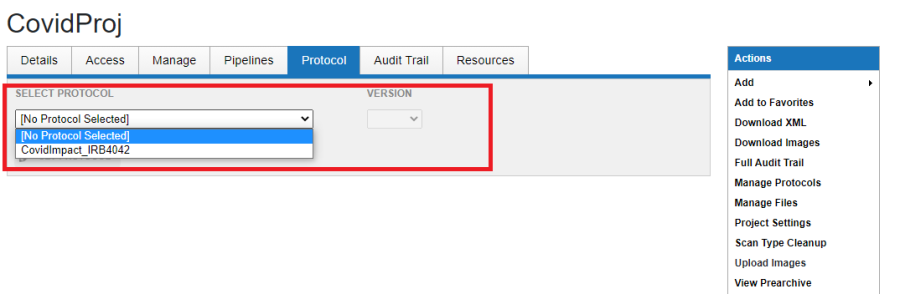
- Click Set Protocol as shown below.
Editing a protocol
As Site Admin navigate to Tools -> Manage Protocols. Click on the protocol you want to edit. After making the necessary changes, click on Update Protocol. This will result in a new version of the protocol to be created. Go through the process of selecting the projects to which the updated protocol should be applied.
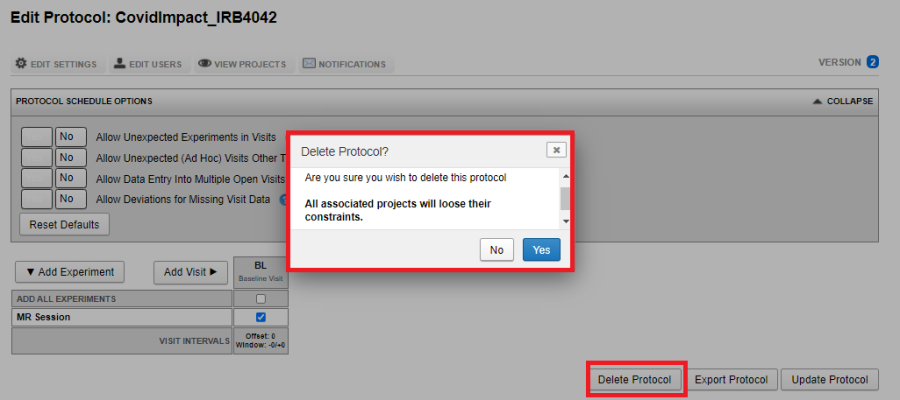
Deleting a protocol
As Site Admin navigate to Tools -> Manage Protocols. Select the protocol you want to delete. Click on Delete Protocol. Deleting a protocol from the site will result in all protocol related constraints to be removed on the project. The data in the project will not be affected.
Additional protocol settings
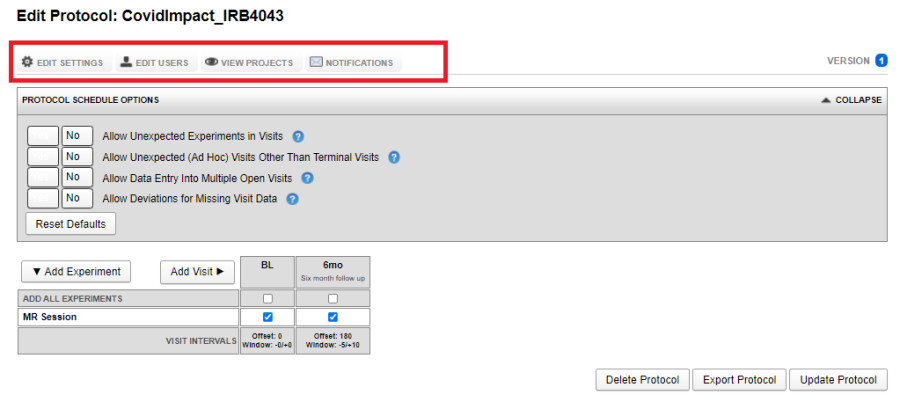
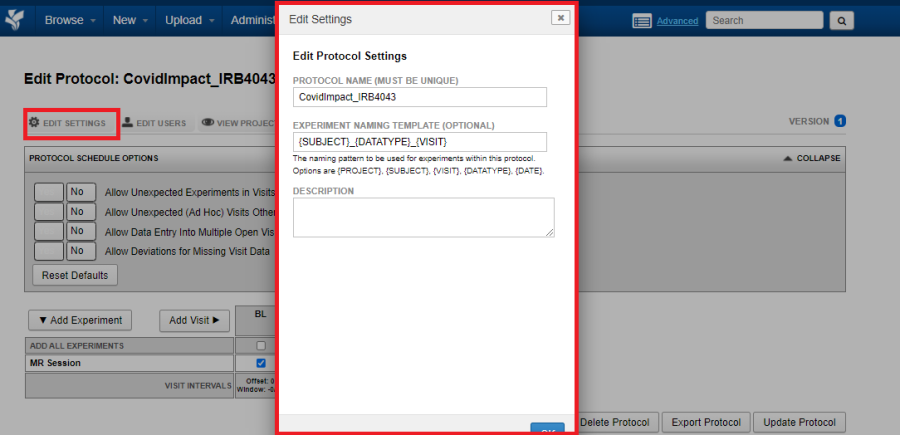
Edit Settings
Click on Edit Settings to edit the protocol name, naming pattern or the protocol description
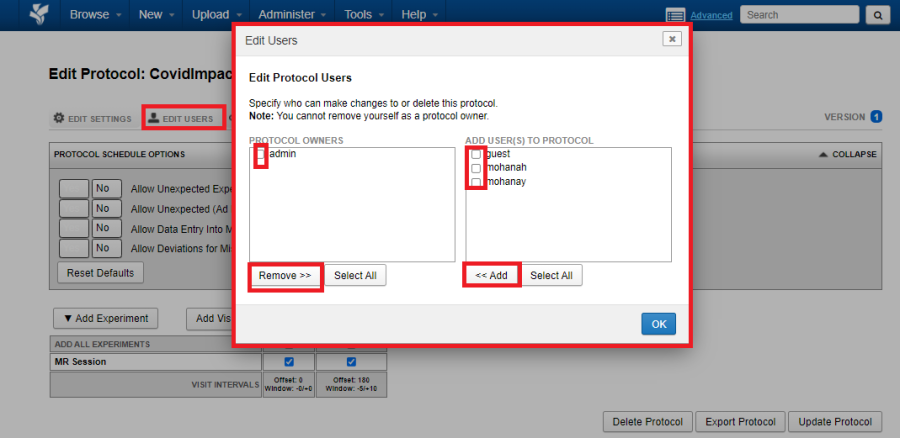
Edit Users
As a site admin, use the Edit Users tab to empower selected users to edit or delete a protocol.
View Projects
Click on the View Projects tab to view the projects to which the protocol is applied.
Notifications
The V&P Plugin can be configured to send email notifications closer to a Visit window or when a visit is missed or overdue. Provide a comma-separated list of email ids to which the notification should be sent.
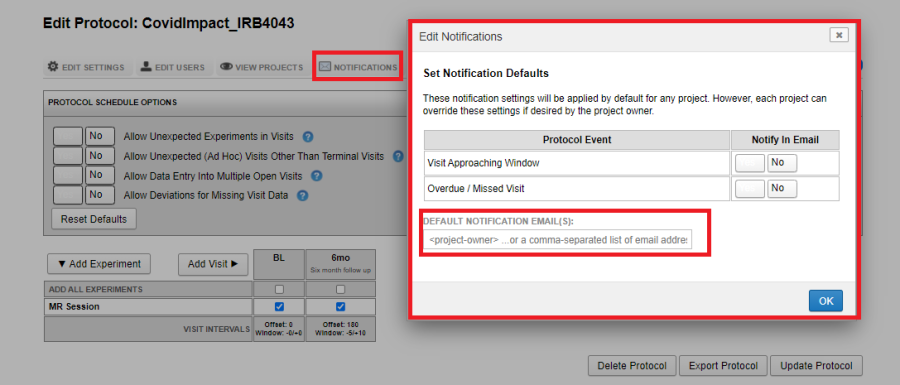
Emails are sent to the configured email ids on the 1st and the 15th of every month at 5am.
When the Visit Approaching Window option is selected, an email listing the subjects whose visits need to be scheduled within the next 30 days from the 1st and the 15th of the month is sent.
When the Overdue / Missed Visit option is selected, an email listing the subjects whose visits are overdue or missing is sent to each recipient.
An XNAT user does not have to be created with each of the notification email ids.
The status of a visit for a project can also be obtained via a GET to /data/projects/{PROJECT_ID}/visit/report which returns the following JSON:
Tracking project progress
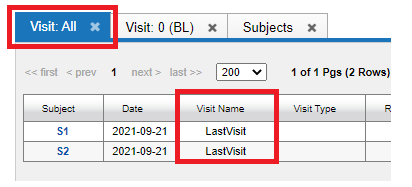
For a project that is configured to adhere to a protocol, the project report page shows the overall progress of data acquisition as shown below. Visit Tabs are available to provide different perspective of the available data. The "Visit All" tab contains data information across all the visits within the protocol. The Visit 0 (BL) lists the data acquired for Visit 0, which in the protocol used is labelled as BL.
In the image shown below, the project "CovidProj1", for the Baseline Visit is expected to have a Resting MR Session, a CT Session and a Gaming MR Session. The + sign indicates that the MR Session for Subject S1 has not been uploaded. Data can be uploaded by clicking on the We can upload data by clicking on the + sign. Note: Only when the visits which are open for at least one subject are shown in the visit tab.
![]()
The visit tab for a project which has two visits in a protocol could look like the following image.
![]()
This shows that the Subject S1191 has for Visit 0, labelled as V1 (the baseline), has the required MR Session, CT Session and needs the ECOG Session. The following image shows the Visit All tab:
![]()
The AdHoc visit "MR" is shown under Visit Name.
Sharing a protocol
Behind the scenes, a protocol is defined in JSON. The JSON description of a protocol can be imported and exported.
Exporting a protocol JSON
To export a protocol, navigate to Tools -> Manage Protocol. Select the protocol and click on Export Protocol, choose appropriate location to save the JSON file.

Importing a protocol JSON
To import a protocol JSON, navigate to Tools -> Manage Protocols and click on Import Protocol JSON File. Proceed to select the file and save the protocol.

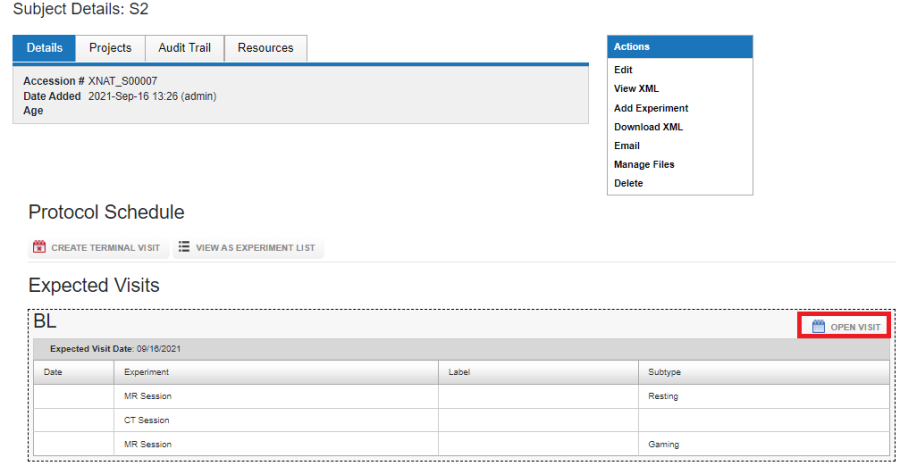
Protocol, Project and Subject
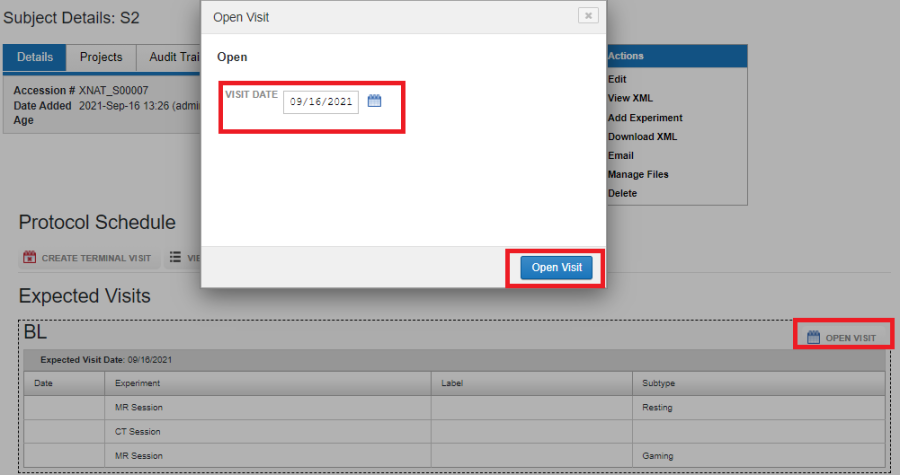
For a project that conforms to a protocol, users can upload data for a subject and a visit from the Subject report page. First, open the required visit by clicking on OPEN VISIT.
Opening a Visit
Once a visit is opened, enter the date of the visit and click on Open Visit
Uploading data into a Visit
Now that the visit is open, data can be uploaded into the visit by clicking on the + sign.
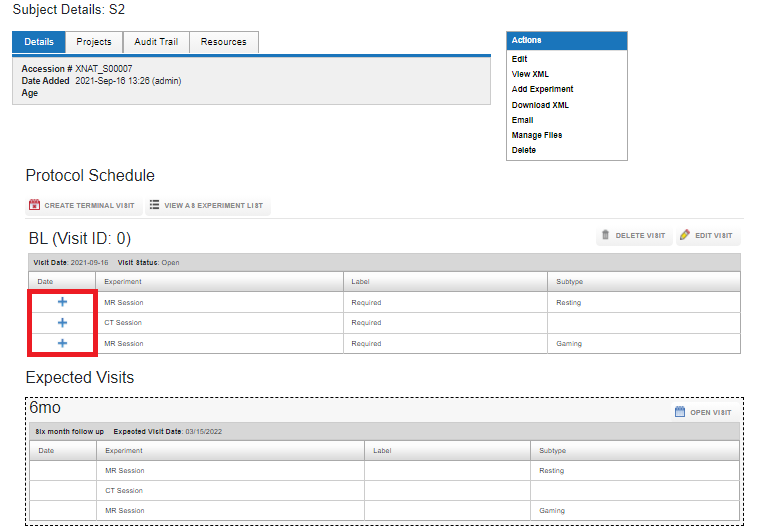
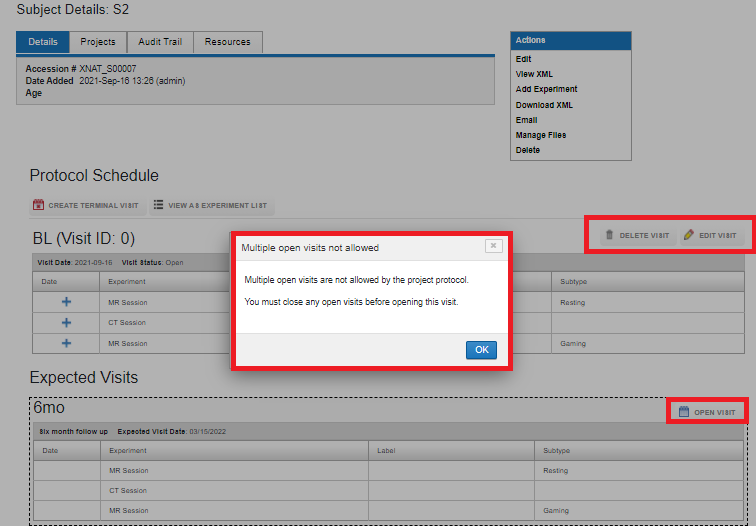
You cannot have multiple open visits, unless the protocol allows it (if "Allow Data Entry Into Multiple Open Visits" is set to Yes in the protocol setting).
After all the required data for a visit is uploaded and the visit is closed, the next visit can be opened.
Uploading data into the next visit
Upload all the required data for a Visit. Close the Visit and open the next visit.
Deviation in a visit
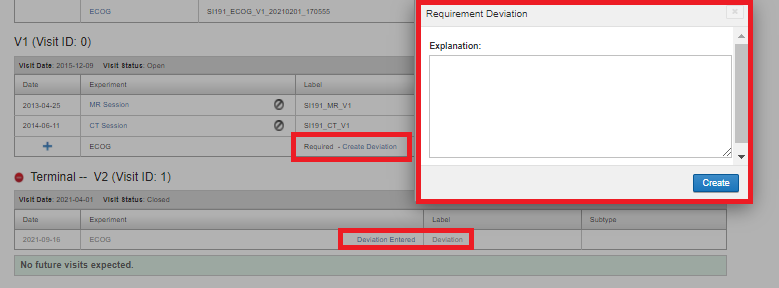
If for some reason, it is not possible to acquire a required experiment and the setting "Allow Deviations for Missing Visit Data" is set to Yes in the protocol definition, one can mark the requirement as a deviation. Click on Create Deviation, Enter the explanation for the requirement deviation and click Create. A deviation would then be listed as "Deviation Entered" as shown below. Clicking on the Deviation Entered would show the deviation explanation.
Delete a visit
Click on Delete visit to delete a visit

Reopening a Visit
For a closed visit, click on Reopen Visit to add/modify data in the visit.

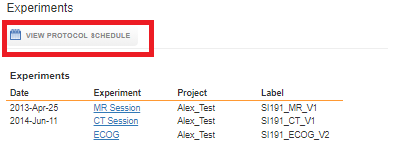
Viewing experiments without visit information
There are two perspectives available to view the acquired data for a subject: Viewing as per the protocol schedule or viewing as an experiment list. To see the experiments without protocol information, click on View as Experiment List.
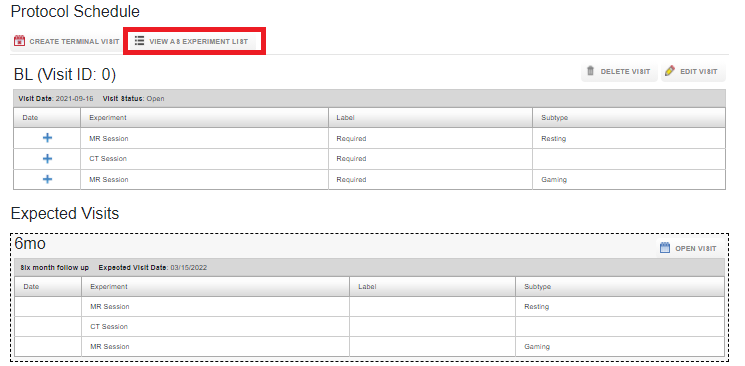
To toggle back to the protocol schedule view, click on View Protocol Schedule.
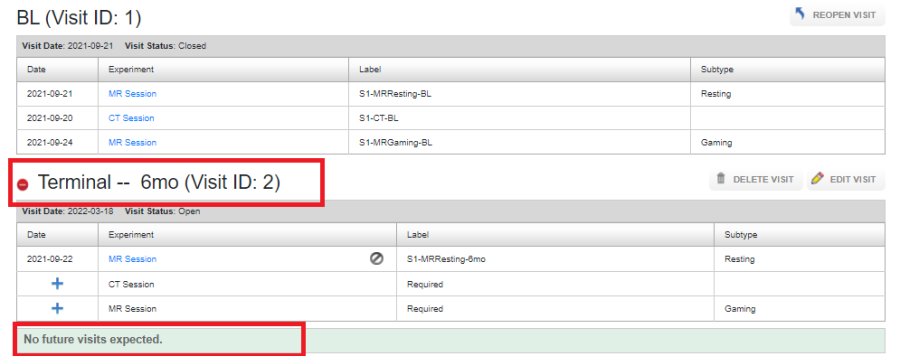
Creating a terminal visit
A "Terminal Visit" is considered the last visit in a protocol for a given subject. This may happen on a schedule, or because the subject is no longer participating in the study and no more data can be collected. The last visit in a protocol is automatically marked as Terminal, as shown below:
If Ad-Hoc visits are not allowed within a protocol, a new visit can be created and can be marked as Terminal.
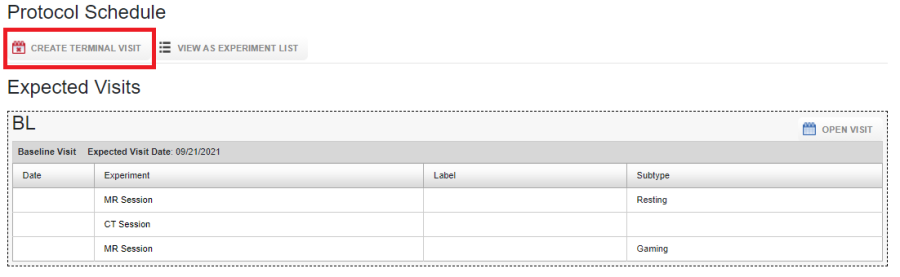
To create a terminal visit, click on Create Terminal Visit, enter the date of the visit.
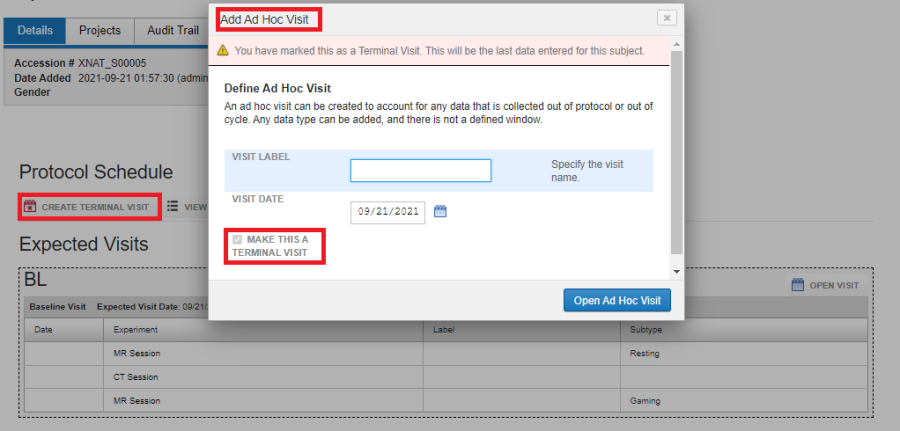
The visit is automatically marked as a terminal visit.
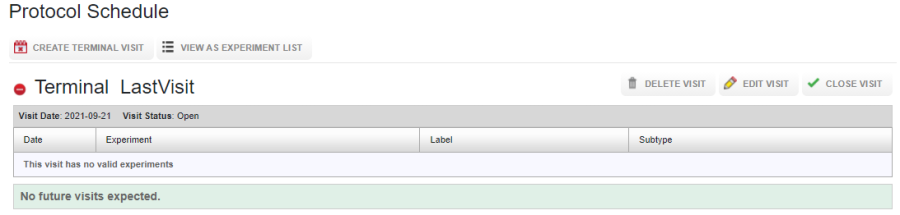
Terminal visits can be viewed under the Visit(All) tab on the project report page.
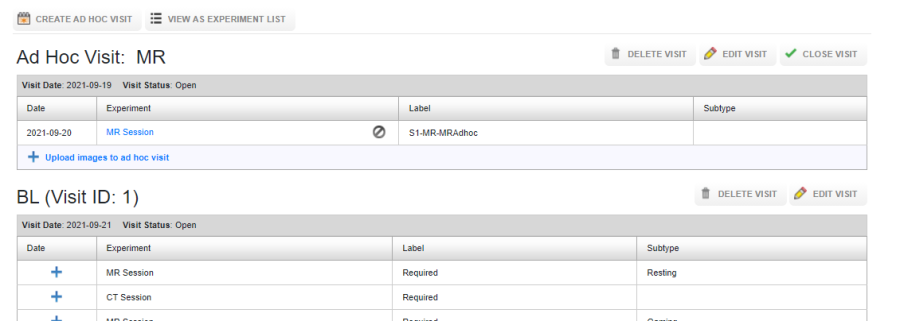
Creating an Ad-Hoc visit
Users can only create Ad Hoc visits if "Allow Unexpected (Ad Hoc) Visits Other Than Terminal Visit" is set to Yes in the protocol definition.
To create an Ad-Hoc visit, click on "Create AD-HOC Visit" beneath the Protocol Schedule header. Enter the Visit Label, Visit Date and if required check "Make This a Terminal Visit" and click on Open Ad Hoc Visit.
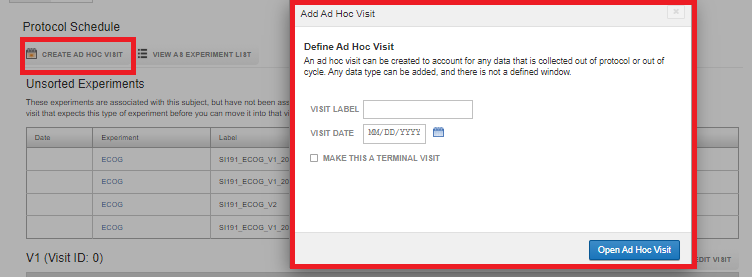
Once the visit is created, you can upload experiments into the ad-hoc visit. The constraint on the visit date and the date of the experiment uploaded into the ad-hoc visit are not imposed. As shown in the image below, the date of the ad-hoc visit is 2021-09-19 whereas the date of the experiment in the Ad-Hoc visit is 2021-09-20.
Uploading an unexpected experiment
Adding unexpected experiments to a subject can only be done if "Allow Unexpected Experiments" is set to "Yes" in the protocol definition
If unexpected experiments are allowed in your protocol, any experiment can be uploaded for a subject. Such unexpected experiments are grouped under Unsorted experiments as shown below:

Unexpected experiments are not listed under any of the Visit tabs on the project report page. The only way to access the information about the experiments from the project report page is to use the datatype specific tab on the project report page, as shown below:
