XNAT-DICOM Gateway
When to use
Use XNAT Gateway to query XNAT for DICOM images from a DICOM viewing workstation. You can install the Gateway locally and connect to it as to any other DICOM server. DICOM requests are translated into XNAT requests, and the result is returned over DICOM networking protocol.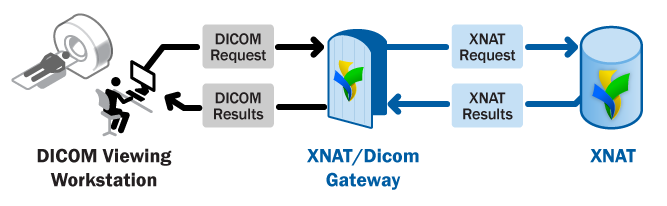
Consult the XNAT/DICOM Gateway User Manual for more details on features and capabilities.
Download XNAT-DICOM Gateway (All Versions)
https://download.nrg.wustl.edu/pub/xnd/download/gw/
Installation: Windows
Under Windows, Sun/Oracle Java 1.6+ is required. Alternatively , you can choose the install version with Java included.
Basic version, no Java included (~5MB): gatewaysetup.exe
Version with 32 bit Java included (~20MB): gatewaysetup-jre32.exe
Instructions: download and run the file, then follow the prompts.
Note: for now, please install to a location without spaces (i.e. not the default location), e.g. C:\Gateway. Gateway doesn't run properly from location that contains spaces; this is a bug in the current version.
Installation: Linux
Linux comes with different Java flavors, but we recommend using Sun/Oracle Java 1.6+. Try bundled Java package if you encounter unexpected behavior with default Java VM.
Download one of the following archives:
Basic version, no Java included (~5MB): Gateway.Linux.zip
Instructions: dowlnoad and unzip. In the command prompt, cd to the application directory and run the command:
#run using graphical interface mode:
./server_gui.sh

#run in console mode
./server_console.sh
Installing XNAT Gateway as a Linux service
(steps courtesy of Haofei Feng from the University of Sydney)
Step 1. Create a file at /usr/lib/systemd/system/xnatgateway.service
[Unit] Description=XNAT DICOM Gateway [Service] WorkingDirectory=/srv/XNATGW2019 ExecStart=/bin/java -Xms128m -Xmx2g -cp "./dist/gatewaye.jar:./dist/lib/commons-codec-1.3.jar:./dist/lib/commons-httpclient-3.1.jar:./dist/lib/commons-io-1.4.jar:./dist/lib/commons-lang-2.4.jar:./dist/lib/commons-logging-1.1.1.jar:./dist/lib/dcm4che.jar:/lib/dcm4che-audit-2.0.21.jar:./dist/lib/dom4j-1.6.1.jar:./dist/lib/jai_imageio_api.jar:./dist/lib/log4j-1.2.15.jar:./dist/lib/xdat-beans-1.0.jar:./dist/lib/xnd-beans.jar" org.nrg.xnat.gateway.XNATGatewayServer c User=root Type=simple RestartSec=10 [Install] WantedBy=multi-user.target |
(1) The XNAT Gateway files will be extracted to /srv/XNATGW2019
Step 2. Create a soft link in the /etc/systemd/system/multi-user.target.wants/xnatgateway.service
[root@XXX]# ln -s /usr/lib/systemd/system/xnatgateway.service /etc/systemd/system/multi-user.target.wants/xnatgateway.service [root@XXX]# ls -ltr /etc/systemd/system/multi-user.target.wants/ |grep xnat lrwxrwxrwx. 1 root root 43 Mar 19 22:37 xnatgateway.service -> /usr/lib/systemd/system/xnatgateway.service |
Step 3. Run the below command to reload and start the service
[user@] sudo systemctl daemon-reload [user@] sudo systemctl start xnatgateway [user@] sudo systemctl enable xnatgateway |
Installation: Mac OS X
Mac OS X provides (as of now) their own Java VM implementation, please update your Java VM if the version is below 1.6.
Mac OS X installation: Gateway-MacOS.zip
Instructions: download and double-click the setup file.
Configuring OsiriX to connect to XNAT Gateway
After following the standard installation and configuration instructions for the XNAT Gateway, you'll need to follow these instructions on getting Osirix configured to speak with the XNAT Gateway.
Getting Started
After running for the first time, you will be presented with the initial configuration screen. For further information, please refer to the online manual.