Step 1 of 10 Creating an XNAT plugin project
Goal
Create the basic structure required to build and expand your XNAT plugin project.
For XNAT 1.7, we provide support for creating plugins using the Gradle build tool. Gradle is a command-line build tool similar to earlier build tools like Ant or Maven, but provides a more easily accessible build model, can be easily extended through the use of its own plugin architecture, and is widely supported by most modern development tools.
The word "plugin" can get a lot of usage in a lot of different contexts:
- XNAT plugins are collections of code, displays, and properties that allow you to extend the functionality of XNAT. We're adding functionality to XNAT by writing an XNAT plugin in this practical session.
- Gradle plugins are extensions to the Gradle build tool that let you use it for additional functions. XNAT provides a Gradle plugin that processes data-type schema and generates Java code and other resources during the build process.
- Many IDEs have plugins that can be installed (and often come installed by default) to provide extra functionality. Both IntelliJ IDEA and Eclipse have plugins that integrate Gradle build projects into the development environment.
Generically these functions are very similar: plugins allow tools to expand beyond their core set of functions. Understandably, which type of plugin is being discussed in a particular situation can be very confusing. We'll try to make it clear the context in which we're using the term when it becomes ambiguous.
To get started, create a folder where your plugin development will go, then change your current directory to that folder.
Once you're there, there are–theoretically anyway–a few ways you can start your new plugin project:
- Copy an existing project
- Initialize a new Gradle project
- Create a new project with your IDE
However, given the requirements for building XNAT plugins, it's easiest to simply copy an existing project. Or, at least, copy the build files from an existing project.
If you want to copy over an existing plugin project, start with the XNAT workshop plugin project (which is basically the end result of what you'll create through the steps of this practical session). Once you've copied this repository to your new project, delete the folders src and .git (if you downloaded the project instead of cloning it with Git, you may not have the .git folder). This will leave you with something like this:
$ ls
LICENSE.txt      README.md        build.gradle     gradle/          gradlew*         gradlew.bat      settings.gradle
These files can all be useful to you for your new plugin:
- LICENSE.txt and README.md are of course particular to the project from which you copied them, but can be adapted to the licensing and documentation for your own project. We won't discuss these files any more within this context (you can of course delete them if you'd like!).
- The gradlew and gradlew.bat scripts–gradlew for Linux and OS X and gradlew.bat for Windows– and the gradle folder compose the Gradle "wrapper". The gradle folder contains a bootstrap library that tells the scripts how to download the required libraries to run Gradle. That is, with the Gradle wrapper you don't need to install Gradle to use it as a build tool!
- build.gradle and settings.gradle define the build project, including its name and version, any libraries or tools required to build it, what build operations should be run, and so on. Much of what is in the workshop plugin project will be included in your new plugin as well.
The build.gradle and settings.gradle files are attached to this page, so you can just download those and copy them into your new project folder.
As discussed above, copying the workshop project provides you with the bootstrap wrapper and scripts. This takes the place of installing Gradle separately on your system. If you are starting with just the build files, you'll need to install Gradle on your system and have the gradle command available on your system path.
Once you have these files in place, start by editing settings.gradle. This file can be very important in Gradle builds, especially multi-project structures, but for a basic project usually just contains the name of the primary build target for the project. The workshop plugin's version of this file contains the following text:
rootProject.name = 'xnat-workshop-plugin'You should change this to another name, e.g. my-workshop-plugin or something similar, to distinguish it from the prepared workshop plugin project.
The build.gradle file contains a lot of information and does a lot of important work. However, describing the full scope of the Gradle build tool and all of its configuration options is beyond the scope of this practical, since it would basically become a description of Gradle. As such, this page discuss in detail only those parts that are of direct interest and gloss over the rest. If you have a question about a particular aspect of the build file that's not addressed, feel free to ask a member of the XNAT development team or leave a comment on this page and we'll do our best to respond.
It's also worth noting that, as the XNAT 1.7 build process matures, much of the configuration that's currently required will be implemented through custom build logic, so future versions of XNAT plugin build files should hopefully be more compact and simpler.
Now let's look at build.gradle. There are a number of interesting parts of this file:
- The first few lines of this file define the group and version for your project. In conjunction with the rootProject.name from the settings.gradle file, these three attributes make up the primary distinct identifier for your plugin. You should use something meaningful for each of these values. The group value is usually based on your organization and primary development effort. For the workshop plugin, we've chosen to use the XNAT identifier–org.nrg.xnat–in conjunction with a special project identifier for the workshop, giving us org.nrg.xnat.workshop. Combined with the project name, it's easy to identify this as a project for an XNAT plugin written for the XNAT workshop. The version of course helps distinguish different releases of your plugin.
- The buildscript block defines resources required by the build file itself. This can get a little confusing, but this basically tells the Gradle application where to find libraries and which libraries to find for the build script, especially those that define Gradle plugins. You'll notice that there are two repositories in here that contain the string nrgxnat. These are XNAT's own repositories that host a number of libraries published or hosted by XNAT.
- The apply plugins block specifies which Gradle plugins should be included for this project. In this case, the java plugin provides support for that language, the maven and maven-publish plugins provide support for accessing and publishing to Maven repositories, and the idea and eclipse plugins provide tools for integrating the Gradle project into each respective IDE. There's one more plugin though and that's the most interesting one for our purposes: xnat-data-builder. If you've ever worked with earlier versions of XNAT, this plugin does much of the work previously done by the XNAT builder process, including parsing XNAT data-type schemas and generating Java code, Velocity templates, display documents, and more.
- The repositories block specifies repositories that can be searched for dependencies required by this project (note the contrast between this and the one in the buildscript block, which defined dependencies for this project's build process). Again, you'll see the two XNAT repositories in this list.
- The sourceCompatibility and targetCompatibility settings specify that the Java code uses the Java 7 code specification and should produce Java 7-compatible code. XNAT 1.7 is written using Java 7 specifications and compiled to Java 7-compatible code and is currently known to be incompatible with code compiled to Java 8 specifications.
- The configurations block defines a number of so-called transitive dependencies–dependencies that are not required directly, but are required by other dependencies–that are excluded from the build. Currently XNAT still uses a number of older frameworks that themselves have older dependencies, some of which can cause conflicts and others that just aren't used and take up space. These exclusions keep many of these older dependencies out of the build.
- The dependencies block defines libraries required by your plugin. These can include any kind of valid Java or JVM-compatible library.
- The sourceSets block defines the various folders that contain source code to be compiled when the Java compiler executes. For a standard Java project this isn't necessary, but, if you include XNAT data-type schemas in your plugin, the xnat-data-builder plugin generates two main Java code bases from those, generated and beans. We'll discuss the code generated here more later when we look at adding data types to your plugin.
- The clean block modifies the standard clean task to set up the folders defined in the sourceSets block so that they're cleaned (i.e. deleted) when the clean task is run.
- The beanJar task defines an output library to be built that contains only a few particular packages.
- The artifact task redefines the standard build assembly task so that the library defined by the beanJar task is also built.
That's a lot of information, but once you have your main build file set up, you'll rarely need to change much more than the dependencies as you add new functionality that requires other supporting libraries. For your first few steps at customization, you won't need most of what's specified in the dependencies block here, but eventually you will, so go ahead and leave them in.
If you started with the XNAT workshop module project, you'll already have the Gradle wrapper as part of your project. If you just copied the build files, you should go ahead and create your own Gradle wrapper (as noted earlier, this requires having Gradle installed and accessible on your system). Just run the following command:
$ gradle wrapperIf you look at the contents of your build folder now, you'll see that you have the same gradle folder and gradlew and gradlew.bat scripts there.
Now you should initialize the wrapper by running the gradlew script:
$ ./gradlewThis may take a little bit of time to complete since, if you haven't ever run this, the wrapper script will go and download an installable jar containing the Gradle engine. Once this has completed, you'll see a help message displayed.
The last step is to import your new Gradle project into your preferred development environment:
IntelliJ IDEA
JetBrains provides two versions of its IntelliJ IDEA development environment: there is a freely available IntelliJ IDEA Community Edition and a commercial IntelliJ IDEA Ultimate Edition, which has a 30-day free trial, both of which are available from the IntelliJ IDEA download page. These instructions show the Ultimate Edition but the process to import a Gradle project is pretty much identical in both environments.
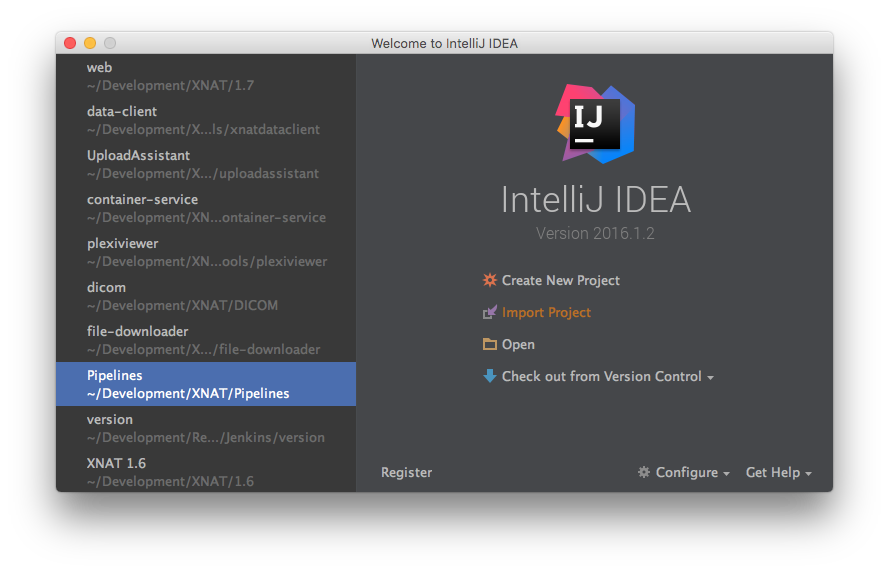
To import your Gradle project, select Import Project from the opening splash screen:
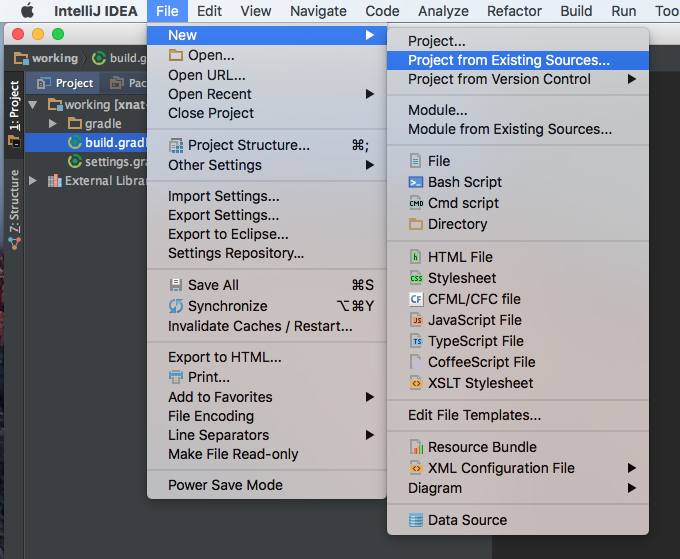
Or, if you already have IntelliJ IDEA open, you can select File->New...->Project from Existing Sources:
In either case, the Select File or Directory to Import dialog will appear:
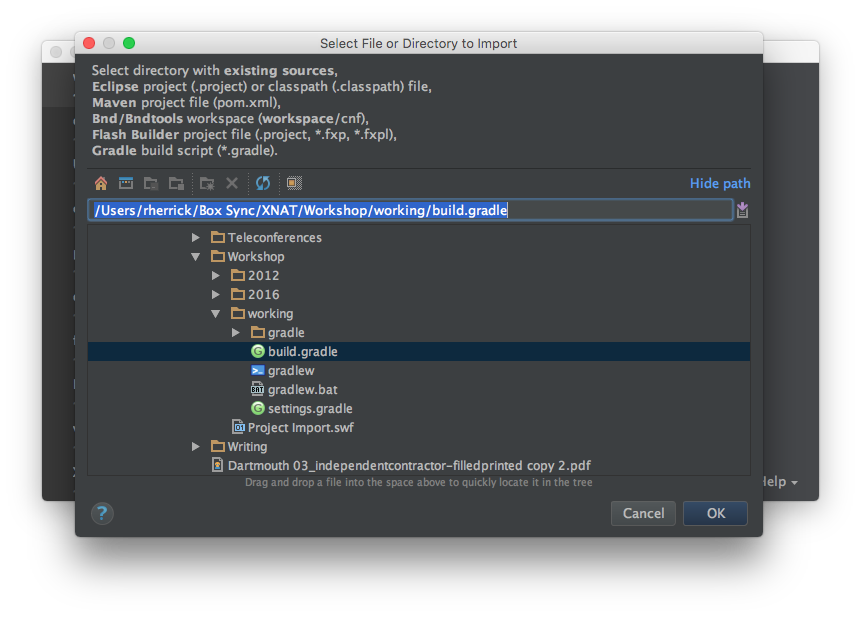
Navigate to your new project folder, select the build.gradle file, and click the OK button. IntelliJ IDEA will process the Gradle configuration and create a new project.
Eclipse
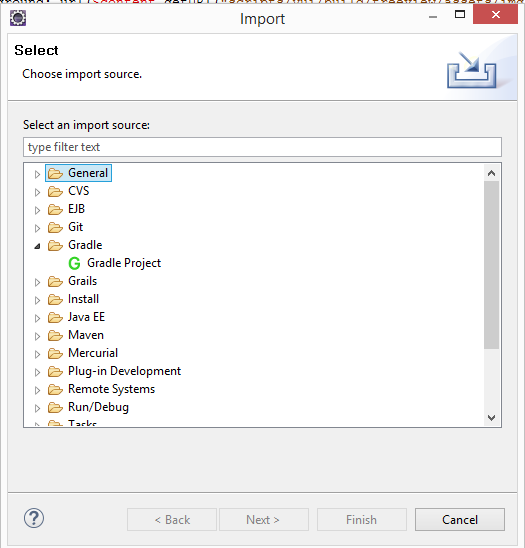
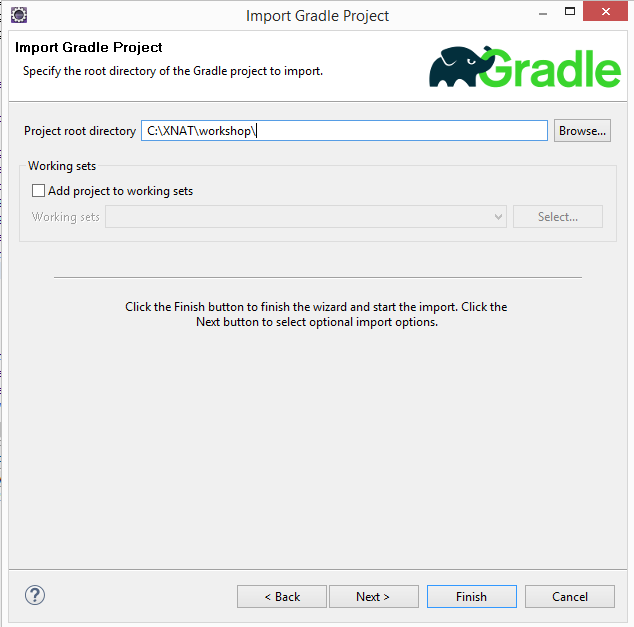
There are a number of gradle plugins, but a common one is http://gradle.org/eclipse/. Once you've integrated that plugin, you can easily import the project using File -> Import -> Gradle -> Gradle Project
Then specify the directory where your build.gradle script is located...
Your project should now be available for use in Eclipse.
Completed!
You now have a working Gradle build structure around which you can build your XNAT plugin project.
Go to the next step
Programming XNAT