Step 2 of 8: Enable the XNAT DICOM receiver
In this step, we're going to set up your XNAT to be able to receive data from a local scanner. The way to do this is to set up the DICOM Receiver in XNAT's administration settings.
A very common way to transport data from a local scanner to XNAT is via XNAT's DICOM receiver. In this practical, we're going to be sending data to our new XNAT's DICOM receiver. If you don't already have a DICOM send tool you're comfortable with installed on your laptop, then go ahead and download DICOM Browser.
There is a bug in DICOM Browser version 1.7.0b5 in Windows that prevents users from adding new attributes. If you are using Windows for this practical, please download version 1.5.2 here: NRG FTP: DicomBrowser 1.5.2 Setup
Also we need to download a little sample data to play with here:
New in XNAT 1.7 is the ability to configure DICOM receivers directly in the UI. To get to this page, click the Administer->Site Administration menu option, then select the DICOM SCP Receivers tab.
Ensure the standard receiver is set up as follows:
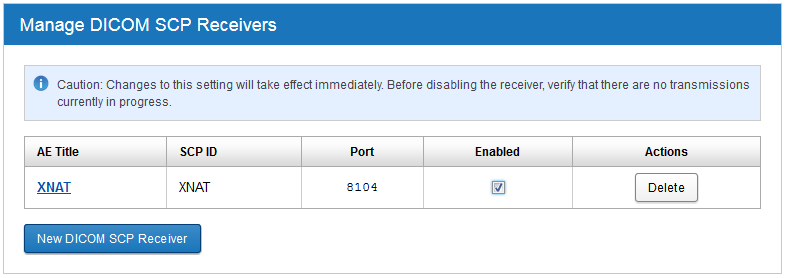
The DICOM receiver should be enabled by default. However, if you find that "Enabled" is not checked, go ahead and check it.
Now let's test it. First we'll open some sample DICOM:
- Launch Dicom Browser
- Select File -> Open.
- Navigate to $YOURDIR/IGT_PROSTATE/case057 for your sample data and click "Open".
Next we want to provide some routing information to get the DICOM into our project. When data comes in through the DICOM receiver, XNAT makes up to four passes through the DICOM headers to try to determine which project is the target. These passes are described in detail in Mapping DICOM to XNAT Metadata .
In this case, we will use use the method found in the First Pass to route data into our project. We need to insert the project, subject, and session label into the Patient Comments field (0010,4000), where XNAT will parse it out and route the subject appropriately.
To do this:
1. Right click anywhere in the right panel of Dicom Browser, and select "Add new attribute"
New attribute tag: 0010,4000
Value: Project:XNAT_2016 Subject:TESTSUBJECT Session:TESTSESSION

2. Select File -> Send.
3. Enter the following information for your XNAT DICOM Receiver
Remote host: xnat-12.xnat.org
Port: 8104
Remote AETitle: XNAT
Local AE Title: XNATTEST (or anything else you like)
4. Click Send.
Problems?
If you get an error that connection could not be established, your DICOM Receiver might not be started. Follow the following steps to try to start it via the REST API:
- Go to Administer->Site administration->Miscellaneous button on the bottom left.
- Click the "Swagger" link on the right.
- Click "dicom-scp-api"
- Click on the second line: PUT /xapi/dicomscp/start
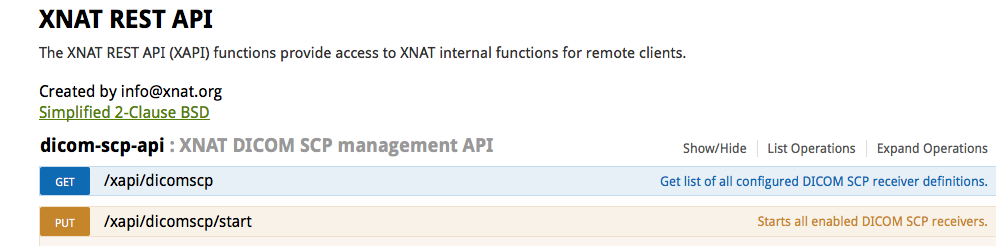
- Scroll down and click "Try it out!" button.
- The response code 200 indicates success.
Now, let's ensure that we received our data. Log in to XNAT http://xnat-12.xnat.org and on the top bar, click the Upload -> Go to prearchive menu option. You should see one entry in the table that loads, with Project = XNAT_2016 and Status = Receiving.
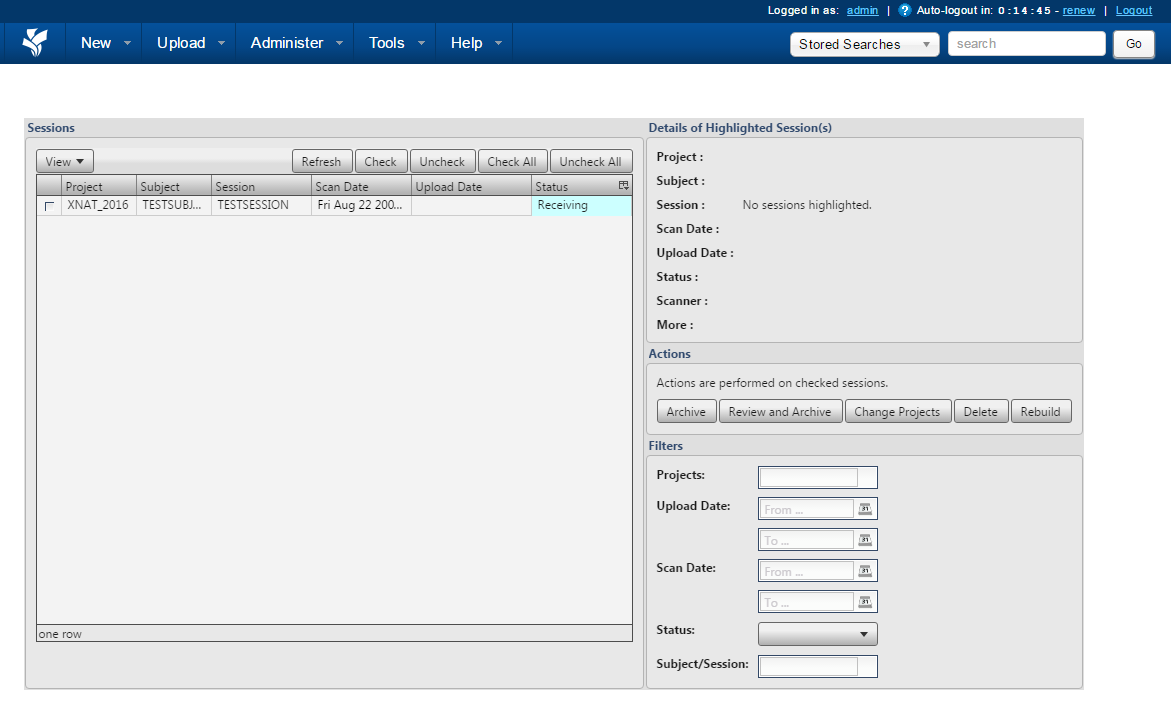
If the status is not "Receiving," click in the checkbox next to the session, and click "Delete". If this happens or you do not see the session at all, check the text in (0010,4000) with the syntax above and try again, or ask a team member for help.
If your session is there with "Receiving" status, great! XNAT will keep the session in "Receiving" status for several minutes (the exact timeout period is configurable) to ensure that all of the files from the session comes in. In our case, we are watching the send happen so we know when it ends. Wait until the "sending" progress bar in DicomBrowser disappears, then go back to your browser, select the checkbox next to the session, then click "Rebuild".
Refresh the page until you see the session status change to "Ready", then select the checkbox next to the session and click "Archive". Once you've done that, you're ready to move on to the next section.
Complete
You have successfully sent data to your XNAT!
Move on to Step 3: Configure DICOM Project Routing
You can retrieve the data for this practical from your XNAT USB stick in the data.zip or from this public git repo https://github.com/XnatWorkshop/Practical1_Part2.git. You will need to copy it to your local drive, not into the vagrant XNAT server. Please make a note of where you store the data. We'll refer back to it as: $YOURDIR