Step 8 of 8: Configure Protocol Validation
In today's final step, we will learn how to configure Protocol Validation to ensure that incoming sessions are complete and matching our expected data requirements.
Scanning is an expensive research activity. There are financial, time, and opportunity costs when a subject is scanned and the data is found to be unusable. Protocol Validation, a handy feature included with base XNAT, can be an incredibly valuable tool to researchers by providing prompt automated QC on your image sessions. If configured to autorun, then the pipeline can let researchers know within minutes whether image data is usable. This provides the opportunity to potentially rescan a subject while they are still on campus. The feature includes both a pipeline to run the automated QC check and a data type to store the results.
How does the Protocol Validation pipeline know what your data should look like? All the characteristics of your data which you wish to be validated must be defined in something called a schematron file. Schematron is a language for making assertions about the presence or absence of patterns in XML documents, and it was design expressly to validate XML based on rules. To refer to the various elements of the MR Session in the schematron file, we use XPATH, a syntax which allows us to address specific parts of a XML document.
Add the Protocol Validation pipeline to a site
First we want make available the XNAT Protocol Validation pipeline /data/xnat/pipeline/catalog/validation_tools/Validate.xml on our site:
- Login to XNAT as Admin.
- Navigate to Administer -> Pipelines
- Click on Add Pipeline to Repository

- Enter Path to Pipeline descriptor xml:
/data/xnat/pipeline/catalog/validation_tools/Validate.xml - Enter Name of the custom webpage to launch this pipeline:
PipelineScreen_protocolcheck.vm - Click "Add"
- You will see the message "Pipeline /data/xnat/pipeline/catalog/validation_tools/Validate.xml has been successfully added to the repository”
- Click the Close button, and you should now see Validate.xml listed in the pipeline repository.
Upload the schematron file as a resource to project XNAT_2016
We happen to have a pre-baked version of a schematron ready because it's a little hard writing one from scratch. Don't worry though, we'll look inside at the end of the practical.
Now we want to attach a First a resource catalog is created, then the schematron file is uploaded to the resource catalog.
Go back to your vagrant ssh command prompt.
If you didn't load xnat-12, then you won't have the schematron loaded, you'll need to get it from here:
git clone https://github.com/XnatWorkshop/Schematron.git
This will create a folder called Schematron. cd into that folder, do
sudo -i
mkdir -p /resources/data/Day1
cp ./mrsession_rules.sch /resources/data/Day1
Upload the Schematron file mrsession_rules.sch with either XnatDataClient or curl:
With XDC
$ XnatDataClient -u admin -p admin -m PUT --header "Content-Type: text/plain" -r "http://xnat-12.xnat.org/data/archive/projects/XNAT_2016/resources/validation_xnat_mrSessionData"
$ XnatDataClient -u admin -p admin -m PUT --header "Content-Type: text/plain" -r "http://xnat-12.xnat.org/data/archive/projects/XNAT_2016/resources/validation_xnat_mrSessionData/files?content=v1.0" -local /resources/data/Day1/mrsession_rules.sch"
With curl
$ curl -u admin:admin -X PUT -H 'Content-Type: text/plain' "http://xnat-12.xnat.org/data/archive/projects/XNAT_2016/resources/validation_xnat_mrSessionData"
$ curl -u admin:admin -T /resources/data/Day1/mrsession_rules.sch "http://xnat-12.xnat.org/data/archive/projects/XNAT_2016/resources/validation_xnat_mrSessionData/files?content=v1.0&inbody=true"
Add the Protocol Validation pipeline to project XNAT_2016
- Go to XNAT_2016 project
- Click on Pipelines tab.
- Click on Add More Pipelines
- Click on Add (for Validate.xml pipeline)
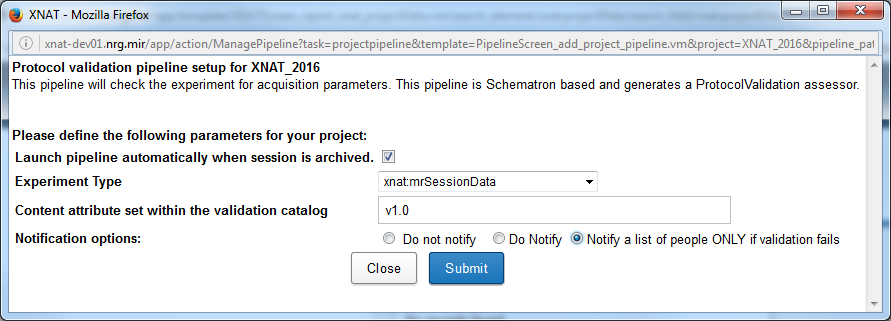
- Check the box for "Is this pipeline to be launched automatically while archiving?"
- Set the value of Experiment Type to xnat:mrSessionData
- Set the value of Content attribute set within the validation catalog to v1.0
- Click on Submit
Verify that the pipeline runs automatically when a new session is archived
- Relaunch Dicom Browser
- File, Open, $YOURDIR/IGT_PROSTATE/case221
- File, Send, click "Send"
- Wait a few moments and you should see session in your prearchive.
- Rebuild and archive the session, and the pipeline should be launched.
Practical Session Complete!
Congratulations, you have completed the XNAT Administration practical session.
This content has been shamelessly purloined from the XNAT 2012 Workshop presentation by Mohana Ramaratnam.