Troubleshooting XNAT Vagrant Installation for Windows Users
Here is a list of common (and some uncommon) issues that can get in the way of a quick and easy XNAT deployment via Vagrant in Windows.
Before You Start
1: Make sure your versions of Vagrant and VirtualBox are compatible.
As of the workshop, Vagrant for Windows should be running version 1.8.7, and VirtualBox should be running version 5.0.x. Later versions of VirtualBox may be operable, but this isn't guaranteed.
2: Use Git Bash in place of the default Windows command line terminal
Important!
Make sure you are running your command line app (Cygwin, Git Bash) as an administrator!
For whatever reason, the default command line terminal in Windows does not play well with Vagrant and VirtualBox, even when run as an administrator. Fortunately, there are third party command line tools that are free to use that do. We recommend using Git Bash, which comes with Git (which you will need to install in just a moment here).
Notes on Installing Cygwin
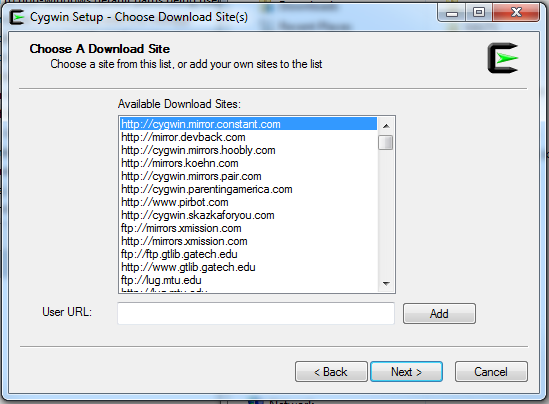
If you're using Cygwin, there are several dialogs that must be configured. Make sure your installer is set to pull down every available package. The best way to do this is to select "Install From Internet" as your installation method, then select the topmost mirror (http://cygwin.mirror.constant.com) as your download source. This should ensure that all required packages (OpenSSH in particular) are included.
When you run Cygwin, it creates a new (empty) home directory. It is simple, if a bit unintuitive, to navigate out to your file system. Enter the following to navigate to your C: drive.
Cygwin Terminal
USER@COMPUTERNAME ~
$ cd C:
You can also create a shortcut within Cygwin to your Repos directory by entering something like the following, substituting your actual directory path for "/path/to/your/Repos".
Cygwin Terminal
$ ln -s C:/path/to/your/Repos /repos
Before You Clone The xnat-vagrant Repo
3: Download Git and use it to clone the xnat-vagrant repository instead of SourceTree or any other GUI tools
There is a '.gitattributes' file included in the xnat-vagrant repo that should force UNIX line endings. If you would prefer to set this globally for all Git repos, during installation of Git, select the option to "Checkout as-is, commit Unix-style Line Endings."
You can download Git here: https://git-scm.com/downloads
Downloading Git directly and using it to clone repos from Github will help you get around pernicious differences between Unix-style and Windows-style line-endings in code. This is particularly bad in code that is downloaded to a Windows machine, but is meant to be run inside of a Linux VM.
SourceTree can be particularly troublesome, as it comes with its own pre-downloaded and pre-configured version of Git, and its default configuration gets these line-endings wrong. If you start seeing problems when running "setup.sh" that look like the following, then you need to convert the line endings of affected files (Notepad++ can do this easily), or you can delete your repo and re-clone it (make sure you back up any local configuration files first).
Common Errors With Windows-style Line Endings
 $ sh setup.sh
setup.sh: line 2: $'\r': command not found
setup.sh: line 4: $'\r': command not found
setup.sh: line 6: $'\r': command not found
setup.sh: line 36: syntax error: unexpected end of file
Cloning the xnat-vagrant repo with git is simple. Open Git Bash and navigate to your repos directory, then run the following command. The process should take just a few seconds.
Cygwin Terminal - Git Clone
USER@COMPUTERNAME /repos
$ git clone https://github.com/NrgXnat/xnat-vagrant.git
Before You Run setup.sh
4: Make sure your vagrant xnatstack box is up-to-date
First, you'll need to navigate to one of the configuration directories in your newly-downloaded repo. ( xnat-vagrant/configs/xnat is the default.) Then, you'll run the following command:
Git Bash Terminal
USER@COMPUTERNAME /repos/xnat-vagrant/configs/xnat-release
$ vagrant box add nrgxnat/xnatstack-ubuntu1604 --provider virtualbox
You can check to see if your installed xnatstack box is out of date. If it is, run the second command to upgrade it.
Git Bash Terminal
USER@COMPUTERNAME /repos/xnat-vagrant/configs/xnat-release
$ vagrant box outdated --global
Loading existing configuration from /repos/xnat-vagrant/configs/xnat-release/vars.yaml...
* 'nrgxnat/xnatstack-ubuntu1604' is outdated! Current: 1.1. Latest: 1.1.1

USER@COMPUTERNAME /repos/xnat-vagrant/configs/xnat-release
$ vagrant box update --box nrgxnat/xnatstack-ubuntu1604
You can also delete previous versions of the xnatstack box.
Git Bash Terminal
USER@COMPUTERNAME /repos/xnat-vagrant/configs/xnat-release
$ vagrant box remove nrgxnat/xnatstack-ubuntu1604 --box-version 1.1
Okay, Try It Now!
From this same config folder, run the setup.sh script in your xterminal. Then sit back and have a nice cup of coffee for the next five minutes or so as your XNAT builds for you.
Git Bash Terminal
USER@COMPUTERNAME /repos/xnat-vagrant/configs/xnat-release
$ sh setup.sh
Other Uncommon Issues
Do you need to allow virtualization in BIOS?
In some Windows machines with Intel processors, virtualization may be turned off by default. This can be changed in BIOS. Here's a quick tutorial: http://www.howtogeek.com/213795/how-to-enable-intel-vt-x-in-your-computers-bios-or-uefi-firmware/
Do you have conflicting versions of Java installed?
Although Java is not required to run XNAT in a Vagrant VM, if you wish to do XNAT development or perform your own builds on your local desktop, you'll need the Java 8 JDK, and a text editor or IDE like IntelliJ IDEA (recommended) or Eclipse.
Do you have Windows firewall enabled?
You may have trouble getting your vagrant box to run if you have the Windows firewall enabled. To disable: http://windows.microsoft.com/en-us/windows/turn-windows-firewall-on-off#turn-windows-firewall-on-off=windows-7.
Hey! My terminal is telling me it can't find vagrant, even though I installed it earlier. What gives?
You will need to add vagrant to your path in order to use it. For either MobaXterm, or Cygwin, you will need to add the vagrant installation location to your path and source your .bashrc file to get it to take effect. You can do this as follows:
In MobaXterm
echo 'export PATH=$PATH:/drives/c/HashiCorp/Vagrant/bin' >> ~/.bashrc
source ~/.bashrc
...or...
In Cygwin
echo 'export PATH=$PATH:/cygdrive/c/HashiCorp/Vagrant/bin' >> ~/.bashrc
source ~/.bashrc
Alternatively, you can simply restart your terminal instead of running the second lines above.