Deployment
If you are upgrading from the XNAT JupyterHub Integration Beta, please see Upgrading From Beta.
This is an overview for deploying JupyterHub and the JupyterHub Plugin alongside an existing XNAT. This approach is recommended if you have manual or automated XNAT deployment and would like to deploy JupyterHub in your existing environment. This can also be used to test against snapshots/backups of existing XNATs. The xnat-docker-compose deployment is ideal for evaluating this feature on your local development environment. If you are already using xnat-docker-compose check out the new features/jupyterhub branch. If you would like to deploy JupyterHub on Kubernetes please see the helm chart here.
Introduction
There are two major setup steps for deployment.
- Deploy JupyterHub on a Docker swarm
- Install and configuring the JupyterHub plugin on your XNAT.
JupyterHub is responsible for starting single user Jupyter notebook containers on to the swarm while the JupyterHub plugin connects XNAT users to JupyterHub. First we will deploy JupyterHub then we will install and configure the JupyterHub plugin.
If you would like to deploy JupyterHub on Kubernetes please see the helm chart here.
Requirements
- You already have an XNAT setup. If it is not empty you should back it up!!! If you are using the xnat-docker-compose repo, check out the README for instructions.
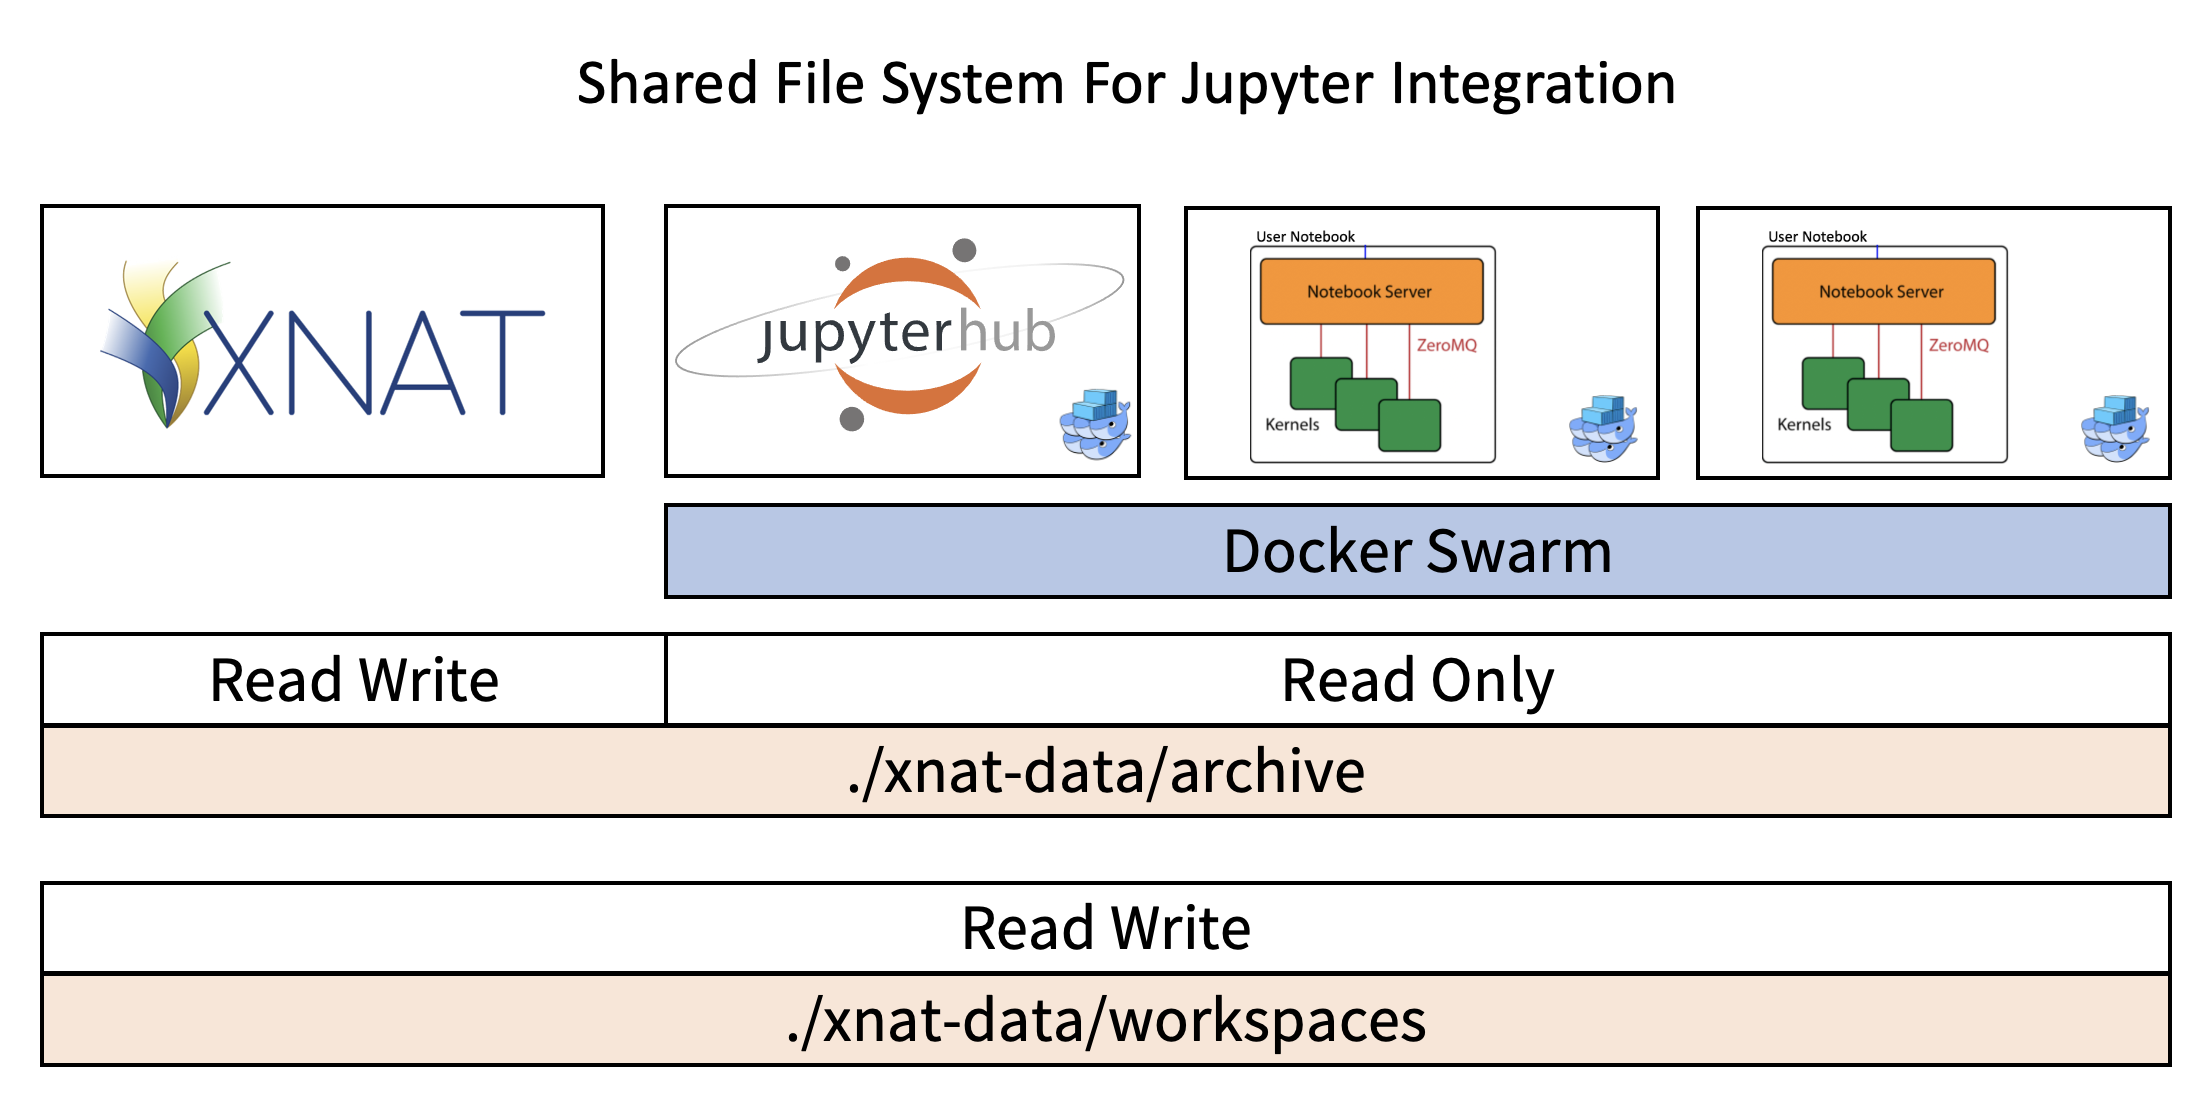
- A Docker swarm with the XNAT archive shared across swarm nodes.
Deploy and Configure JupyterHub
Setup Docker Swarm
Before proceeding you must run Docker in swarm mode. JupyterHub will launch single user notebook servers as Docker Swarm mode services. This allows for running JupyterHub in a swarm so that notebook containers can be run on any of multiple servers. To initialize a swarm:
docker swarm initFor multi-node swarms parts of the XNAT file system must be shared across the swarm. Every node on the swarm must have read-only access to the XNAT archive directory. Every node on the swarm must have read-write access to a new directory, workspaces, which is used for persisting users Jupyter notebooks.

The xnat/jupyterhub Docker Image
The easiest path to deploy JupyterHub is to use the preconfigured xnat/jupyterhub image [Docker][GitHub Source].
Navigate to the directory you'd like to deploy JupyterHub from:
cd /opt
git clone https://github.com/NrgXnat/xnat-jupyterhub-image.git jupyterhub
You'll find a docker-stack.yml file contained in the repo. Or you can use the following docker-stack.yml:
version: '3.8'

networks:
  jupyterhub-network:
    name: &networkname jupyterhub-network
    driver: overlay
    attachable: true

services:
  jupyterhub:
    image: xnat/jupyterhub:latest
    hostname: jupyterhub
    volumes:
      - "/var/run/docker.sock:/var/run/docker.sock:rw"
    ports:
      - "8000:8000"
    networks:
      - jupyterhub-network
    environment:
      JH_NETWORK: *networkname
      JH_UID:
      JH_GID:
      NB_UID:
      NB_GID:
      JH_START_TIMEOUT: 180
      JH_XNAT_URL:
      JH_XNAT_SERVICE_TOKEN: zaq1xsw2 # user generated token for XNAT to talk to JH
      JH_XNAT_USERNAME: jupyterhub # this account needs to be enabled in the XNAT UI
      JH_XNAT_PASSWORD: zaq1xsw2 # user generated password for JH to talk with XNAT
    deploy:
      replicas: 1
      placement:
        constraints:
          - node.role == manager
Setting Environmental Variables
Next we need to set the environmental variables.
JH_UID, JH_GID, NB_UID, NB_GID
It is critical to correctly set the UID/GID environmental variables. JupyterHub needs permission to the Docker socket to spawn the single user notebook containers. The notebook containers need to have the same permissions as the files on the XNAT archive (which are generally owned by a tomcat or xnat user).
Get the id of the tomcat/xnat user:
$ id tomcat
uid=54(tomcat) gid=54(tomcat) groups=54(tomcat),992(docker)
You can also find the gid of the docker socket with:
$ cat /etc/group | grep docker
docker:x:992:tomcat
Tomcat, JH and the NB containers will share this UID (54). Tomcat and the NB containers will share the same GID (54) while JH will be a member of the docker group (992).
JH_XNAT_URL
Provide the domain name of your XNAT here. This environmental variable is used by JupyterHub to communicate with your XNAT.
JH_XNAT_SERVICE_TOKEN and JH_XNAT_PASSWORD
XNAT requires a service account on JupyterHub to start and stop servers for users. Create a token/password for this, which XNAT will use access JupyterHub's API. Set the created token as the JH_XNAT_SERVICE_TOKEN environment variable.
JupyterHub also needs its own account on XNAT to establish communication with the platform. During the installation of the plugin, the system will attempt to create a new user account named 'jupyterhub'. After installation, you will need to manually enable this account in the Manage Users panel on XNAT (which we will do later in the instructions). For now, create a password specifically for this service account and set it as the JH_XNAT_PASSWORD environment variable. The JH_XNAT_PASSWORD environment variable must be properly configured with the password you set for the 'jupyterhub' account.
Save these passwords/tokens for later. They will be needed when configuring the JupyterHub plugin in the XNAT UI.
JH_START_TIMEOUT
The amount of time JupyterHub should wait (in seconds) before deciding the single user container failed to start. We've found it generally takes ~30s for a single-user Jupyter container to start. If you have an auto-scaling Docker swarm, you may need to increase this time out to account for the time it takes to spin up a new swarm node.
Start JupyterHub
Your docker-stack.yml should now look something like this:
version: '3.8'

networks:
  jupyterhub-network:
    name: &networkname jupyterhub-network
    driver: overlay
    attachable: true

services:
  jupyterhub:
    image: xnat/jupyterhub:latest
    hostname: jupyterhub
    volumes:
      - "/var/run/docker.sock:/var/run/docker.sock:rw"
    ports:
      - "8000:8000"
    networks:
      - jupyterhub-network
    environment:
      JH_NETWORK: *networkname
      JH_UID: 54
      JH_GID: 992
      NB_UID: 54
      NB_GID: 54
      JH_START_TIMEOUT: 180
      JH_XNAT_URL: https://your.xnat.org
      JH_XNAT_SERVICE_TOKEN: zaq1xsw2 # user generated token for XNAT to talk to JH
      JH_XNAT_USERNAME: jupyterhub  # this account needs to be enabled in the XNAT UI
      JH_XNAT_PASSWORD: zaq1xsw2 # user generated password for JH to talk with XNAT
    deploy:
      replicas: 1
      placement:
        constraints:
          - node.role == manager
With your docker-stack.yml configured we can now start JupyterHub:
docker stack deploy -c docker-stack.yml jupyterhubJupyterHub should be available on http://ip-address:8000/jupyterhub. Read the notes below for configuring your reverse proxy to add the http://your.xnat.org/jupyterhub route.
Inspect JupyterHub
To view and inspect JupyterHub and the single-user notebook containers:
docker service ls

docker service logs 9hzw7gu0mo79

docker service inspect 9hzw7gu0mo79
JupyterHub can be stopped with:
docker stack rm jupyterhubConfiguring your reverse proxy
JupyterHub is responsible for spawning single-user Jupyter containers. For user's to reach these containers a route must be added to the reverse proxy serving your XNAT. The root location / should point to XNAT while /jupyterhub should be directed at JupyterHub.
HAProxy
Below is an example of adding a backend to an existing HAProxy configuration
# haproxy.cfg example

# ...

frontend appserver
        bind 0.0.0.0:80
        bind 0.0.0.0:443 ssl crt /etc/ssl/certs/devcert.pem
        http-response replace-value Location ^http://(.*)$ https://\1
        use_backend jupyterhub if { path_beg /jupyterhub } || { path_beg /jupyterhub/ }
        use_backend web_servers if { path_beg / }
        default_backend web_servers

backend web_servers
        mode http
        balance roundrobin
        option forwardfor
        http-request set-header X-Forwarded-Port %[dst_port]
        http-response set-header location %[res.hdr(location),regsub(http://,https://)] if { status 301 302 }
        server web01 127.0.0.1:8080

backend jupyterhub
        mode http
        balance roundrobin
        option forwardfor
        http-request set-header X-Forwarded-Port %[dst_port]
        http-response set-header location %[res.hdr(location),regsub(http://,https://)] if { status 301 302 }
        server jhub01 127.0.0.1:8000
NGINX
The xnat-docker-compose repo has an example of configuring NGINX. This was based on the JupyterHub documentation for using a reverse proxy.
worker_processes auto;
events {
  worker_connections 1024;
}

http {
  ##
  # Basic Settings
  ##
  sendfile on;
  tcp_nopush on;
  tcp_nodelay on;
  keepalive_timeout 65;
  types_hash_max_size 2048;
  include /etc/nginx/mime.types;
  default_type application/octet-stream;
  ##
  # SSL Settings
  ##
  #ssl_protocols TLSv1 TLSv1.1 TLSv1.2; # Dropping SSLv3, ref: POODLE
  #ssl_prefer_server_ciphers on;
  ##
  # Logging Settings
  ##
  access_log /var/log/nginx/access.log;
  error_log /var/log/nginx/error.log;
  ##
  # Gzip Settings
  ##
  gzip on;
  gzip_disable "msie6";

  map $http_upgrade $connection_upgrade {
        default upgrade;
        '' close;
    }

  server {
    listen 80;
    location / {
        proxy_pass                          http://xnat-web:8080;
        proxy_redirect                      http://xnat-web:8080 $scheme://localhost;
        proxy_set_header Host               $host;
        proxy_set_header X-Real-IP          $remote_addr;
        proxy_set_header X-Forwarded-Host   $host;
        proxy_set_header X-Forwarded-Server $host;
        proxy_set_header X-Forwarded-For    $proxy_add_x_forwarded_for;
        proxy_connect_timeout               150;
        proxy_send_timeout                  100;
        proxy_read_timeout                  100;
        proxy_buffers                       4 32k;
        client_max_body_size                0;
        client_body_buffer_size             128k;
    }
    access_log /var/log/nginx/xnat.access.log;
    error_log /var/log/nginx/xnat.error.log;

    # https://jupyterhub.readthedocs.io/en/stable/reference/config-proxy.html
    location /jupyterhub {
        proxy_pass http://jupyterhub:8000;
        proxy_set_header X-Real-IP $remote_addr;
        proxy_set_header Host $host;
        proxy_set_header X-Forwarded-For $proxy_add_x_forwarded_for;

        # websocket headers
        proxy_http_version 1.1;
        proxy_set_header Upgrade $http_upgrade;
        proxy_set_header Connection $connection_upgrade;
        proxy_set_header X-Scheme $scheme;

        proxy_buffering off;
    }
}
}
Apache
See this XNAT Google Group discussion post for details on updating an Apache configuration. You will likely need to restart your reverse proxy for these changes to take effect.
Deploy and Configure the JupyterHub Plugin
Deploy
The JupyterHub plugin is available as a jar and is deployed in the same manner as any XNAT plugin. Download the latest jar file, shutdown Tomcat, deploy in ${xnat.home}/plugins, then restart Tomcat.
Configure
Login to your XNAT and navigate to Administer → Users
You should see a new user, jupyterhub, has been created. This account is used by JupyterHub to get configuration meta-data for the single-user Jupyter notebook containers.

By default the jupyterhub user account is disabled. Enable this account and update the password. This password needs to be updated in the JupyterHub configuration as the JH_XNAT_PASSWORD environmental variable.
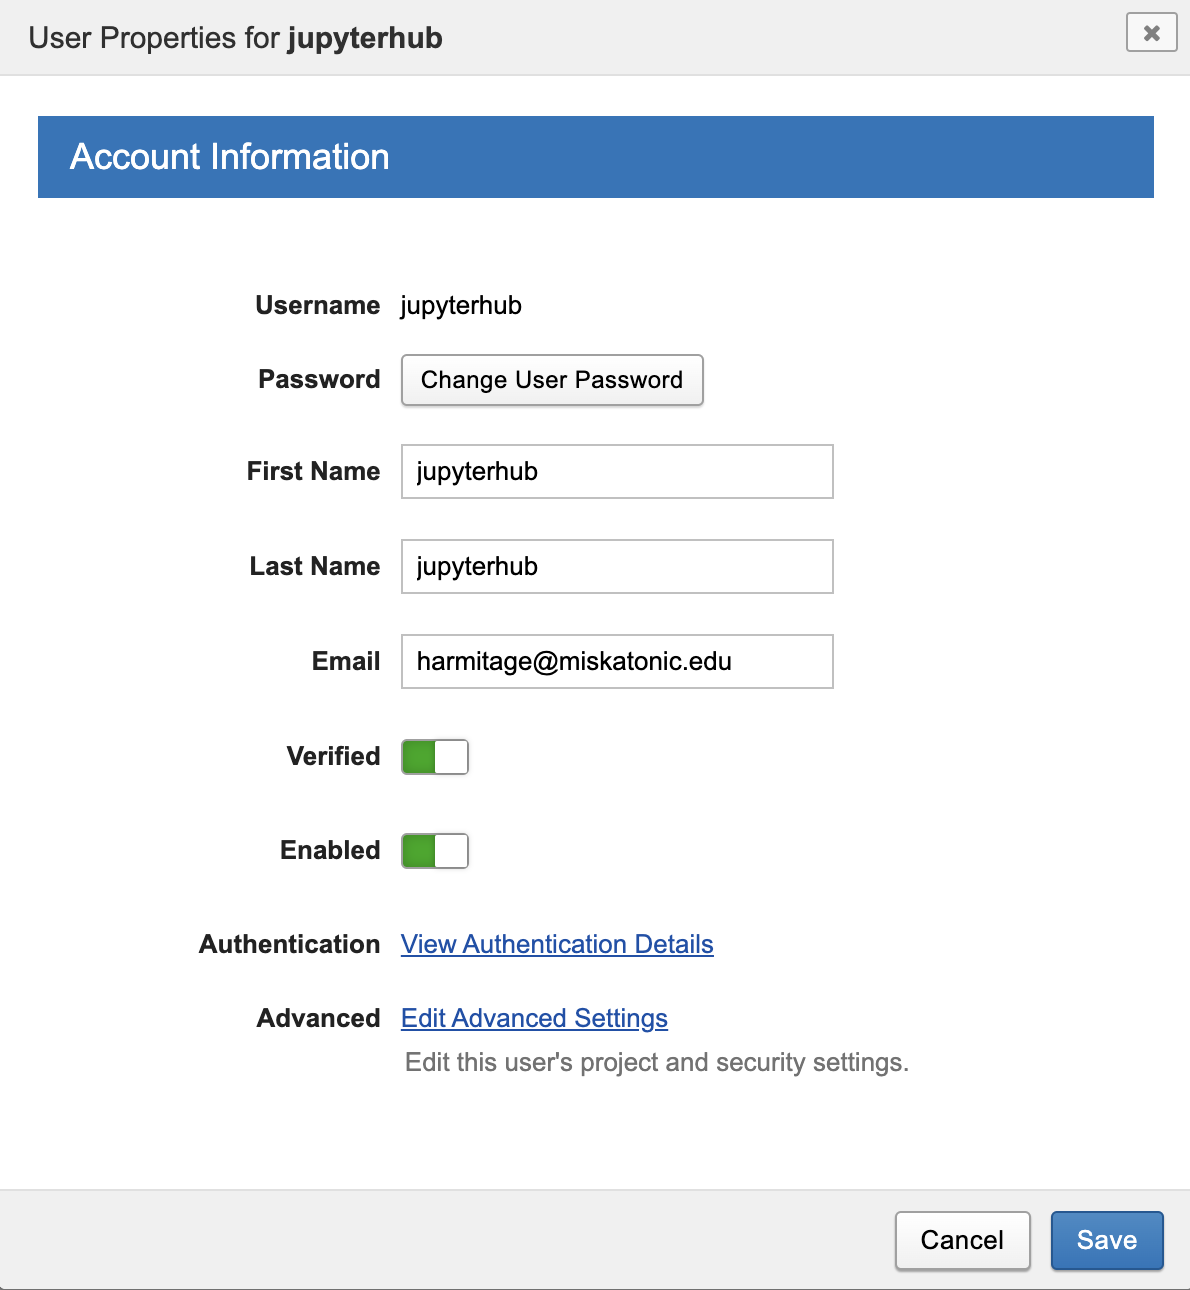
If you do not see the jupyterhub user, it may have failed to be created during plugin installation (potentially due to password complexity requirements). Manually create a new user with username jupyterhub and a password of your choosing. After you've created the jupyterhub user, you then need to enable the JupyterHub Service Account role using Advanced User Settings.

JupyterHub will not be able to communicate with XNAT without this account. Please be sure that this account is enabled, has the JupyterHub service account role set, and that the credentials have been supplied to JupyterHub with the JH_XNAT_USERNAME and JH_XNAT_PASSWORD environment variables before continuing.
Next navigate to Administer → Plugin Settings. A new JupyterHub group should appear in the plugin settings, navigate to the Setup tab.
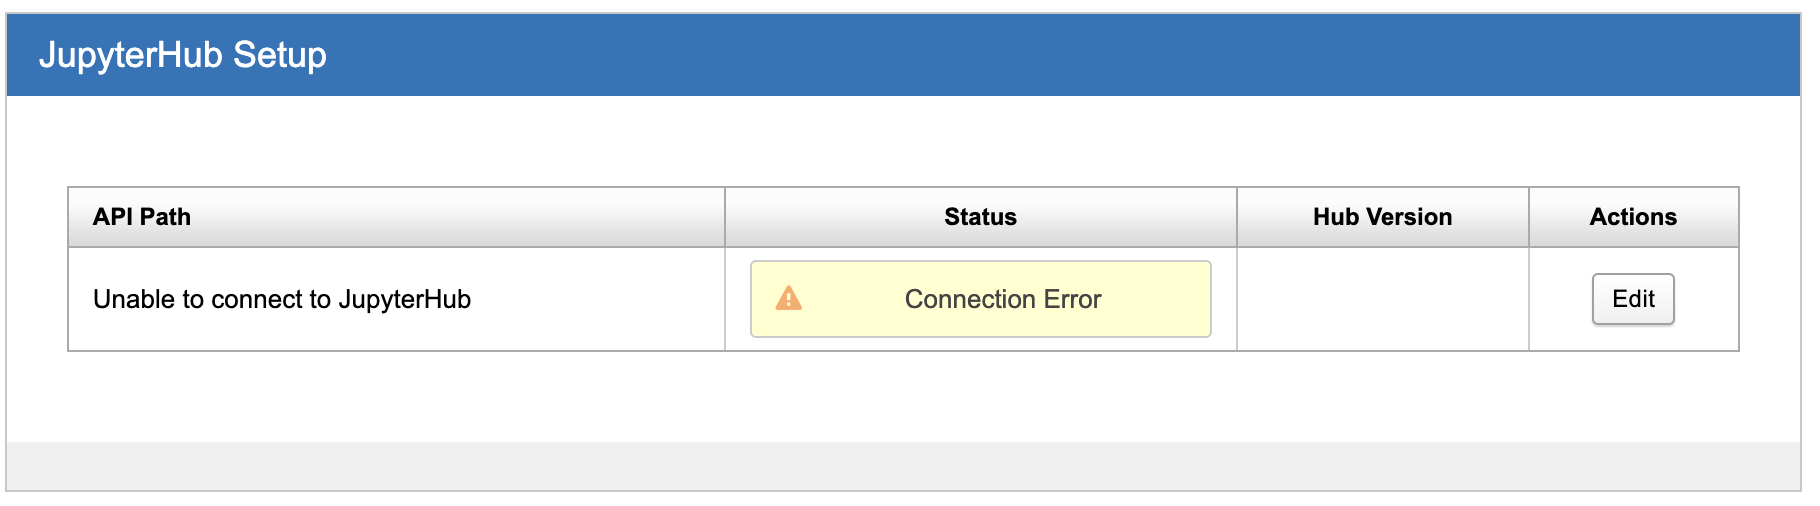
If the status of JupyterHub is Connection Error that is ok. We will fix that. If the status is Connected, then XNAT is able to communicate with JupyterHub. But don't skip ahead as there are other preferences which are required. Under the Actions column, select Edit.
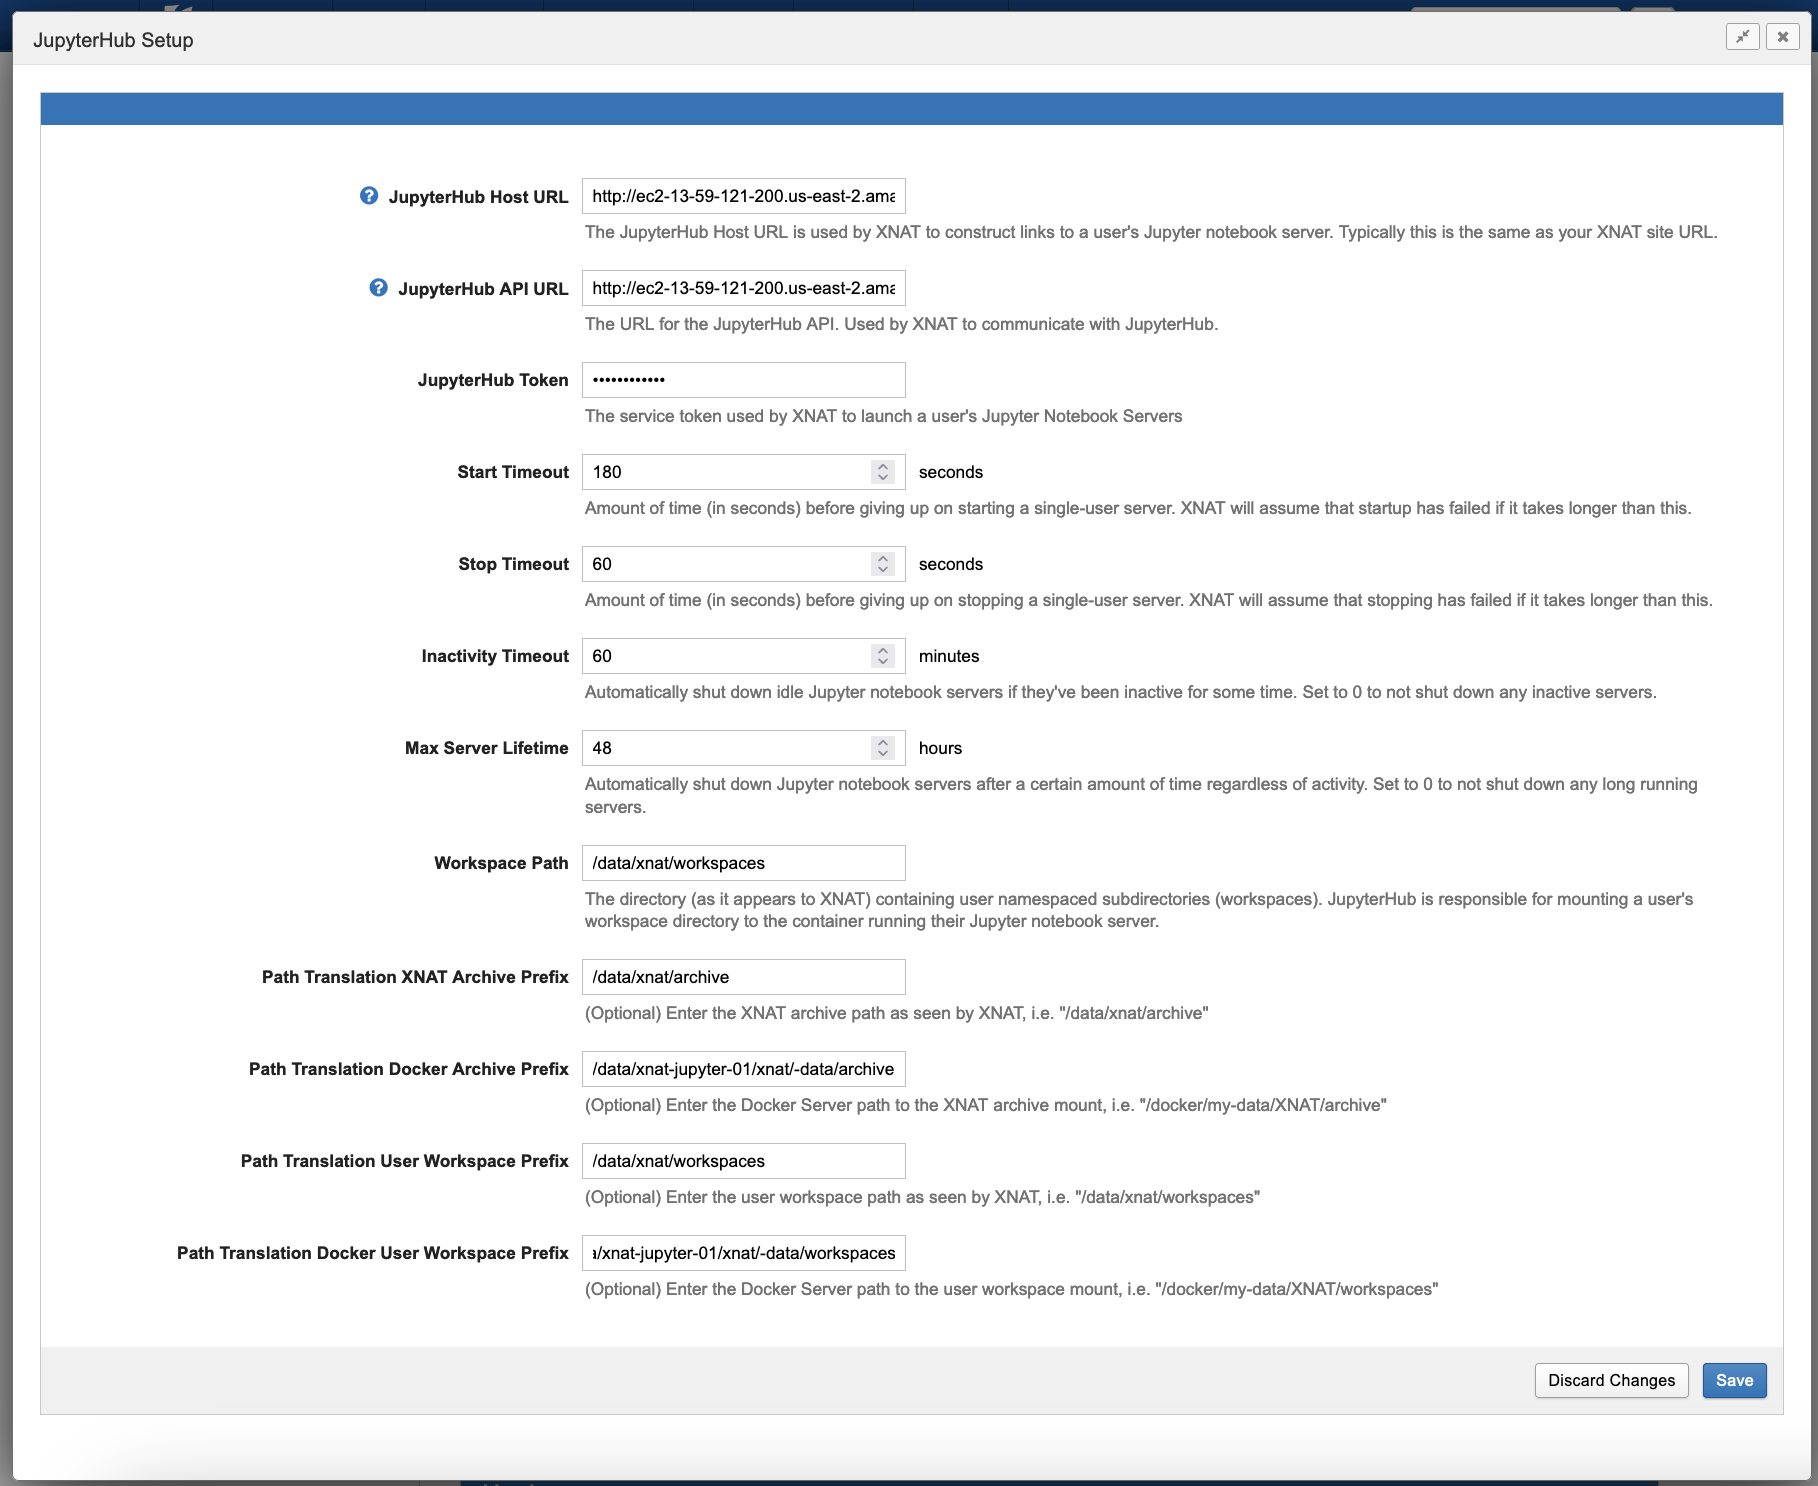
JupyterHub Host URL
The JupyterHub Host URL is used by XNAT to construct links to a user's Jupyter notebook server. This is typically the same as your XNAT site URL but could be different depending on your XNAT deployment, how you have configured JupyterHub, and how you have configured your reverse proxy. Include the protocol (http or https), hostname, and port number (if necessary). Exclude any trailing /jupyterhub path. JupyterHub will provide the path to the user's notebook server.
Examples:
- http://localhost
- http://localhost:8081
- https://xnat.myorg.com
- https://your.xnat.org/
JupyterHub API URL
This is the URL of the JupyterHub API and will depend on your environment. This should be set to something like:
https://your.xnat.org/jupyterhub/hub/apiWith xnat-docker-compose on Linux:
http://172.17.0.1/jupyterhub/hub/apiOr if you're running locally on a Mac:
http://host.docker.internal/jupyterhub/hub/apiJupyterHub Token
The JH_XNAT_SERVICE_TOKEN env variable that was set in our docker-stack.yml file and needs to be added here. This is XNAT's password for it's service account on JupyterHub. You must create this token for XNAT to be able to connect with JupyterHub.
Workspace Path
We need a directory on the file system to persist user's notebooks and any intermediate work products. The single-user Jupyter containers need read/write access to this directory. We are calling this the workspaces directory and XNAT will manage the contents of each user's workspace. Specify the path to that directory here.
This is an example of the XNAT file system used with the xnat-docker-compose repository.
Path Translation
This is only necessary if your XNAT is running inside of a Docker container. The XNAT Container Service documentation of Path Translation details why this is needed. You will need to supply both the XNAT prefix and Docker prefix if your are running your XNAT in a container, regardless of whether you are using Container Service.
These are all of the required plugin preferences. See Plugin Settings for details on other settings.
Save these settings and close the setup dialog.
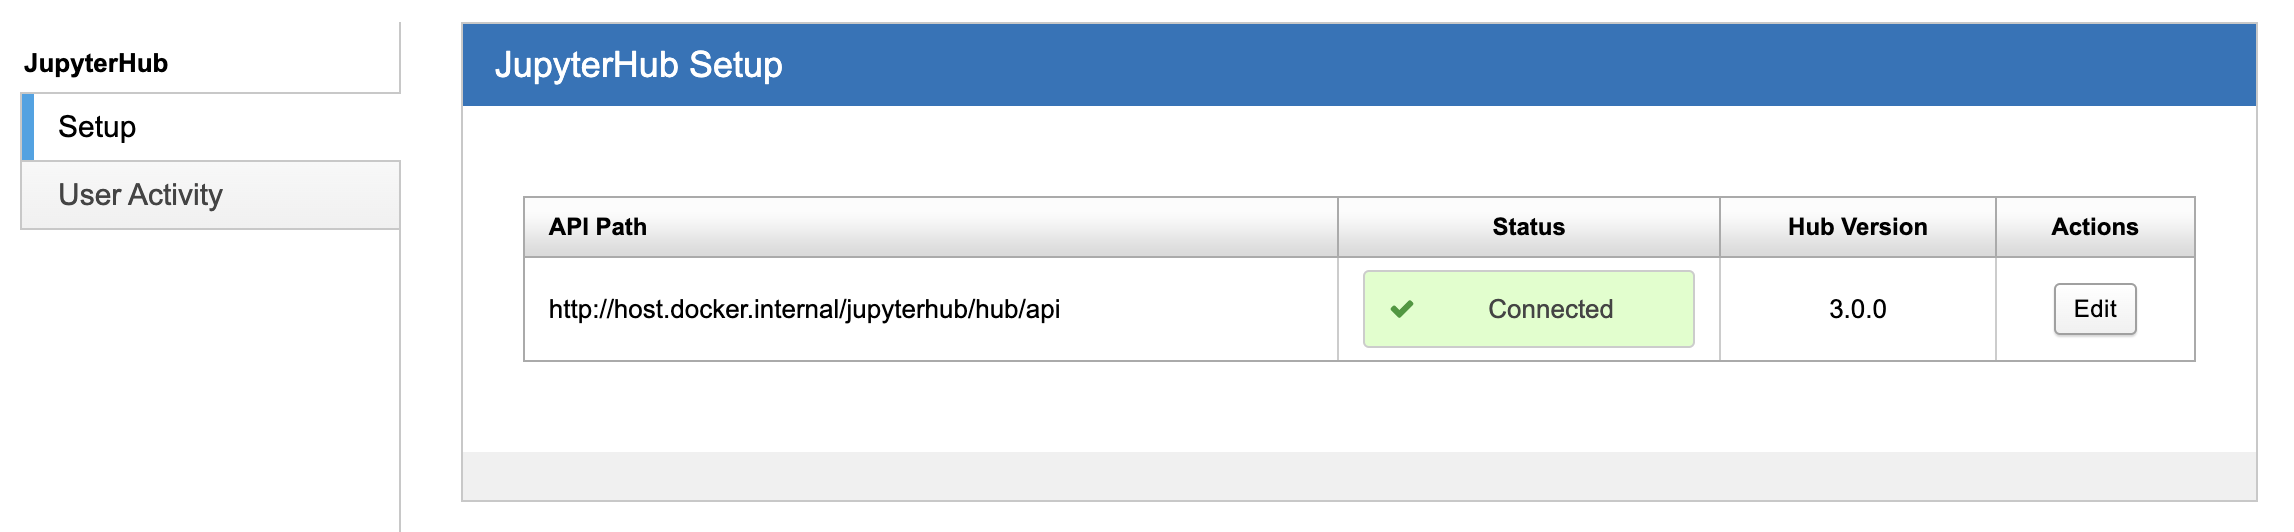
The status should be Connected. You have successfully setup JupyterHub and the JupyterHub Plugin.
References
[1] Docker swarm
[2] xnat/jupyterhub image [Docker][GitHub]
[3] xnat-docker-compose/features/jupyterhub NGINX Configuration
[4] Using a reverse proxy with JupyterHub
[5] Container Service Path Translation