Step 4 of 8: Write Anonymization Scripts
In step 4, you'll learn how to modify the DICOM metadata on your incoming scans, before they get archived. There are several reasons that you might want to edit DICOM headers: to remove PHI, to blind the data, to recode the data with your study's own identifiers, and to insert additional information related to the image deidentification.
XNAT provides the ability to insert, remove and edit DICOM headers through a language called Dicom Edit written by Kevin Archie. Documentation for DICOM Edit syntax can be found here: DICOM Edit Reference.
An example of a XNAT anonymization can be found here. Note that this script is a useful reference for a number of DICOM header tags, but it removes so much metadata–including all of the SOP, study, and series instance UIDs–that the resulting files are generally unsuitable for upload to XNAT.
If you have any questions about the DICOM tags themselves, the DICOM Data Dictionary published by National Electrical Manufacturers Association (NEMA) is a useful reference.
Sitewide Anomymization
Let's begin with a sitewide anonymization script. The sitewide script allows routine deidentification or anonymization for all projects. This can be helpful if your institution's IRB may have a strict mandate about which fields must be removed from data upon upload for all projects.
Pictured below is the sitewide anon script we'll be adding.

The first five lines of the script remove various DICOM headers. It's typical to remove a much longer list of headers known to contain potential PHI, but for this example, we've kept the list short. The syntax to remove a DICOM header is: -(xxxx,xxxx)
Next we set the (0012,0063) De-identification Method tag with an anonymization script identifier and version in case we later realize there was an issue. We are just entering free text here. Any value would be fine.
Finally we change our Study Instance UID (0020,000D). This field is the unique identifier for the session and must be present for the DICOM to meet the standard. However, many groups believe that for complete anonymization (for distribution to the public, for example), this field must be changed. We will use (0020,000D) := hashUID[(0020,000D)] to obfuscate the Study Instance UID. The hashUID method creates a hash, of course, of the UID and is therefore, repeatable. The same UID comes in again, and the same UID will come out, which is desireable in this situations. (An alternative expression offered by DicomEdit, "new UID" keywords, generate a completely new Study UID for every image in the session and is not appropriate in this site-wide anonymization context).
Now let's try out the script.
In XNAT:
- Go to Administer, Site Administration
- Click on tab labeled Session Upload, Import & Anonymization
- Check the "Enable Site-wide Anonymization Script"
- Enter the anonymization script in the "Edit Anonymization Script":
- (0010,0030) //Remove Patient Birth Date
- (0010,1000) //Remove Other Patient IDs
- (0010,1001) //Remove Other Patient Names
- (0010,1005) //Remove Patient Birth Name
- (0010,1040) //Remove Patient Address
(0012,0063) := "My XNAT sitewide anon script v01"
(0020,000D) := hashUID[(0020,000D)] // Study Instance UID- Click the "Submit" button.
Project Level Anonymization
Next, we want to provide some support for naming conventions at a project level.
The script above shows some of the variables available in XNAT anon scripts:
projectsubjectsessionmodalityLabel: This refers not to the DICOM tag (0008,0060) Modality, but to the ultimate modality the session will receive. For example, in XNAT, a dual-modality PET-CT session is stored as PET.
The first three lines of the script store the selected XNAT project, subject and session labels into the DICOM. (You might recognize these three DICOM headers from Pass 3 in Mapping DICOM to XNAT Metadata). The three lines work for any type of upload: Upload Applet/Application, Compressed Uploader, and DICOM reciever.
Conversely, the last line is only there for use with the Upload Applet/Application. The support for the makeSessionLabel method only exists in the Java tools. The logic serves to provide guidance on naming conventions to user uploading the session to the project. In the script above, we would always like to have the session variable formatted as: subject_v##_lowercaseModality.
The "v##" portion of this string refers to a visit id. This is an XNAT-customized feature of anon scripts. If you use the ## symbol within the makeSessionLabel function, XNAT will search your project and subject for the count of the modality your are currently uploading and then take a guess for what the next ## will be. For example, if you already have a 111_v00_mr, then the uploader will guess that 111_v01_mr is next. So just use the v## part verbatim.
It's probably best to take the rest of this expression in steps, from inside to out:
lowercase[modalityLabel]Pretty obvious: make the modality lowercase. (Hint: Remember the XNAT modality variable available above.)format["{0}_v##_{1}", subject, lowercase[modalityLabel]]Use the built-in format function to construct the string from subject, v##, and your lowercase modality.makeSessionLabel[format["{0}_v##_{1}", subject, lowercase[modalityLabel]]]Wrap everything in amakeSessionLabelmethod to make it a session label. (This must be used for v## to render correctly.)
Now let's save the script in XNAT:
- Go to home (Hint: clicking on the XNAT symbol at the top is one way to do this)
- Click on your project
- Click the Manage tab
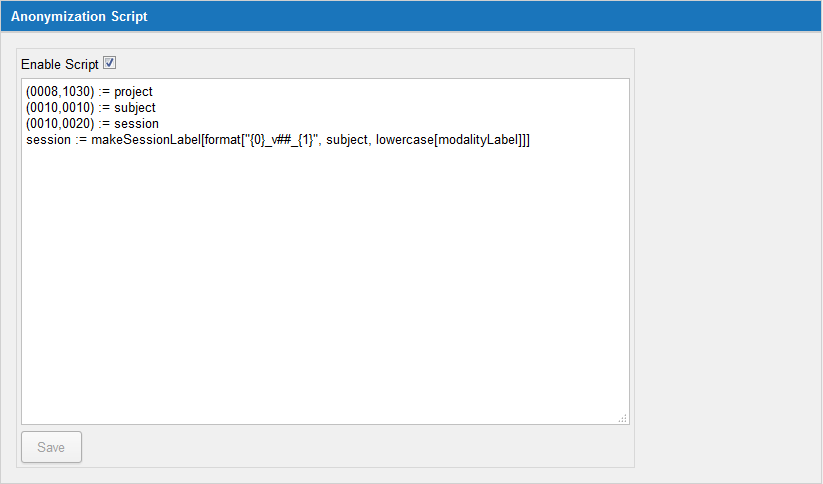
- Click on Anonymization Script
- Click Enable Script
- Copy your script into the space provided
(0008,1030) := project
(0010,0010) := subject
(0010,0020) := session
session := makeSessionLabel[format["{0}_v##_{1}", subject, lowercase[modalityLabel]]]- Click "Save"
Step Through
Finally let's test it our scripts. As mentioned, the scripts will function differently depending on the upload method.
Test Upload via DICOM Browser
In the DICOM Browser application:
- Close and relaunch DICOM Browser
- FILE > OPEN, Navigate to $YOURDIR/IGT_PROSTATE/case142
- FILE > SEND to send to your XNAT DICOM receiver
In XNAT:
- Log into XNAT in your web browser
- Go to UPLOAD > PREARCHIVE
- Select the checkbox next to your session, the click the "Rebuild" button
- Wait until Status reads "Ready", then highlight row and click the "Details" button
- Next to any of the series, click "Review DICOM tags"
Observe that:
- Site level anonymization script changes do appear in the headers. Because this script is not project dependent, it can run immediately upon upload of data. You can verify by checking that:
(0012,0063)is now set to "My XNAT sitewide anon script v01" and that(0010,0030) Patient's Birth Datehas been removed. - Project level anonymization has not yet occurred. Since data is sometimes mislabeled or misrouted into either the Unassigned folder or the wrong prearchive project (it's part of the purpose of the prearchive to allow a buffer to fix these common mistakes), the project level anonymization script will not run until the session is archived. You can verify by checking that (0008,1030) is still equal to
XNAT^XNAT-2016.
Now archive the session:
- In the prearchive, check the box for that session and click the "Review and Archive" button.
- In the form that appears, change the session label and click submit. After a few seconds, the session page should appear.
- Click on "+" next to one of the scans
- Scroll down until you see "View DICOM Headers". Click the link and review the DICOM tags for these changes:
(0008,1030)changed from XNAT^XNAT-2016 to XNAT_2016(0010,0020)changed to the session label you entered
Note
Remember the session formatting we wrote into the project level anonymization script won't have applied here. We've got rely on the scanner techs to get it right, or set our project to "Prearchive", so we can review labels before sessions are archived.
Test Upload via the Upload Applet:
Java Applet Warning
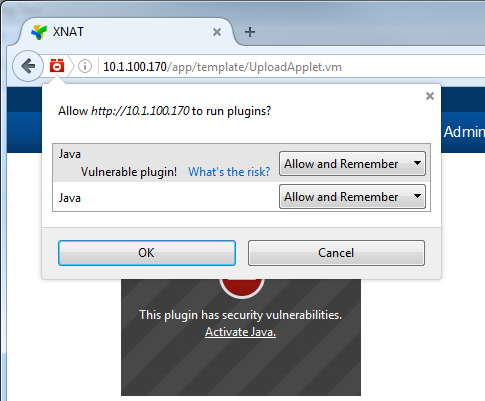
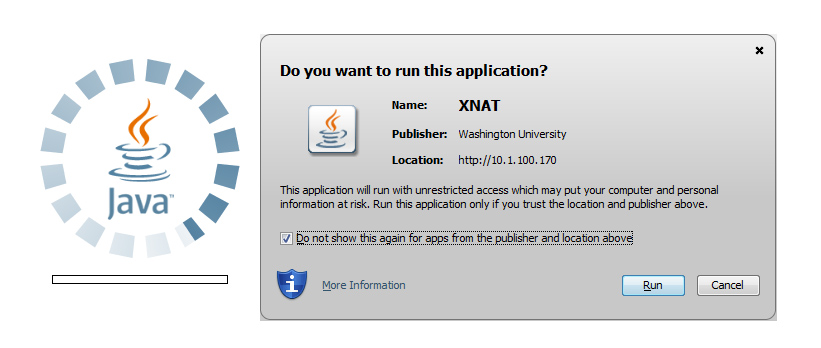
Chrome has stopped support for Java applets, which affects the XNAT Upload Applet. We recommend using Firefox for this portion of the practical. The first time you run the Upload Applet, you will need to Activate Java for your browser. Click the red icon next to your URL, and select "Allow And Remember" for both Java warnings, then select "Run" in the Java confirmation dialog that follows to continue.
In XNAT:
First, we need to create a subject to upload data into.
- Go to NEW > SUBJECT
- Give your subject a Project and an ID ("subj190") and click Submit
Now we can go to the upload applet.
- Go to UPLOAD > IMAGES > UPLOAD APPLET
- Click "Click here" to launch the applet.
- Make the following selections
- Project: XNAT_2016
- Subject: select the subject you just created
- Date: Aug 22, 2008
- Click "Launch Uploader"
Here, you'll most likely see the Java warnings shown above. Click through those to continue, and the Upload Applet will load and show you a file selector pointing to your local file system.
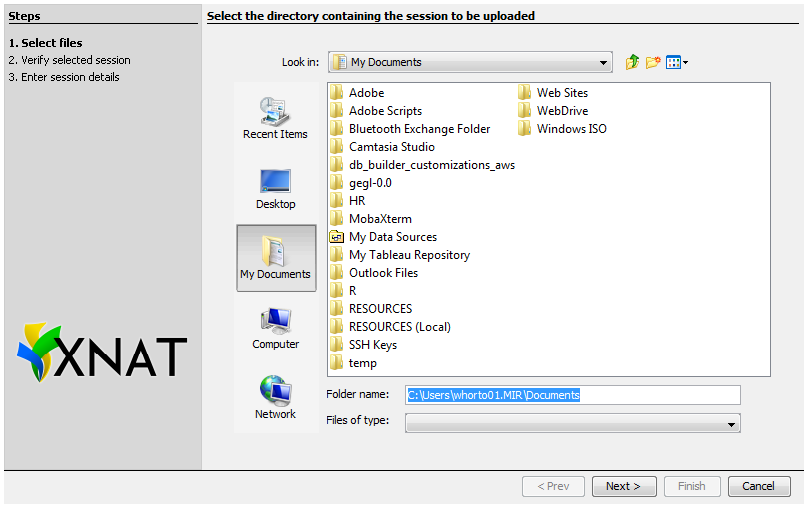
In the XNAT Upload Applet:
- Navigate to $YOURDIR/IGT_PROSTATE/case190, the click "NEXT >"
- Verify that you see scans and that they are selected, then click "NEXT >"
On this screen, you should see:
Project: XNAT_2016
Subject: one you just created
Session: <SubjectID>_v00_mr (observe that the formatting was used by default here)
- Click "Finish"
The uploader will take a moment to upload your file. The rest of these steps will be similar to the DICOM Browser upload example.
- Go to UPLOAD > PREARCHIVE
- Select checkbox next to your session, the click the "Rebuild" button
- Wait until Status reads "Ready", then highlight row and click the "Details" button
- Next to any of the series, click "Review DICOM tags". Observe that changes appear as expected in the DICOM. (They were actually made before the data was uploaded into XNAT).
(0010,0030) Patient's Birth Datehas been removed(0012,0063)is now set to "My XNAT sitewide anon script v01"(0008,1030)changed from XNAT^XNAT-2016 to XNAT_2016(0010,0020)changed to the session label you entered
Complete
You have successfully uploaded an MR Session using two of XNAT's upload methods, and verified that your DICOM Edit script is properly editing the session metadata before it gets archived.